
End Legs – four at 1-1/2" x 3-1/2" x 16-1/2"
Legs – eight at 1-1/2" x 3-1/2" x 16-1/2"
Long Front Aprons – two at 1-1/2" x 3-1/2" x 25-1/2"
Short Front Apron –one at 1-1/2" x 3-1/2" x 18-1/8"
Long Back Aprons – two at 1-1/2" x 3-1/2" x 25-1/2"
Short Back Apron – one at 1-1/2" x 3-1/2" x 18-1/8"
End Aprons – six at 3/4" x 3-1/2" x 11"
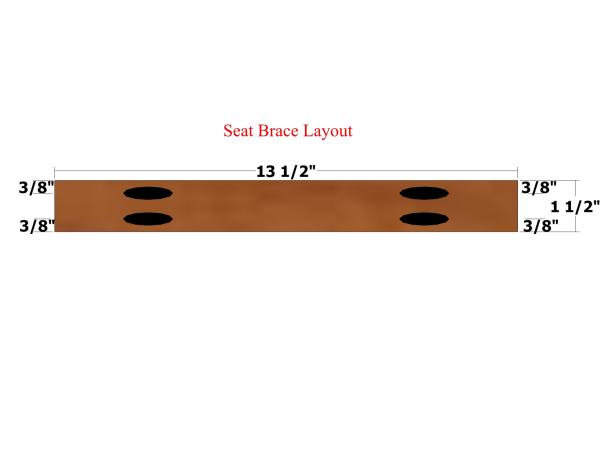
Seat Braces – three at 1-1/2" x 1-1/2" x 13-1/2"
Outer Seat Slat 1– two at 1-1/2" x 3-1/2" x 31-1/2"
Inner Seat Slat 1 – two at 1-1/2" x 3-1/2" x 24"
Outer Seat Slat 2 – two at 1-1/2" x 3-1/2" x 33"
Inner Seat Slat 2 – one at 1-1/2" x 3-1/2" x 27"
Outer Seat Slat 3 – two at 1-1/2" x 3-1/2" x 34-1/2"
Inner Seat Slat 3 – one at 1-1/2" x 3-1/2" x 30"
Outer Seat Slat 4 – two at 1-1/2" x 3-1/2" x 36"
Inner Seat Slat 4 – one at 1-1/2" x 3-1/2" x 33"
Outer Seat Slat 5 – two at 1-1/2" x 3-1/2" x 37-1/2"
Inner Seat Slat 5 – one at 1-1/2" x 3-1/2" x 36"
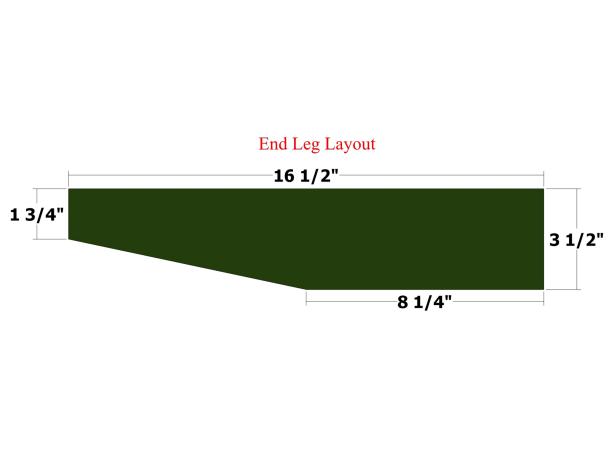
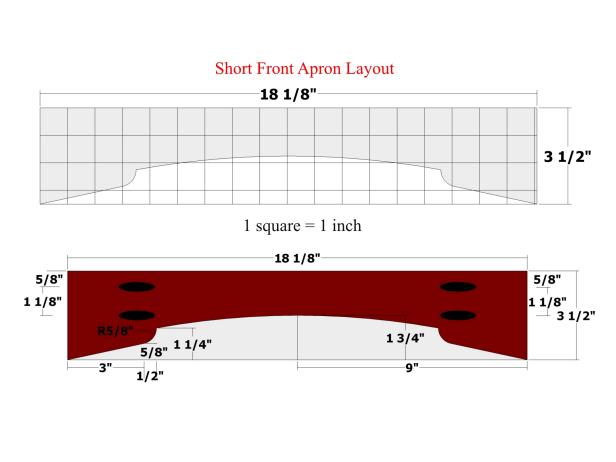
The aprons are rails used to connect the legs and support the seat. Use the layouts in Image 1 and Image 2 (below) to create the long and short front aprons. Refer to the cut list above for the exact sizes of the aprons.
To cut the radii on the inside corners of the front aprons, use a half-dollar coin or something of similar size (Image 3).
For marking the top arc, use a thin strip of wood or a flexible metal ruler. Drive in nails or brads to hold the wood strip or ruler in place while marking (Image 4). Use a jigsaw to cut the front apron pieces to shape.
Drill pocket holes in the front aprons as marked in Images 1 and 2. Set the pocket-hole jig and drill bit for drilling into 1-1/2-inch stock (Image 5).
Position a seat brace centered and flush against the top of the short front apron and short back apron (Image 2) and attach using glue and 2-1/2" pocket-hole screws (Image 3).
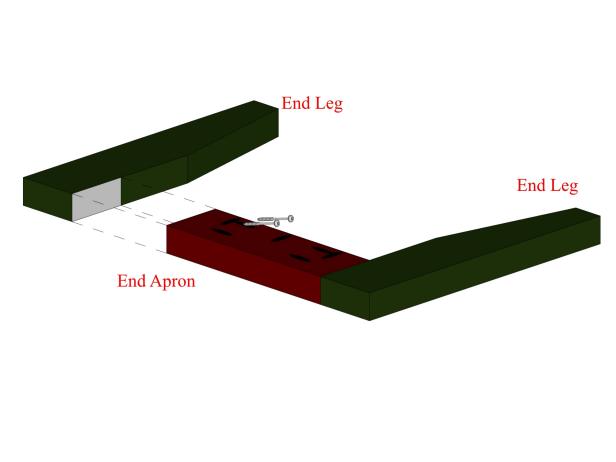
Position an end apron flush against two end legs (Image 4) and attach using glue and 2-1/2" pocket-hole screws. Build two assemblies.
Place a scrap piece of 1-by material (3/4-inch thick) underneath the long front apron and positioned flush against one end apron assembly and one end leg/end apron assembly (Image 5) and attach using glue and 2-1/2" pocket-hole screws.
Position the short back apron flush against the end apron assemblies as shown in Image 5, and attach using glue and 2-1/2" pocket-hole screws.
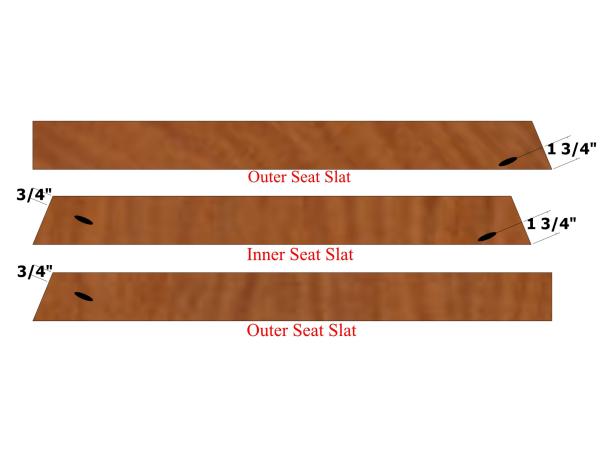
Refer to the cut list on page 1for measurements on the seat slats. Refer to Image 1 (below) to see the 22.5-degree angle cuts for each piece. Dry fit them on a work surface.
Drill pocket holes in the seat slats as marked in Image 1. Be sure to select the best-looking (least amount of defects) face of each board to be positioned up and drill the pocket holes on the opposite face.
Position the outer seat slats 1 flush against the inner seat slat 1 as shown in Image 4 (below) and attach using glue and 2-1/2" pocket-hole screws.
Position the outer seat slats 2 flush against the inner seat slat 2 and attach using glue and 2-1/2" pocket-hole screws.
Position the outer seat slats 3 flush against the inner seat slat 3 and attach using glue and 2-1/2" pocket-hole screws.
Position the outer seat slats 4 flush against the inner seat slat 4 and attach using glue and 2-1/2" pocket-hole screws.
Position all of the seat slat assemblies with the pocket-hole sides facing up. Place the base assemblies on top the seat assemblies and test fit. The innermost seat slat assembly should be flush with the front edges of the base assemblies and overhanging the outside edges of the side base assemblies by 1-1/2 inches. The outermost seat slat assembly should be flush with the back edges of the base assemblies and overhanging the outside edges of the side base assemblies by 1-1/2 inches.
Drill countersunk pilot holes in the front rails and seat braces of the base assemblies positioned as

Position the remaining seat slat assemblies equidistantly apart (about 1/8") and attach using 2 1/2" pocket-hole screws and 2-1/2" deck screws. You can use a spacer from scrap wood or a paint stirrer to help with positioning the parts (Image 4).
Original article and pictures take http://www.diynetwork.com/how-to/skills-and-know-how/carpentry-and-woodworking/how-to-build-a-semi-circular-wooden-bench?soc=sharepin site
Комментариев нет:
Отправить комментарий