How to Keep Bark on Your Wood Projects with Glue, Shellac and Wood Choice
If you want your bark to stay attached while you"re working with it, try a bark friendly type like walnut or basswood wood.
A: Keeping the bark on chunks of wood, in my experience, is a hit-and-miss business. Some species are reputed to shed their bark regardless of treatment (hickory is one with a bad reputation in this regard), while others are more likely to not shed their skin — walnut and basswood have a good reputation here.
Basswood bark"s tight bond makes
it ideal for bark art, as it is unlikely to be disturbed in the process of completing your project.
There are a couple of things that you can do to improve your chances of keeping the bark on your wood. The first thing is to cut the stock in the winter when the sap is not flowing. Bacteria or mold growing under the bark will reduce its bond to the wood, so the next thing to do is to store your harvested pieces in a cool, dry place. Or, if you can put it in a kiln right away — that is even better.
Before I answer your question directly, if you find loose chunks of bark, CA [cyanoacyrylate] glue (the thin stuff often used by turners) can be used to secure them. You can indeed use shellac to help stabilize the bark for machining, but it won’t “glue” loose bark back onto the log. What I have done is thin the shellac down by 50% and really soak the bark. This allows it to get into small cracks and crannies. Then I apply a thicker coat of shellac which reinforces the first one. I used Zinsser SealCoat the last time I did this, and it worked well. You can then apply poly over the shellac should you choose, but you would not need to do so.
Original article and pictures take http://www.rockler.com/how-to/bark-wood-projects-glue-shellac-wood-choice/ site
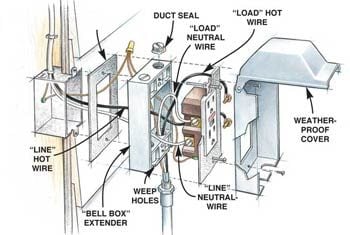
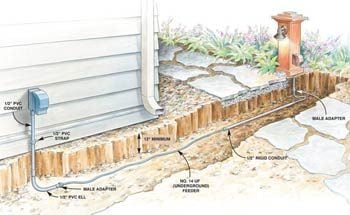
Mark the cable route from the power source (house outlet) to the position of the remote outlet with spray paint. Dig a 12-in. deep trench connecting the two points and the 2-ft. deep posthole for the light.
Get started by determining where you want the electrical post positioned and then find the nearest existing outlet to supply the power. That outlet must be GFCI protected. We used the closest outlet on the house, but garage outlets are also good candidates. By code, those outlets should be GFCI protected. To make sure the “feeder” outlet you choose is protected, look for the characteristic GFCI buttons, or if it"s a standard outlet, check it with a GFCI tester. Standard outlets still may be GFCI protected by being linked to another GFCI outlet elsewhere in the house. If yours isn"t protected, simply replace the standard outlet with a new GFCI outlet using the techniques we show in Photo 13 and Figure A. Another option is to cut in, mount and wire a new outside GFCI outlet, feeding it from an outlet mounted on an inside wall in the house. Sometimes that"s easier than digging a long trench to a more distant power source.
You also have to make sure the new outlet/light won’t overload the circuit you tie into, and that the box is big enough to handle the additional wire. To determine whether the circuit you want to use can handle the additional electrical demand, first shut off the circuit in the main panel. Then go through the house turning on lights and other electrical items. Add up the wattage of everything that stays off (the items on the circuit). Then add on the wattage of the post light plus the wattage of items continuously powered by the outlet. We recommend a maximum connected load of 1,440 watts for a 15-amp circuit and 1,920 watts for a 20-amp circuit (the amperage is stamped on the breaker or fuse). If the total wattage exceeds these amounts, find a different circuit. If you"re not sure, call in a licensed electrician to help with
this part.
To figure the minimum box size required by the National Electrical Code, add: 1 for each hot and neutral wire entering the box, 1 for all the ground wires combined, 1 for all the clamps combined and 2 for each device (switch, receptacle or combination device) installed in the box. Multiply this figure by 2 for 14-gauge wire and 2.25 for 12-gauge wire to get the minimum box volume in cubic inches. Plastic boxes have the volume stamped inside.
Once you"ve selected a power source, choose the easiest path for a 12-in. deep trench for the new cable. Give trees a wide berth to avoid chopping through roots. Approach sidewalks or paths at right angles for easier tunneling and make sure to plan a 3-ft. long straight section of trench on one side of the walkway. That"s so you"ll have room for driving the conduit beneath it (Photo 2). Mark the route with paint and then call the utility companies to mark any underground lines. (Don"t forget the telephone and cable company if those lines are underground.) Last you"ll need to get an electrical permit. Your local building inspections department either grants those or will direct you to a state office. The inspector will want to see the trench with the cable in place before you fill it back in, and then again for a final inspection after the project is finished.
The best digging tools to use for the trench itself are a mattock and a trenching shovel (Photo 1). That way you"ll be able to dig a fairly narrow trench to avoid moving the mountains of dirt you would with a conventional shovel.
Pile the dirt on a strip of plastic next to the trench. That keeps dirt out of the grass and/or makes cleanup on adjoining patios much easier. Dig trenches that approach walkways a few inches deeper to allow for driving the conduit (Photo 2). After the trench is finished, dig a posthole at the end of the trench about 2 ft. deeper than the trench to receive the light pole post.
Original article and pictures take http://www.familyhandyman.com/electrical/outdoor-lighting/how-to-install-outdoor-lighting-and-outlet/step-by-step site
In the summer, good attic ventilation reduces heat buildup. That cuts cooling costs and prolongs shingle life. In the winter, warm, moist air seeps into the attic from the living space below. Good ventilation allows the heat and moisture to escape. That keeps your attic dry and reduces ice dams. Here are four signs of an unventilated or under ventilated attic:
Look at your eaves
and roof. If you don’t see any vents on the roof or in the eaves, you need to add some. Your roof vents may not look anything like the ones shown in this article. Your roof may have a ridge vent, which is a low profile, continuous vent running along the peak of the roof. Or it may have gable vents, which are louvered openings at the top of gables.
Touch your ceiling on a warm, sunny day. A hot ceiling tells you that the attic is acting like a solar oven, raising your cooling bills and cooking the shingles.
Thick ridges of ice on your eaves in winter are a sign of poor attic ventilation. Warm air that escapes rooms below gets trapped in the attic. Snow melts and the water refreezes on the cold eaves, creating ice dams.
Warm air that escapes living space also carries moisture that will condense on rafters or roof sheathing. Grab a flashlight and inspect your attic during the winter. If you see dampness or frost, you need better ventilation.
For the best results, place roof vents near the roof"s peak and soffit vents in the eaves. Air flows in through the soffit vents and out through the roof vents. Vents come in various styles. We chose rectangular, hooded roof vents and rectangular soffit vents because they"re easy to install. Everything you need is available at home centers. Aside from vents, you"ll need a handful of 1-1/4 in. roofing nails, 1/2-in. galvanized screws for the soffit vents, utility knife blades, a dust mask and one tube of roofing cement for every three vents. You"ll cut holes for the vents with a jigsaw or reciprocating saw. Expect to spend a full day on this project. A cool day is best. On a warm day, attics can get dangerously hot. Heat also makes shingles easy to damage.
How many vents do you need? First determine your attic area by multiplying the length by the width. A 30 x 40-ft. attic, for example, has an area of 1,200 sq. ft. Then aim for about 1 sq. ft. (144 sq. in.) of vent opening per 150 sq. ft. of attic. The building code lets you reduce that by half under some conditions, but more ventilation is usually better. The open area of a vent is sometimes listed on the vent as NFVA (net free vent area). If not, measure the size yourself. Roof vents will provide about half of the vent area and soffit vents the other half.
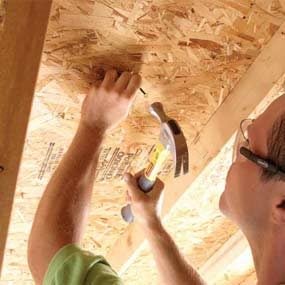
Adding roof vents is a simple matter of cutting holes and installing vents. Photos 1 – 6 show how it"s done. But before you cut any holes, plan the locations of the vents.
Mark the roof vent locations from the attic, where you can see the rafters and avoid placing vents over them. Place all the vents on the same side of the roof. If your roof peak runs parallel to the street, put them on the backside, where they"ll be less prominent. Space vents evenly and mark the locations by driving nails up through the shingles (Photo 1). Wear a dust mask while working in the attic and lay planks or plywood across rafters so you don"t step though the drywall ceiling below.
Follow photos 1 - 6 for the simple how-to.
Original article and pictures take http://www.familyhandyman.com/attic/how-to-improve-attic-ventilation/view-all site
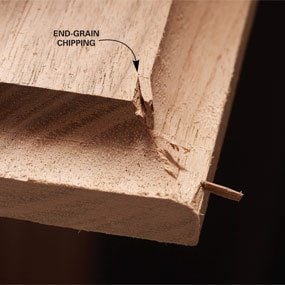
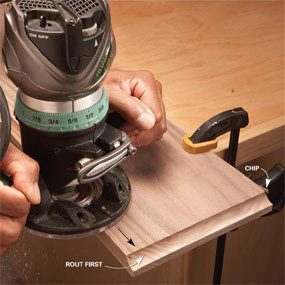
If you"re planning to rout the ends as well as one or both sides of a board, rout the two ends first. Here"s why. End grain has a tendency to split out as the bit exits the end of the cut.
If you rout the sides first, the split-out will occur on the previously shaped edge (see "Don"t rout the sides before the ends"). But if you rout the ends first, you"ll cut off any damaged areas when you rout the sides.
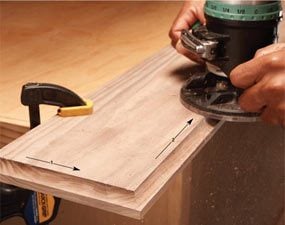
Router bits spin clockwise as you look down on the router, so moving the router counterclockwise tends to pull the pilot bearing tight against the wood and allows easy control of the router. When you"re routing the outside perimeter of a board, move the router counterclockwise. However, when you"re routing the inside of something like a picture frame, move the router in a clockwise direction.
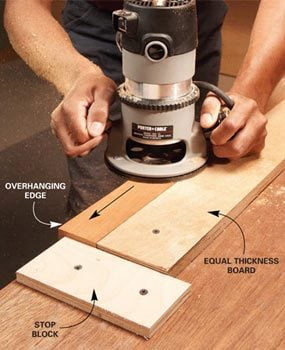
Narrow strips are difficult to rout because clamps get in the way. The solution is to screw blocks to your workbench to corral the strip of wood. If you"re routing a thin piece of wood, the bearing on the router bit will most likely extend below the piece of wood you"re routing. In this case, hang the piece of wood over the edge of the bench at least 1/4 in. so the bit doesn"t hit the workbench. Screw a strip of equal thickness behind the long edge of the narrow strip you’re routing. Then screw a thinner stop block at
the end to keep the board from sliding.
Here"s a nifty trick for securing small pieces while you rout them. Start by screwing a scrap of wood to the workbench to elevate your project and provide clearance for the bearing. The scrap should be smaller than the piece you"re routing. Then apply 1/2 teaspoon of hot-melt glue to the scrap and stick your workpiece to it. Allow it to cool a few minutes before you rout the edge. When you’re done, just twist the routed piece to break it free. Then scrape off the hot-melt glue with a chisel or putty knife.
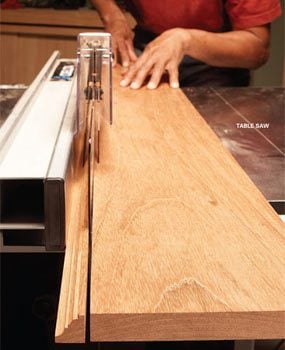
One way to make narrow moldings with your router is to use a router table and featherboards. But if you don"t have a setup like this, try this other method. Start by routing the desired profile on a wide board. Then make the molding by cutting the shaped edge from the wide board with a table saw. Repeat the process until the board is too narrow to work with.
Original article and pictures take http://www.familyhandyman.com/DIY-Tools---Tips/DIY-Skills/Tool-Skills/how-to-get-perfect-routed-edges site
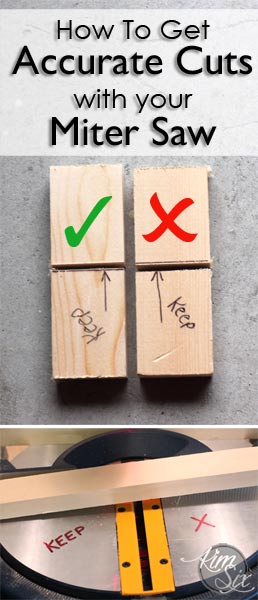
If you own a power miter saw, especially one with a laser guide, and you are having trouble getting accurate cuts, I have a dirty little secret to tell you. YOUR LASER GUIDE LINE IS LYING TO YOU.
Although that guide line is there to tell you where your cut line will be, if you line up your cut exactly along the laser guide there is a good chance that the final cut piece will not be the exact size you want, at least 50% of the time. It will be slightly (and in some cases, quite a bit) off, depending on which side of the board is the piece you are keeping and which side is the ‘leftover’ piece.
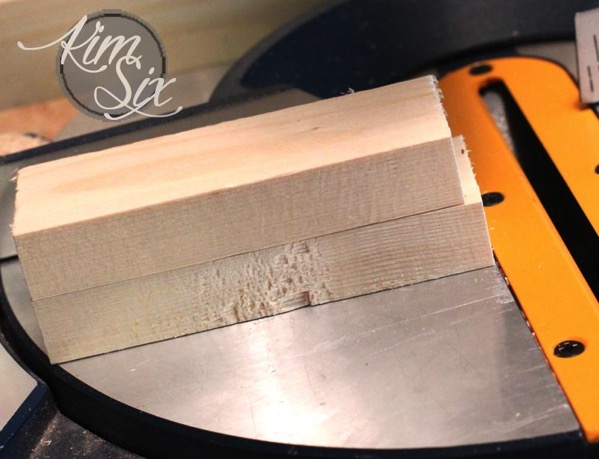
Case in point: On my saw, if I draw a line down the EXACT center of a board, and line the laser level directly on top of the line and then cut, when I take the two pieces and lay them on top of each other this is what I get:
One is significantly shorter than the other. That is NOT GOOD! NOT GOOD AT ALL!
When making my cuts you can only trust the laser line HALF of the time.
What?? Blasphemy you say! Why would tool companies add those handy little laser beams if they weren’t accurate?
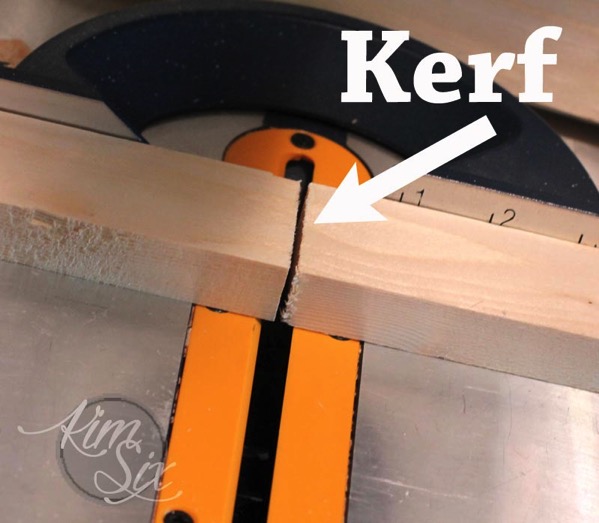
Well.. It isn’t that they aren’t accurate, it is that they CAN’T be, at least not all the time. And the reason that is happening is because of something called KERF.
What is a KERF?
I know it sounds like a muppet or perhaps a lifestyle blogger, but alas, no. It is not. A KERF is actually the notch in a piece of lumber left behind by the saw blade.
You see, when you cut a piece of wood you aren’t really splitting it in half. You are actually removing a tiny area at the cut site, which is *just* slightly wider than the width of your saw blade.
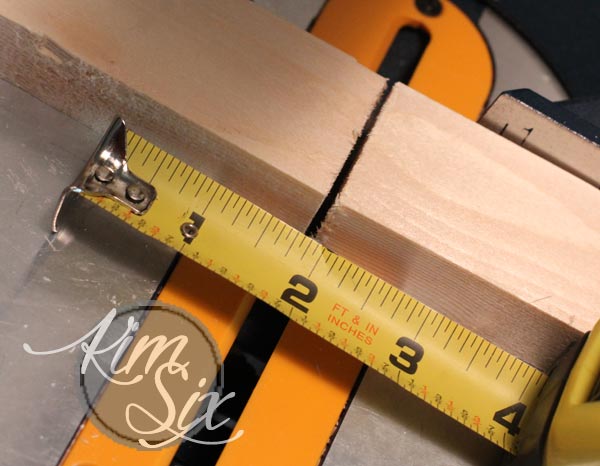
On my blade the kerf is nearly A QUARTER INCH!
And if you are trying to do any sort of project that requires hyper-accurate cuts, that difference can be a project breaker. When I try to cut a board in half, one side ends up 1/4 inch shorter every.single.time. Multiplied over the course of a project can mean I have to buy wood filler
by the truck load.
How do you take into account the width of the saw blade when making cuts?
Well, the short answer is: "ALWAYS CUT ON THE “WASTE” SIDE OF THE LINE"
And if you are a pro-woodworker you probably know exactly how to do that. But if you are a regular person who is just getting used to their saw or have been fudging it for a while now.. let me explain to you what that means.
When you make a mark on your board, you always want the blade to fall right NEXT to the line, so that the kerf is removed from the piece of wood you are not keeping. That also means the board you are keeping comes out at exactly the correct length.
Which side of the blade is the “waste” side?
This is going to be different for every saw. But there is an easy way to figure it out.
The first thing you need to do is determine exactly where you blade cuts, and if you are using the laser guide, you want to know where it cuts relative to that line.
Here is a quick test:
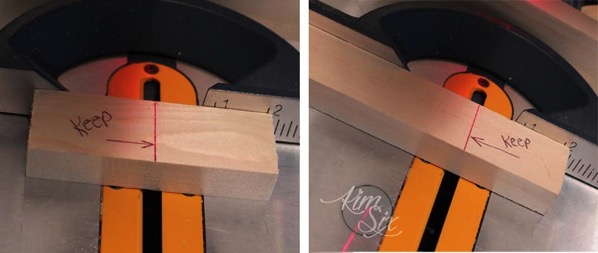
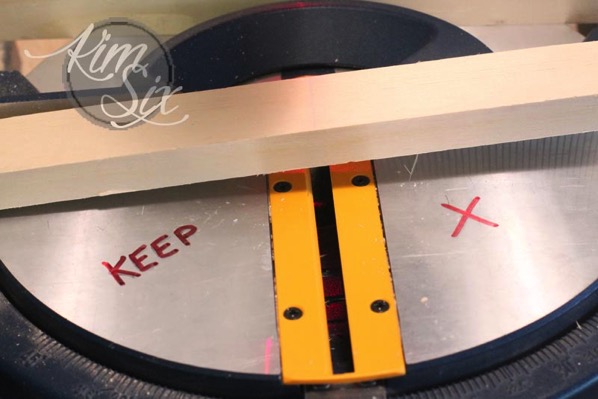
Take two pieces of scrap wood and draw a cut line on them. On each board, mark one end as the “Keep” side. You are going to cut one board with the keep side on the right of the blade and one board with the keep side on the left of the blade. And if you have a laser guide on your saw, you are going to use that to line up the cut.
So here is what my test set up looked like (you can barely make out the red laser line on top of my pen marks):
If your saw doesn’t have a laser guide, you can just pull the saw blade down (WITHOUT IT SPINNING) until it touches the wood. Your goal is to line up the blade next to line on the "waste" side of the board.
Next, make the cuts and look closely at your cut lines.
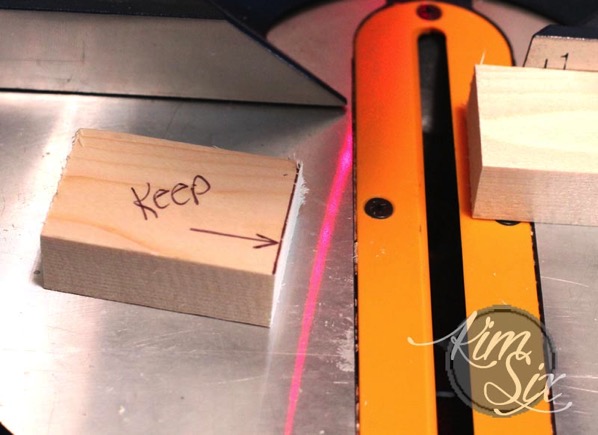
When my board is placed with the “keep” side on the left and my “waste” side on the right, this is what the cut looks like. The cut is perfect:
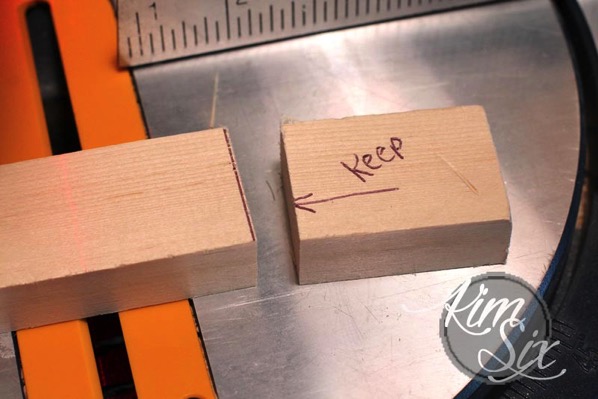
But when my board is placed with the “keep” side on the right and my “waste” side on the left, this is what the cut looks like:
In this case, you can see that my cut mark is actually left behind on my waste board and the 1/4 inch kerf has been removed from the board I wanted to keep and use. NO BUENO!!
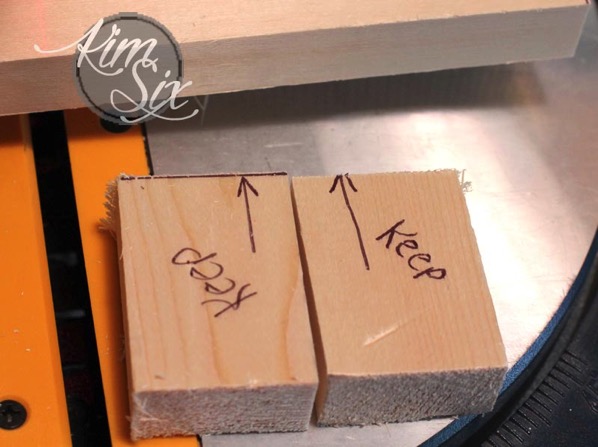
The difference is super clear when you line them up side-by-side:
The board on the left is significantly longer than the board on the right. Even the tip of my arrow is missing.
So in MY CASE, my saw blade comes down ON THE RIGHT of my laser line. That means, every time I use my saw, I want my “waste” end of the board to be on the right. I always need to make sure I want to keep the piece on the left.
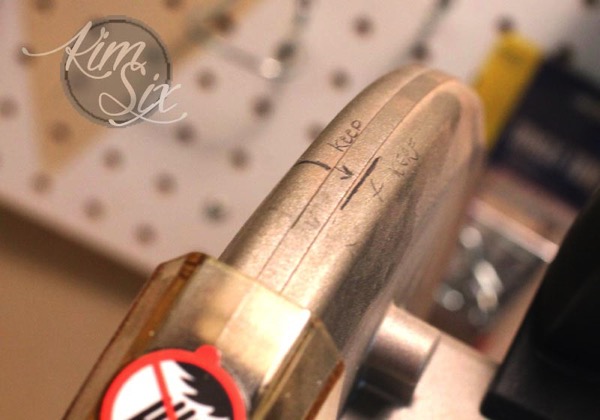
For many years now I have had this reminded myself of this with a note on my saw blade itself (this was a tip from my dad).
However, I recently made it way more obvious for myself, so now I every time I put a board down on the saw I know the correct orientation of the cut:
That being said, on some saws you can adjust the laser line. In those cases you could set it up to make either side the waste side. That would be good if your workbench is set up to accommodate longer boards only on one side. My miter saw doesn’t have that option.
If your cuts end up looking exactly the same (the kerf ends up directly on top of your mark), that means your laser is actually centered. This isn"t necessarily ideal since you would be losing a little bit of length on both sides of the cut (in my case I"d lose 1/8 inch from both the waste and keep board).
If your laser guide is centered, and you can"t adjust it, I would make sure to push my board over just SLIGHTLY away from the “keep” side when making the cut. Line your laser guide up NEXT to your cut mark on the waste side of the line.
Now let"s revisit my sample board, the one I wanted to cut perfectly in half. To accomplish that, on my saw, I have to slide my board so the laser line is 1/8 inch to the left of my center mark. This would mean the kerf would be split evenly between my ‘keep’ piece and my ‘waste" piece. That means they are the same length, but keep in mind now BOTH boards are 1/8 inch shorter than the half the original width. The 1/4 inch loss to the kerf has to be accounted for somewhere.
Which brings me to my final tip about accurate cutting on a miter saw:
You should not mark multiple measurements on a board without re-measuring after every cut.
If you take a 4-foot board and mark it into four 1-foot sections and go down the line cutting, those boards will not be the same size. The first piece may be 12 inches (if your cut was on the waste side of the board) but that means the second piece will be 1/4 inch too short. To be accurate you either need to measure each time, or ‘cheat’ 1/8 inch into the ‘keep’ side each time so that all the boards are 11 7/8” inches wide. (However if your plan calls for four accurate 1 foot lengths this could screw you up!)
When buying lumber make sure you always take into account a little waste from the kerf in every single cut!
I hope this explanation alleviates some frustration you may have been having when your cuts weren’t coming out correctly. On large building projects, it probably doesn’t matter as much, but the more accurate the cuts, the more tightly fitting your pieces will be. And especially in cases of miters or other tricky joints, you really want your measurements to be dead on! So don’t ignore the KERF!!
Original article and pictures take http://www.thekimsixfix.com/2016/05/Accurate-Cuts-with-A-Miter-Saw.html site
Here is my version of the scrap wood star… standing 42 inches high, looking totally chippy and marvelous on my mantel. The size and scale of it makes such a huge impact! I grin and do a little happy dance every time I see it. What a statement piece this turned out to be.
I am so in love with it… the colors, the texture, and the fact that it was SO simple to DIY with the help of my husband. Come along and let me show you how we created this one-of-a-kind wall hanging by hand in just a few simple steps.
I’ve created this sketch in AutoCAD to show you the steps we took to cut out the star template. First we cut out a template using a large sheet of foam core, then used the template to trace out the star pattern onto a sheet of wood. You could use paper or even a cardboard box to create the template, as long as it starts out about 48” square you should be fine.
See how simple that is? In case you are a more visual learner, let me show you the step-by-step process in pictures. I picked up a 4’ x 8’ sheet of Luan at my local True Value Hardware, and the folks were nice enough to cut it in half for me right in the store. That gave us two 48” square pieces to use. You could use Luan, plywood, or MDF– just make sure it’s sturdy enough to support some weight without bending or cracking. You can check to see if your local True Value store carries lumber here.
Once he had the foam core template created, he found the center line of a 48” piece of wood and marked it with a straight edge.
He lined up the bottom points of the template along the bottom edge of the wood and matched the center points along the center line that was already marked.
Then, he simply turned the template 90 degrees and lined up the bottom corner of the template with the bottom right hand triangular corner that he had already traced. Then he traced all around the template once again.
After that, I arranged the pieces of scrap wood in a pattern that I liked right on top of the wooden star backerboard. I found all of this chippy old wood at a local architectural salvage store called The Depot Architectural Antiques. I hit the jackpot with all of those beautiful weathered grey, blue and green colors. To get a nice pattern we cut a few of the planks into several pieces so they would show up more than once inside the star.
We clamped down some of the smaller pieces to apply pressure and hold them in place, then we let the whole thing dry overnight. Once all the glue was dry, we flipped the whole thing over and cut off the excess wood using the circular saw again. He followed the wooden star template to trim the excess, being careful not to cut the wooden backer board.
We chose to leave the cut edges exposed and unfinished since the scrap wood was already so worn and rustic. You can see here that a lot of the beadboard we chose was tongue-in-groove, which we made sure to join together if possible to get a tighter joint. Some of the pieces were so old and rotted that they broke off during construction. I didn’t mind, though- it just gives it more character!
My mantel is having a holly jolly, rustic and weathered Christmas. I hope yours will, too, after seeing how simple this fun DIY project turned out to be.
I was one of the bloggers selected by True Value to work on the DIY Squad. I have been compensated for my time commitment to the program as well as writing about my experience. I have also been compensated for the materials needed for my DIY project. However, my opinions are entirely my own and I have not been paid to publish positive comments.
Original article and pictures take http://unskinnyboppy.com/2013/12/diy-giant-wooden-star-christmas-mantel/ site