How To Build A Small Wood Cabin On A Budget - DIY 4 Home Ideaz
Have you ever wanted to build yourself a small wood cabin or log cabin? Give yourself that sense of accomplishment and joy that you completed it. Well we found just the project for you. This cabin is actually quite simple to do and doesn’t require a lot of
money as well. Sounds too good to be true? Here are the steps required to build this beautiful small wood cabin!
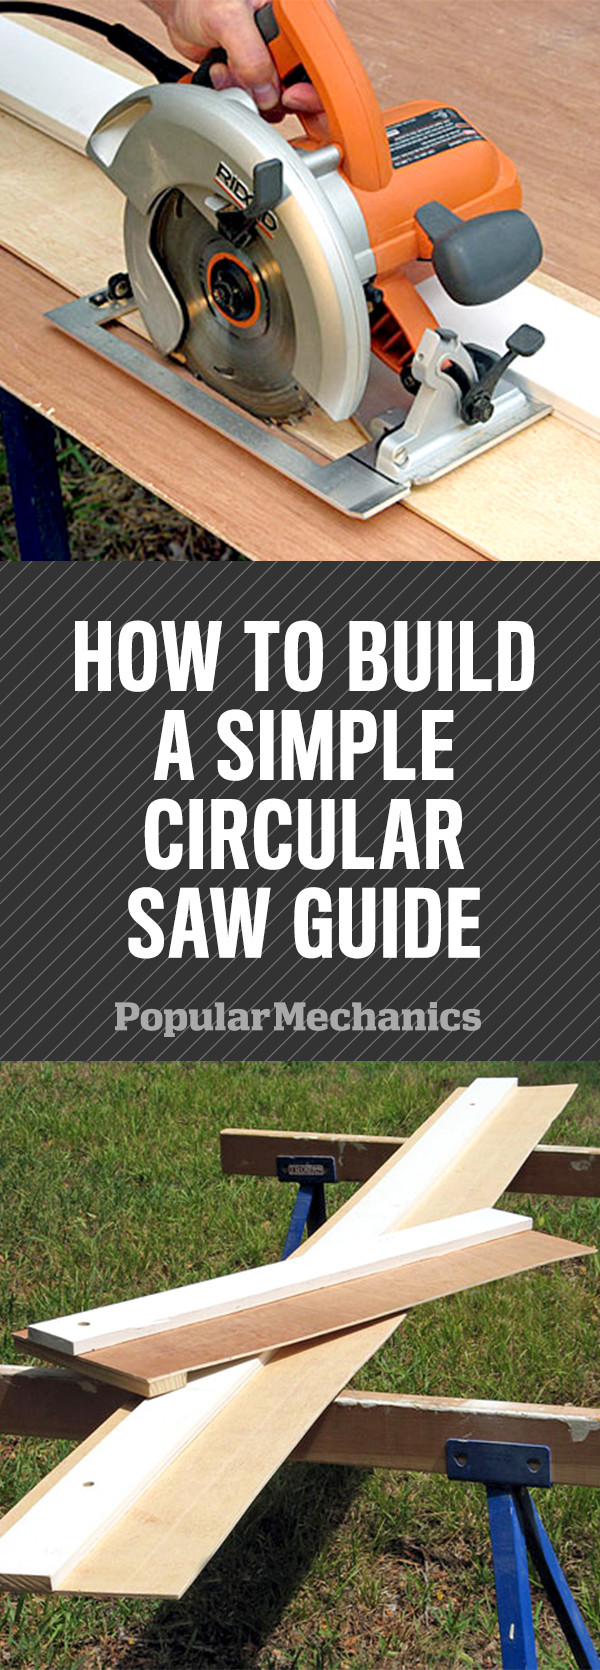
How to Build a Simple Circular Saw Guide for Straighter Cuts
American Artist
When I moved a few years ago, I parted ways with my 15-year-old table saw. I planned to replace it once I settled into my new house, but when the time came to build a room divider/bookshelf unit, I decided to build a couple of my own makeshift circular saw guides instead. The guides are compact and store easily. More important, they can also help you work more accurately and safely in the shop.
I made two guides--one for ripping long pieces of the medium-density fiberboard that I was using on the project, plus a shorter one for crosscutting boards. I spent nothing for materials, using plywood and boards that were collecting dust in my garage.
Here"s how to make the long guide:
1. You"ll need a straight 8-ft.-long 1 x 4 and an 8-ft.-long strip of plywood at least 12 in. wide. Position the 1 x 4 about 1 1/2 in. away from one edge of the plywood, making sure the edges of the 1 x 4 and the plywood are parallel. Fasten the plywood to the 1 x 4 using wood glue and 3/4-in. box nails, driven every 8 to 10 in. Drive through the plywood first--you generally want to nail through the thinner piece into the thicker piece.
2. Rest the wide side of the saw"s shoe against the 1 x 4. Cut the excess plywood along 8 ft. of the 1 x 4"s length, trimming the larger side of the plywood.
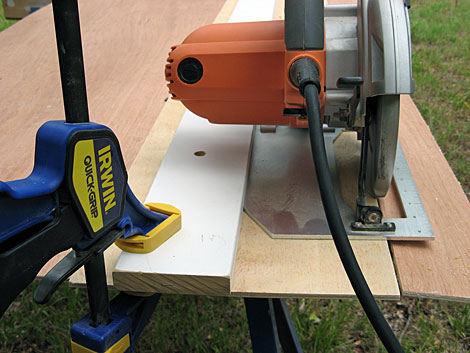
That"s it! Now, when you need to cut a long board or sheet, just align your cut marks with the edge of the guide, clamp the guide on each end, and cut. The blade will travel right along the plywood edge, with the shoe riding against the 1 x 4. It"s quick, safe and especially useful when you need to cut a sheet of plywood down to size or to rip a long straight edge on a wide piece of lumber to prepare it for further ripping on a table saw.
I made a short guide the same way, using 3-ft.-long pieces. The only
difference is that I put a 1 x 2 stop on the bottom, perpendicular to the 1 x 4 guide, which automatically squares the guide across the piece being cut.
The only thing I would change is the plywood thickness--for these, I used a 3/8-in. scrap I had on hand. Next time, I"ll use 1/2-in. plywood to create a more rigid guide. When I"m not using them, I hang both guides on the wall.
Save this article for later by pinning it. For more ideas, follow Popular Mechanics on Pinterest.
Original article and pictures take http://www.popularmechanics.com/home/tools/reviews/a3602/4283497/ site
Long Front Aprons – two at 1-1/2" x 3-1/2" x 25-1/2"
Short Front Apron –one at 1-1/2" x 3-1/2" x 18-1/8"
Long Back Aprons – two at 1-1/2" x 3-1/2" x 25-1/2"
Short Back Apron – one at 1-1/2" x 3-1/2" x 18-1/8"
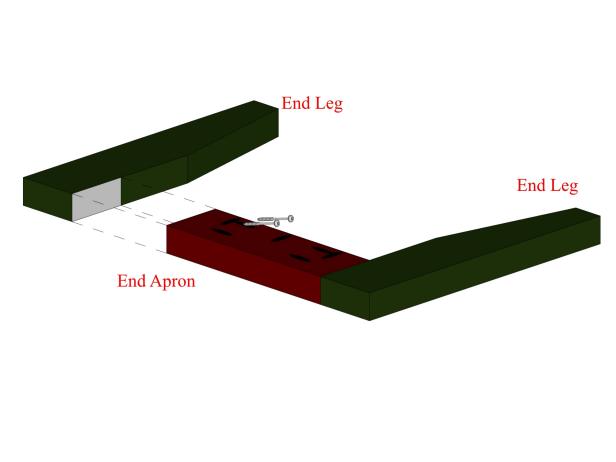
End Aprons – six at 3/4" x 3-1/2" x 11"
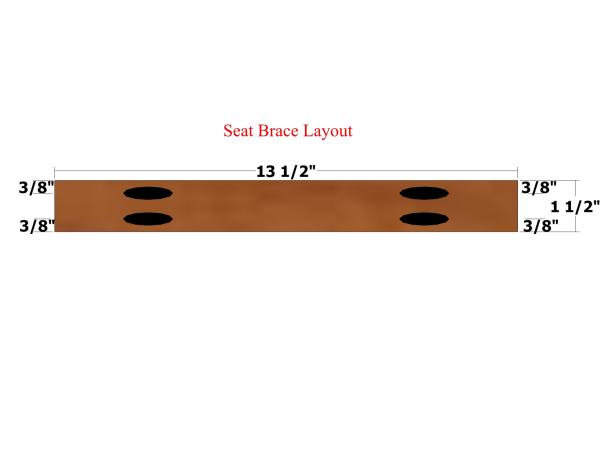
Seat Braces – three at 1-1/2" x 1-1/2" x 13-1/2"
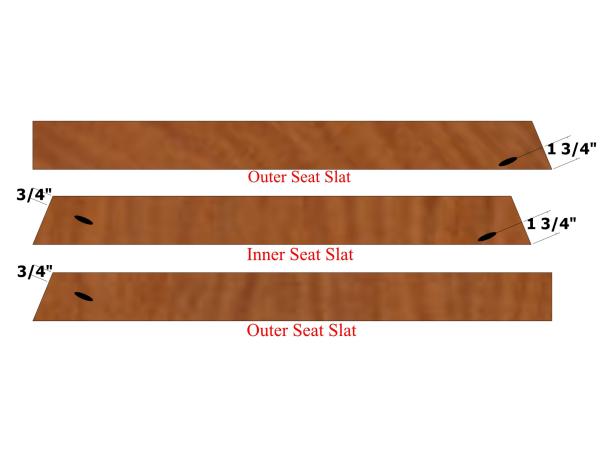
Outer Seat Slat 1– two at 1-1/2" x 3-1/2" x 31-1/2"
Inner Seat Slat 1 – two at 1-1/2" x 3-1/2" x 24"
Outer Seat Slat 2 – two at 1-1/2" x 3-1/2" x 33"
Inner Seat Slat 2 – one at 1-1/2" x 3-1/2" x 27"
Outer Seat Slat 3 – two at 1-1/2" x 3-1/2" x 34-1/2"
Inner Seat Slat 3 – one at 1-1/2" x 3-1/2" x 30"
Outer Seat Slat 4 – two at 1-1/2" x 3-1/2" x 36"
Inner Seat Slat 4 – one at 1-1/2" x 3-1/2" x 33"
Outer Seat Slat 5 – two at 1-1/2" x 3-1/2" x 37-1/2"
Inner Seat Slat 5 – one at 1-1/2" x 3-1/2" x 36"
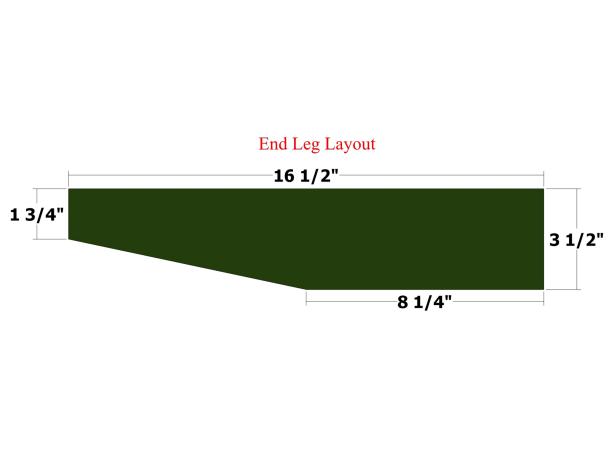
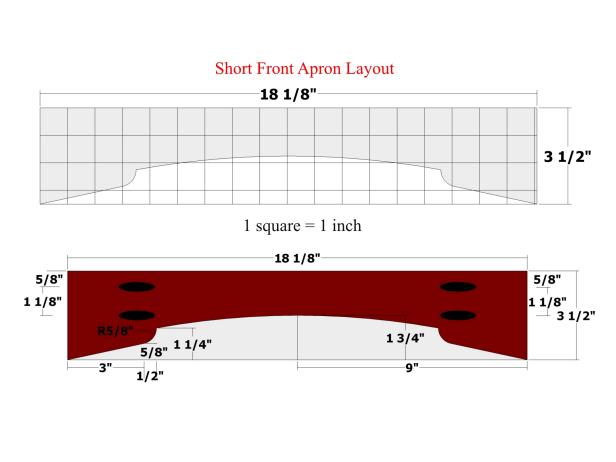
The aprons are rails used to connect the legs and support the seat. Use the layouts in Image 1 and Image 2 (below) to create the long and short front aprons. Refer to the cut list above for the exact sizes of the aprons.
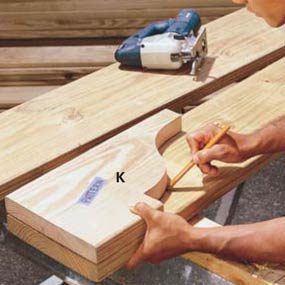
To cut the radii on the inside corners of the front aprons, use a half-dollar coin or something of similar size (Image 3).
For marking the top arc, use a thin strip of wood or a flexible metal ruler. Drive in nails or brads to hold the wood strip or ruler in place while marking (Image 4). Use a jigsaw to cut the front apron pieces to shape.
Drill pocket holes in the front aprons as marked in Images 1 and 2. Set the pocket-hole jig and drill bit for drilling into 1-1/2-inch stock (Image 5).
Position a seat brace centered and flush against the top of the short front apron and short back apron (Image 2) and attach using glue and 2-1/2" pocket-hole screws (Image 3).
Position an end apron flush against two end legs (Image 4) and attach using glue and 2-1/2" pocket-hole screws. Build two assemblies.
Place a scrap piece of 1-by material (3/4-inch thick) underneath the long front apron and positioned flush against one end apron assembly and one end leg/end apron assembly (Image 5) and attach using glue and 2-1/2" pocket-hole screws.
Position the short back apron flush against the end apron assemblies as shown in Image 5, and attach using glue and 2-1/2" pocket-hole screws.
Refer to the cut list on page 1for measurements on the seat slats. Refer to Image 1 (below) to see the 22.5-degree angle cuts for each piece. Dry fit them on a work surface.
Drill pocket holes in the seat slats as marked in Image 1. Be sure to select the best-looking (least amount of defects) face of each board to be positioned up and drill the pocket holes on the opposite face.
Position the outer seat slats 1 flush against the inner seat slat 1 as shown in Image 4 (below) and attach using glue and 2-1/2" pocket-hole screws.
Position the outer seat slats 2 flush against the inner seat slat 2 and attach using glue and 2-1/2" pocket-hole screws.
Position the outer seat slats 3 flush against the inner seat slat 3 and attach using glue and 2-1/2" pocket-hole screws.
Position the outer seat slats 4 flush against the inner seat slat 4 and attach using glue and 2-1/2" pocket-hole screws.
Position all of the seat slat assemblies with the pocket-hole sides facing up. Place the base assemblies on top the seat assemblies and test fit. The innermost seat slat assembly should be flush with the front edges of the base assemblies and overhanging the outside edges of the side base assemblies by 1-1/2 inches. The outermost seat slat assembly should be flush with the back edges of the base assemblies and overhanging the outside edges of the side base assemblies by 1-1/2 inches.
Drill countersunk pilot holes in the front rails and seat braces of the base assemblies positioned as
shown in Image 2 (below). Drive 2-1/2" deck screws through these pilot holes and into the seat slats.
Position the remaining seat slat assemblies equidistantly apart (about 1/8") and attach using 2 1/2" pocket-hole screws and 2-1/2" deck screws. You can use a spacer from scrap wood or a paint stirrer to help with positioning the parts (Image 4).
Original article and pictures take http://www.diynetwork.com/how-to/skills-and-know-how/carpentry-and-woodworking/how-to-build-a-semi-circular-wooden-bench?soc=sharepin site
How to Build a Router Plate Template with Scrap Wood and Bondo Filler
To build a good insert template for your router table, all you need is a bit of scrap wood and some auto body filler.
The best way to cut an insert opening in a router table is by guiding your router with a flush trim bit against a template made for the insert plate. I make mine from shop scraps and auto body filler. Here’s how: Rip 3"-wide pieces of MDF or other scrap into strips that are about 6" longer than each of the sides of your insert plate. Your template material can be 1/8" to 1/4" or so thicker than the plate and still work fine. Wax the corner areas of your plate to keep glue from sticking to it, and place it on a flat, waxed paper surface. Stagger the strips around the plate so each strip extends past the next. Epoxy the strips together, making sure that all four strips fit tightly around the plate.
To round out the corners of the template so that it matches up with the router better, the author filled them in with a little Bondo automotive filler.
Now mix up some quick-set two-part auto body filler and pack it into the corners of the template up to the insert plate to fill the gaps. When the filler dries, carefully tap the plate free and shave away any extra filler from the corner curves. You now have an inside template that matches your router plate’s shape perfectly. The longer “ears” of the template make clamping easier, too.
Original article and
pictures take http://www.rockler.com/how-to/poor-mans-router-table-insert-template/ site
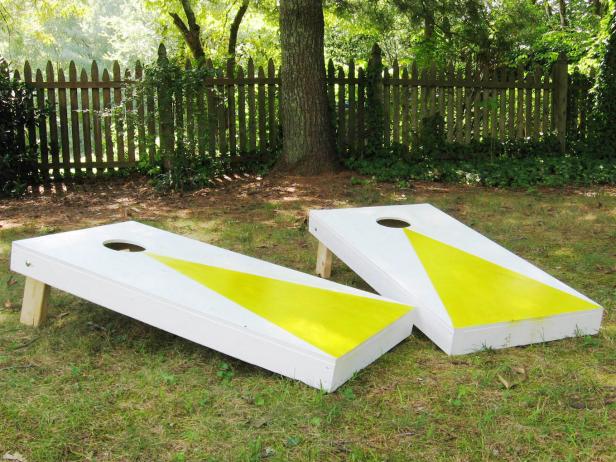
The American Cornhole Association requires platforms be a 48" x 24" rectangle made from 1/2-inch plywood. The front of the platform stands 2-1/2 to 4
inches tall and the back of the platform sits 12 inches off the ground. The plans for this project follow those requirements.
Regulation corn bags need to be 6-inches square, made from duck canvas and be filled with two cups of corn feed. A set of eight can be purchased online for $25 to $30. You can also purchase corn bags made with a plastic filling; these are less expensive than the corn-filled bags and are weatherproof. Corn-filled bags can easily get ruined if left in the rain.
Original article and pictures take http://www.diynetwork.com/outdoors/how-to-build-a-regulation-cornhole-set/pictures/page-10.html site
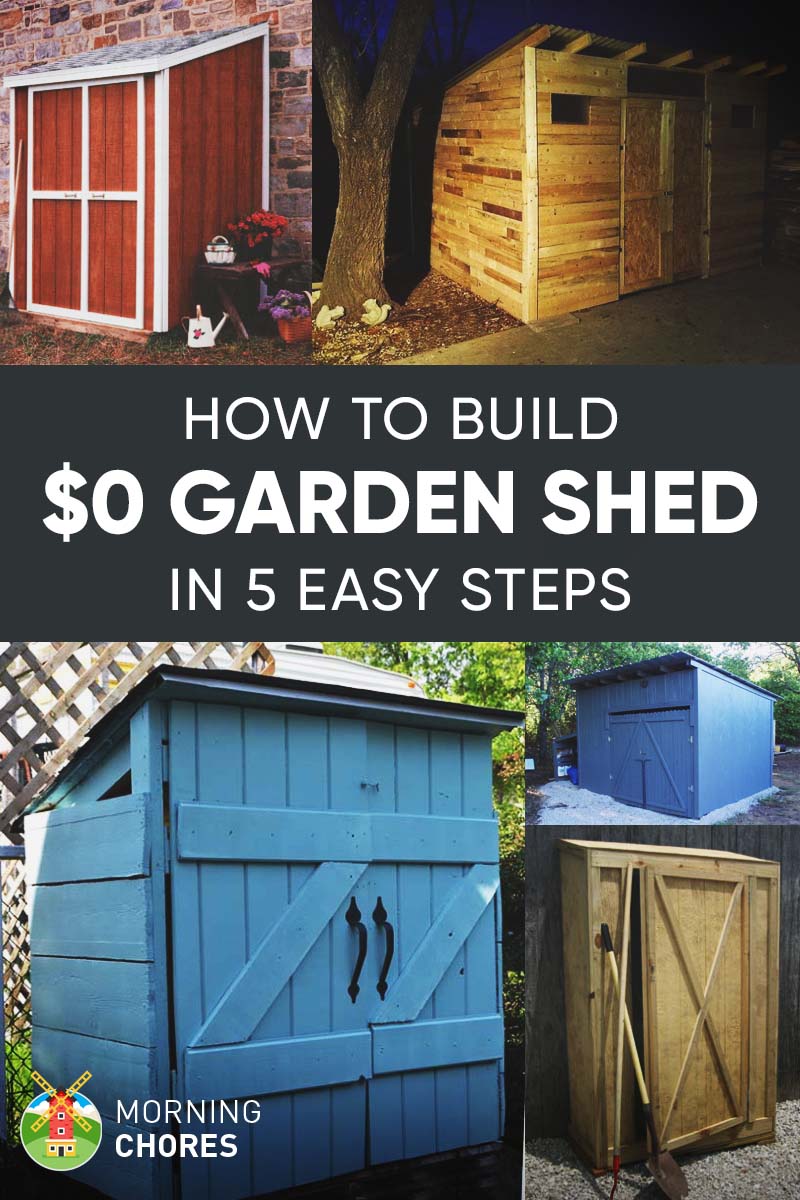
How To Build a Practically Free Garden Storage Shed (Plus 8 Inexpensive Ideas)
Are you on a budget and need extra storage in your garden?
Well, I think it would be a safe assumption that most of the world is.
It’s hard to build a storage shed if you have a limited budget. So today I wanted to share with you how my family built a free tool shed. Even if you can’t find all of the materials we had on hand for free, you can still build this simple shed for very little money.
I’ll also include a few ideas on how to keep cost down if you have to purchase the building materials.
And with all of that in mind, let’s build your shed—
What You’ll Need:
2 or more Pallets
10- 2x4s
Nails
Instructions:
Step 1 – Frame the floor
We began by deciding how big we wanted the structure. This was done in a real scientific way (that’s a total joke.)
So we actually used pallets for the floor (I love building with pallets). What this means is we laid two pallets down on the ground and contemplated if we wanted the tool shed to be two or three pallets in width.
We decided to go with only two. I did this because I didn’t need a large tool shed. I really just wanted a small space by the garden that I could easily access the tools I’d need. Any larger tools could remain in our pole barn or other storage buildings.
So if you are looking for free pallets, I usually advise you to look at local businesses. Stores like nurseries or any other locally owned place that would have items shipped. You will actually be doing them a favor by taking them off of their hands.
Because most companies have to pay to have their pallets disposed of. Smaller businesses care about such expenses. Where a lot of the larger companies do not.
So that is why I recommend you start with the local mom and pop stores.
Step 2 – Frame up the walls
I told you all we built this garden shed at no expense to us. Well, I actually cheated a little.
My brother-in-law works at a lumber yard. So any wood that they can’t sell they allow their employees to take home. Which means we traded a few goats and got a huge amount of wood.
But I realize not everyone has that same option. But most local hardware store sells pressure treated 2×4’s for around $2.50 apiece. Which means you could still have a garden shed (if your store prices are similar to ours) for $25.00.
That isn’t too bad.
Now, we’ll move on. Once you know how big you are going to make the tool shed, it will be time to frame up the walls.
You will begin by cutting 2×4’s to length.
Now, this will change depending on how tall you want your garden shack.
But regardless, you will need to place posts at the corner of each side of the garden shed. Once you do this, it is kind of like a game of connecting the dots.
So you’ll need to cut the other 2×4’s to length and run them across the top to connect each corner post. And you don’t need to run any 2×4’s at the bottom of the pallets. They are strong enough as is.
Then you’ll want to add some bracing posts that run diagonally from corner post to corn post to help the tool shed have some extra stability.
3. Frame the roof and add roofing
The roof is the next step to this project. You’ll begin by building a square the size of the garden shed along the top of the structure. You will need to cut the 2×4’s to length.
And this is to outline and support the future roof.
Then you’ll want to cut 2×4’s to length when adding slats within the roof frame to support the actual roofing. When this is done it is time to add the actual roofing material to the frame.
So we used metal roofing because we had some laying around our property. And I would actually recommend using metal roofing because of how inexpensive it is.
But if you have other roofing materials lying around that you could use for free by all means use those.
And you will cut your roofing material down to size and overlap the sheets of metal. Then you’ll attach them to the roof with a nail gun and roofing nails.
Or a good old fashioned hammer and nails will do the trick.
4. Cover the outside walls
My go-to for siding is always slabs. We can get them for free at a lumber yard nearby.
So all we did was cut the slabs to length for each side. And then used a nail gun and placed them on the side of the shed.
But if you don’t have a place to get free slabs around you, you could use old siding. Or just some old wood that you saved from a project.
And truthfully, a lot of times we’ll save some wood from projects that we take apart. For instance, we had an old wooden walkway that would lead up to our house when we first moved in.
But the downside was every time it would rain, the walkway would become very slippery.
So when we took the walkway apart and replaced it, we saved the wood.
Well, it was pressure treated 2×4’s. And honestly, it would’ve worked well for the siding on this tool shed as well.
So if you have any salvaged wood like that, pull it out and transform it into siding.
5. Move your stuff in and add storage options
We kept our tool shed very simple. I didn’t add a door (though you could if you wish.)
And I stacked all of my belongings inside. But over time I hope to add more storage options. You could add nice gardening hooks () to help keep your tools organized.
Or you could go as simple as placing nails in a v-shape on the wall and use them as hooks.
So you could easily build a double frame and then place the plastic bottles in between the two frames. This would be inexpensive and also provide great protection for the items being stored inside the shed.
4. Tarp
A tarp would be a good option to enclose this garden shed because they are rather inexpensive. And plastic is also a great option because it withstands the elements pretty well.
So you need something to place on the outside of this shed that would be quick, easy, and also easily accessible then a tarp might be a good option.
5. Bubble Wrap
Bubble wrap can be easily purchased at any moving store or even at a dollar store. It would take quite a bit to go around a garden shed.
But could still be fairly inexpensive. You would have to tape sheets of it together.
However, with it being plastic it would be another fairly inexpensive option that would be great protection against the elements and also be a great protector of your tools.
More Inexpensive Garden Shed Ideas
So you liked the idea of a free garden shed. But you aren’t sure if you have all of the tools to make this project a reality for you.
Well, that’s okay. Our main goal here is to share what we know and are doing ourselves. But also equip our readers with the ability to build something they need that is functional.
So here are a few more ideas to help get your creative juices flowing. Who knows? Maybe you can combine my structure with one of these and build the masterpiece you’ve been desiring.
1. Pallet Shed
They actually built this shed completely free from pallets. And the really neat part is they even pulled pallets apart to make the siding for the shed.
And it looks like a little rustic cabin. If you’ve hung around this blog long then you know how much I love rustic.
2. The Large Pallet Shed
This is another creation from pallets. It is actually quite large and looks as though it could hold a lot more than a few garden tools.
So if you were looking for a larger garden shack then you might want to give this one a look. It appears to be very sturdy. And should be cheap (if not free) to build since it is mainly constructed from pallets.
3. The Blue Pallet Shed
Photo by Oklahoma History.net
This shed is built mainly from pallets. Because the building materials are pallets it should be really inexpensive to build (if not free as well.)
And basically, it will all depend upon what materials you have on hand or accessible to you. But this is another great shed option that would hold pretty much anything. Though it might be a little large as a garden shed.
Well, that is it for today guys. I really hope you like the shed my family built. And I also hope that you could build it as
a functional storage facility on your property.
Original article and pictures take http://morningchores.com/how-to-build-a-shed/ site
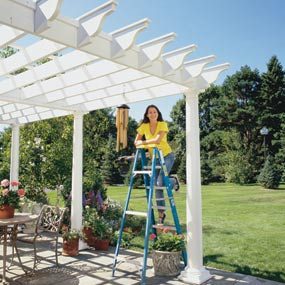
Here’s a summer project designed to keep you cooler on even the hottest of days. The classical columns support an overhead wooden lattice that works like a big shade tree, letting only a portion of the sun’s radiance shine through.
What looks like the toughest part of this project is actually the easiest—the graceful, solid-looking columns. They’re not wood at all but a hollow-core composite material with amazing structural strength and durability. We’ve designed the project so you simply slip these columns over treated 4x4 posts embedded in concrete. When screwed to the wooden posts, these columns provide a stable, solid base for the overhead lattice framework.
These paintable precast columns are available by special order at home centers. They come in a wide variety of diameters and heights and architectural styles.
Pressure-treated dimensional 2x8s and 2x10s make up the majority of the upper framework, and the decorative end pieces are cut with a jigsaw from our pattern. The whole project can be built in a couple of weekends, with another weekend for staining and painting.
We built our pergola over an existing stone patio; that saved a lot of patio work. If you’re planning to install a patio as part of your overall project, you’ll need to allow extra time.
Because this project is made to stand independent of the house, you can either locate it right near your house as we did or let it stand alone in the garden. You can also consider using wood chips or gravel as a floor or even pour a concrete slab underneath. By keeping it unattached (about 4 in. from the eaves), you don’t have to deal with moving existing gutters or matching eaves. You also don’t have to mess with frost footings (in colder climates). However, if you have clay soil, it’s best to dig to frost depth (if greater than 24 in.) for your footings to prevent frost heave.
Our existing patio was built over a sand and compacted gravel base, so we removed only the stones necessary to dig the 12-in. diameter holes to secure the posts. You’ll most likely have a different situation.
If you’ll be adding a patio later, be sure to pour all the footings at the finished patio height. Keep in mind any slope you’ll include in the patio. Most patios slope about 1/8 in. per foot to drain.
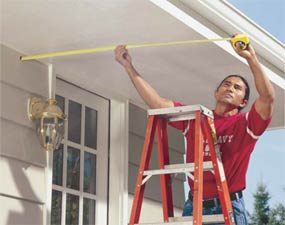
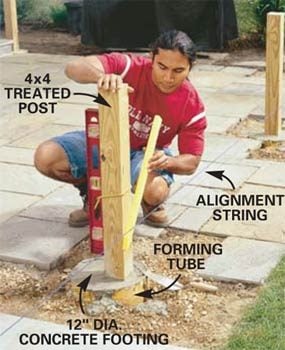
If you plan to build your pergola close to the house, first measure the projection of your eaves as shown in (Photo 1). Keep the center of the posts nearest the house at least 7 in. farther from the house than this measurement.
To keep the posts in alignment, stake your post locations using remote stakes with a string. With the stakes driven beyond the work area (Photo 2), you’ll be able to undo the string while you dig and then reattach it later to check for alignment. To check for left-to-right placement parallel to the house, just measure the distance from one of the remote stakes and write this measurement on a note pad. To make sure the layout is square, adjust the diagonal measurements of the postholes so they’re equal.
As you dig your holes, put the soil in a wheelbarrow and find a place to relocate it away from your site. Save any gravel or sand to reinstall pavers. Note: You may need to move a post slightly. We shifted one post near the house to create an entry along the steps.
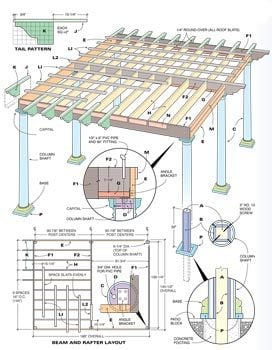
This illustration shows how the pergola is assembled.
Dig the postholes a minimum of 2 ft. deep and 12 in. in diameter. Dig 24-in. tubes into the holes, add your 60-in. posts and pour concrete around them. Plumb your posts and align them with your outer string line. Allow the concrete to harden for a couple of days, then trim the posts to 32 in.
Before you dig any holes, call your local utilities or 411 to mark any buried cable or gas lines. Once you’re sure there are no buried utilities in the area, dig your holes with a hand-held posthole digger or rent a power auger. You’ll also need a shovel to widen the hole. Dig until it’s at least 24 in. deep.
Reconnect your layout string to make sure the holes are aligned. Cut your forming tubes (Photo 2) and insert them into the holes. Level the tops of the forming tubes until they’re flush with the patio surface. If you mix the concrete on site, you’ll need about five bags of Quikrete or Sakrete concrete mix per hole, for a total of 30 bags. (That’s enough to have your home center or lumberyard deliver it to the site. If you call for a ready-mixed delivery, ask for 1/2 cubic yard.)
As you set your posts, reposition your string line about 1-3/4 in. to allow for the post thickness and then align the posts with your string line (Photo 2) as you pour in the concrete.
Note: If you have a post that’s 1/2 in. out of whack, don’t sweat it. You’ll be able to align the tops of the columns later when you install the overhead beam. Once the posts are embedded in concrete, let the concrete harden for a minimum of two days.
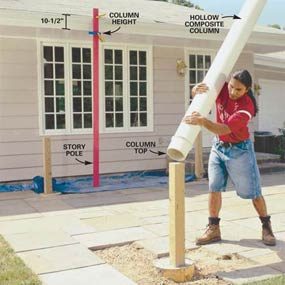
Lift the columns (upside down) over the 4x4 posts to mark the bottoms for trimming. Attach a story pole to the house to establish a reference point.
We wanted the roof of the pergola to align with the fascia of the house for a custom, fluid look. To keep the roof of the pergola even and level across the whole topside, you’ll need to cut each post exactly. Just clamp or nail a board temporarily to the fascia as shown in (Photo 4). Measure down 10-1/2 in. from the top of your fascia board for the cutoff height of your columns (95 in. for ours).
To make sure we cut the bottom only (we didn’t want to have to wait another two weeks for a new column), we flipped the columns end for end, slipped them over the posts and marked the bottoms of each column—and numbered them as well.
Note: To make cutting the columns easier, lay them on sand bags or mulch bags to keep them from rolling or vibrating as you cut. Transfer your length mark completely around the column base with a combination square that’s set from the bottom of the post.
I found the jigsaw a lot safer, quieter and less dusty than a circular saw. This composite polymer is only about 1/2 in. thick but pretty hard, so expect to eat up a new blade on each column.
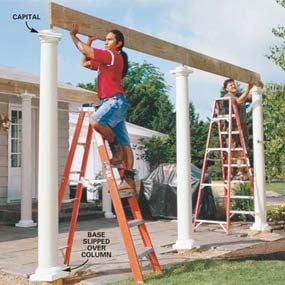
Once you’ve cut each column, fatten the posts with 1x4s as shown in (Photo 7). Predrill each column with a combination pilot and countersink bit (three holes 6 in. from the bottom and another three 30 in. from the bottom). Also drill four evenly spaced holes 1-1/4 in. from the top of each column to secure the plugs (Photo 6). Now slip each column over its post. Strap a level near the base of each column (the column begins to taper slightly after 32 in. from the bottom) and screw into the wood beneath. Tighten or loosen opposing pairs to “plumb up” each column. Next, slip the molded base over the top of the column and then slip the capital on as well. It’s best not to fasten these in place until the project is nearly completed.
Measure the length of the front and back 2x10 beams (E), making them 3 in. less than the outside of the column tops, and cut them to length.
Note: If you have a column that won’t quite straighten up, you can have someone push it straight up and down and then fasten it in place with the steel brackets from above.
Next, measure and cut the side beams (F1) and screw them to the ends of the front beams. Now cut the center beam (F2) 3 in. shorter than the side beams and fasten it to the posts and the front and back beams (E) with 3-in. deck screws.
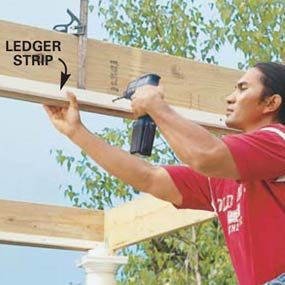
Once all the 2x10 beams are in place, cut your 1x2 ledgers and screw them 1/2 in. up from the bottom of each beam F1 and F2 with 2-in. deck screws every 8 in. Now measure each 2x8 flat rafter (referred to as “flat” because they have no pitch) and cut it to length. Ideally these should all be the same length, but if you had problems with your post positioning earlier, you may have to adjust them.
Mark 16-in. centers along the beams F1 and F2. Rest each rafter on the ledgers (Photo 12) and screw them in place one at a time from the backside of each beam, aligning them with your marks. Where the rafters meet the center beam (F2), angle the 3-in. deck screws through the beam and into the rafter (Photo 13). When you’ve finished the rafters, secure each capital to the underside of the beams with 2-1/2 in. deck screws (Photo 14). Predrill the capitals.
Cut the decorative rafter tails (J) using the grid template shown in (Fig. A). For consistency, mark your first one as the pattern and trace this piece each time. Sand the gentle curves with a belt sander or portable drum sander.
Now cut the tail tops (K) from 5/4 decking. Round over the cut ends with a hand plane or a router (Photo 17). Ease the edges of the tails and the tops with 100-grit sandpaper and then apply a solid-color stain. Make sure the treated wood pieces are dry to the touch before you prestain them. If they feel cool, let them dry in a shady spot for two days before applying the solid-color stain. Rushing the process could cause the stain to blister or roll off.
Once the stain is dry, screw the tops to the tails with 2-1/2 in. deck screws (allow the top to overhang 3/4 in.) and fasten them over the tops of each flat rafter and beam end as shown in (Photo 16) and (Fig. A).
You’ll need to cut the tail top short on the assemblies that project from the corners and screw them in place from the backside of the front beam.
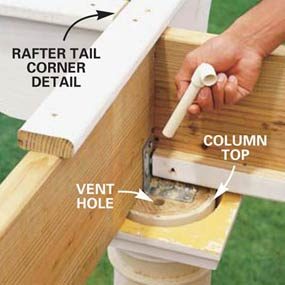
Drill 3/4-in. holes and insert 6-in. long 1/2-in. PVC pieces with 90-degree fittings attached. These little pipes act as ventilators to help slough off any excess moisture that may get into the columns.
Cut and nail (8d galvanized finish nails) the 1x4 fascia strips (M) flush to the top of the beams and in between each pair of tails (Photo 20). Next, screw the lattice strips across the rafter tops, letting them project 3 in. past the fascia.
Now cut the sub-base pieces from treated 2x4. Screw the corners together with 3-in. deck screws. If you haven’t already done so, fit the patio stones back against the footings and glue the subbase
to the patio surface. Then screw the molded base to the sub-base and caulk the seams with acrylic caulk.
Before you paint the columns, mix auto body filler and spread it over the screw holes along the column (Photo 19). Let the filler dry and then sand it flush. Prime the columns, and then paint them with a good-quality exterior trim paint. Don’t use paint on the rest of the pergola; instead roll and brush the wood portions with solid-color stain.
Original article and pictures take http://www.familyhandyman.com/garden-structures/how-to-build-a-pergola/step-by-step site
You can often find pallet sheds for free on Craigslist so start searching then get to building!
Recycling pallets to build projects is a sustainable activity, just make sure your pallets are chemical and nail free before using them. We actually recommend you shop for new pallets as often times used pallets may be contaminated without you even knowing it.
Butch Bridges built this shed from pallets and there are a lot of people out there who want to save money and recycle and wish to
find clean pallets for cheap that they can use in their own home improvement projects. Here is his project with more detailed information on how he built it.
A mini-industry has popped up for anyone with a pickup truck that is willing to find pallets and sell them.
The tools you need to build with pallets include:
Crowbar
Sander
Circular Saw
Recip Saw
Having all of the above tools will make quick work of stubborn nails and damaged pallets. You shouldn’t mess with old pallets that have rusty nails as it can be extremely dangerous, and make sure you dispose of any unused pallets before someone steps on them.
Have fun!
Original article and pictures take http://charlesandhudson.com/pallet_shed/ site
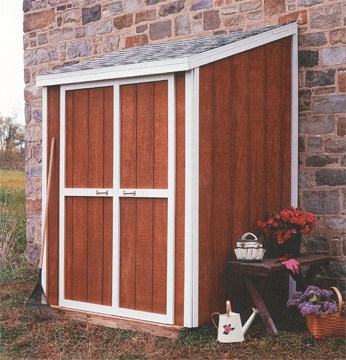
Lean-to shed provides simple shelter for yard gear and more. Photo: Sunset Publishing Corp.
Have you been longing for a shed where you can store lawn and garden equipment, sports equipment, compact outdoor furniture, and miscellaneous tools and supplies? When inconspicuous, functional storage is all you’re looking for, the lean-to is the perfect solution.
Per its name, the structure simply leans against the house or garage for additional support and provides a water-safe haven for shielding gear from the elements. If you have moderate do-it-yourself skills and tools, this is a weekend project.
Storage Shed Design
Because
the shed is designed to abut to another structure, the foundation need only be pressure-treated skids, the roof pitched in only one direction to shed water, and the back wall sheathed with 1/2-inch CDX plywood, which withstands indirect exposure to moisture. See Anatomy of an Outdoor Shed or Playhouse for more about typical shed construction.
Plan Modifications
It isn’t a requirement that this shed be built against a wall—but the structure is designed to take advantage of the wall for strength. So if you modify it to be a freestanding shed, you’ll need to build a conventional stud wall across the back and face it with the same type of plywood siding used on the rest of the shed. For information on how to mark, cut, and fasten wall studs, see How to Frame an Interior Wall (ignore the part about working with drywall because you’ll be using exterior-rated T1-11 siding instead).
For a freestanding shed, you can build the shed on top of a concrete slab (see Pouring a Concrete Slab) instead of the pressure-treated skids and floor joists; this will actually result in a sturdier—more permanent— structure. Otherwise, for a freestanding shed, the foundation should be constructed on concrete piers or poured footings (see Pouring Concrete Footings & Piers). Be aware that building on footings will raise the height of the shed up from the ground.
Materials Required
To build the shed shown here, you’ll need:
• Pressure-treated 4x4s for skids
• Pressure-treated 2x4s for floor joists
• 3/4″ Tongue-and-groove plywood for flooring
• 2x4s For studs, header, rafters, top plate nailers, etc.
• T1-11 Plywood siding
• 1/2″ CDX plywood for roof sheathing
• 1×3 Door trim
• 1×4 Fascia and rake trim
• Asphalt shingle roofing, 15-pound felt, metal framing brackets, door hinges and latch, miscellaneous galvanized nails and outdoor screws, and paint, stain, or preservative.
Basic Lean-To Shed Construction Diagram
Building the Shed
The shed shown here is 6 feet long by 4 feet wide. You can easily expand its dimensions in increments of 2 or 4 feet.
1To construct the framing for the shed’s floor, cut two pressure-treated 2 by 4s to a length of 6 feet for the rim joists. Then position six 45-inch-long floor joists between the rim joists 16 inches on center (with the exception of the last one, as shown in the floor joist detail at right). Attach them with 16d nails.
Cut two pressure-treated 4 by 4s to a length of 6 feet for the skids. Position the frame on the skids, and, when square, toenail the floor joists to the skids.
Attach 3/4-inch tongue-and-groove plywood flooring onto the frame.
2he walls for the shed are constructed separately and then raised onto the frame.
Start with the back wall, which is 8 feet high with 6-foot-long top and bottom plates and four studs placed 18 inches on center. The tops of the wall studs are mitered at 18 degrees. Attach the wall to the floor frame and temporarily brace it.
The front wall has a 6-foot-long top plate and two 1-foot-long bottom plates, leaving space for a 4-foot-wide door. The four wall studs are 81 1/4 inches long; install them as shown in the front framing detail at left. Next, install the 73-inch-long jack studs, and then attach the 51-inch-long doubled header. Finally, attach the 6 1/4-inch-long cripple studs.
Raise the front wall, attach it to the floor, and temporarily brace it.
The side walls have top and bottom plates 41 inches long and studs 81 1/4 inches tall. Raise them, attach them to the floor, and temporarily brace them if needed. When all wall sections are square, attach them at the corners with screws.
3The frame of the roof consists of four 2-by-4 rafters cut so that they rest on the front- and rear-wall top plates, as shown in the rafter detail at right. Install a gable stud directly over the center studs on both side walls to fit between the end rafter and the top plate. Install the sub-fascia and then the fascia to the front ends of the rafters.
4Position pieces of T1-11 siding on the front and sides of the shed so that they are flush with the bottom of the rim joists. Attach the siding with 8d galvanized nails spaced every 8 inches.
Cover the rear wall with 1/2-inch CDX plywood from the bottom of the rim joists to the tops of the rafter ends.
5Sheath the rafters with 1/2-inch CDX plywood; stagger the joints so that none end up on a rafter. Nail them in place with 6d nails. Attach rake trim to cover the exposed edges of the roof sheathing, and install drip edging. Roll out 15-pound roofing felt, and apply the shingles (see Asphalt Roof Installation).
6Construct the doors from T1-11 siding, and trim them out with 1 by 3s. Add cross trim in the centers of both doors, and install the door latches. Use strap hinges to attach the doors.