The classic Greek Revival styling of our library is reminiscent of traditional bookcases built more than a hundred years ago. The bookcases look ornate but are relatively simple to build. There"s no complex joinery like mortise-and-tenon, or even doweling, so if you"ve hung a new door or trimmed a room with new molding, you have the expertise to handle this project.
We sized the bookcases to fit into a typical room with an 8-ft. ceiling and at least 8 ft. of wall space, something like a typical bedroom you may want to convert to a library or home office. It can also be expanded by adding standards (the upright partitions; see Fig. B).
We"ve engineered this project to work even if your room is a bit out of kilter. The moldings are applied after the main standards are installed to cover any gaps resulting from uneven floors or walls.
At the end of this article, in “Additional Information,” you"ll find lists of the tools and materials you"ll need to complete this project.
Even though this project isn"t complicated, it"s still going to take you at least 40 hours to build.

As you can see, the center section of our bookcases is 6 in. wider than the two outer sections. This establishes a focal point, and the two side sections provide symmetry. However, this exact design may not work for your room. To check, carefully measure your selected site (Photo 1). Take into consideration the height, width and any obstructions unique to your room. You may find you need to alter our plans a bit. Keep in mind, you can move the standards (Fig. B and Photo 12) closer together or add another standard or two to fit a longer wall.
As you plan, note the location of your electrical receptacles and heating ducts. They may dictate where you place the standards. Your only other absolute is that the ladder support rod (Photo 17) should not span more than 36 in. between brackets. Use a level to check for irregularities like a sloping floor or an uneven wall. If your walls and floor aren"t exactly straight or level, you"ll be able to scribe the standards on the backside and bottom, and then cut along your scribe for a perfect fit (see How to Scribe for a Perfect Fit for more on scribing).
If you decide to include the ladder in your design, be aware that it could take several weeks for delivery. This shouldn"t slow you down—you can get started with the project and install the ladder when it arrives.
Our bookcases were built onto a wood floor. If you have carpeting, you"ll need to pull back the carpet and pad and reinstall them later around the base of the bookcases. And yes, the ladder will roll on carpeting as well.
With the exception of the rolling ladder, the maple fluted casing and the plinth blocks, all the materials are available at lumberyards and well-equipped home centers (see “Shopping List” in Additional Information, below). We made the four vertical standards and shelves from birch-veneer plywood sandwiched around ordinary 2x4s. The only hitch is finding really straight and dry 2x4s. They must not have any bow, but they can have a slight crook or crown. And since the 2x4s will be completely hidden, some rough edges are acceptable. Even if your 2x4s feel dry to the touch, let them dry inside the house for at least a week. Too much moisture will cause problems because the wood shrinks as it dries.
We used birch-veneer plywood and maple trim for our project because it complemented the existing maple woodwork. Whatever wood you choose, be sure it has a “plain-sawn”veneer, which has a straighter, less wild grain pattern. Plain-sawn hardwood plywood is available at woodworking stores and cabinet suppliers, but may have to be special ordered at lumberyards and home centers.

You don"t need a fancy shop to cut the plywood and build the standards. A set of sawhorses under a sheet of 3/4-in. plywood will work just fine. The first order of business is to rip (cut lengthwise) the eight pieces of plywood 13-3/4 in. wide to make the standards. You can use a table saw, but we prefer to use a circular saw and a homemade rip guide, made from two pieces of straight scrap plywood. (See Photo 2. For more on making rip and crosscut guides, see Two Essential Saw Cutting Guides.) After ripping the pieces, you"ll need to crosscut the tops to length as shown in Photo 3. The length will be the measurement from your floor to the ceiling minus 1 in. This extra inch of space is needed to slide the bookcase top (C) into position later (Photo 12).
After cutting the plywood to size, you"ll need to drill 1/4-in. dia. holes into the inner sides for the shelf support hardware. These holes must be precise from one standard to the next so your shelves don"t wobble. The best way to ensure this is to make a drilling jig.
To make your drilling jig, buy a 1-1/4 in. wide x 1/8-in.thick x 6-ft. long piece of mild steel from your hardware store. Mark it every 2 in. from one end to the other as shown in Photo 4. Next mark centers 3/4 in. from the edge. To keep your bit from wandering as you drill, use a center punch to dent the steel at your mark. Using a 1/4-in. high-speed steel twist bit, drill all the holes. Sand off sharp burrs with 100-grit sandpaper.
To finish your jig, drill four 1/16-in. holes evenly spaced along its length so you can tack it to the plywood sides (Photo 5).
TIP: Mark the jig with a bit of paint so the top can be identified at a glance. If you don"t, you can easily flip it end for end and then get the shelf-hole pattern goofed up!
At 84 in. from the bottom, mark each plywood piece (A, A1) for drilling. The A2 pieces don"t get drilled. Align the top hole of the jig with your mark. Align the edge of the jig with the back edge of the plywood (Photo 5). Nail the jig to the workpiece with 3/4 in. long, 17-gauge nails.
To get clean, flat-bottomed holes, use a 1/4-in. brad point bit in your drill. Use a stop collar on the bit to ensure a 1/2-in. depth, and drill into each hole of the jig.
Drill the front holes next, centered at 2-3/4 in. from the front edge as shown in Fig. B.
NOTE: Pieces A and A1 are mirror images of each other, so double-check to make sure you drill them correctly.


Glue the 2x4s between the plywood pieces (A and A1) “sandwich style” to create the two middle upright standards. Also, glue together an A2 and A1 for the far right standard and an A and an A2 for the far left standard. After gluing, clamp them for at least two hours. Be sure the front 2x4 (B) is flush with the front side of the panels and the rear 2x4 (B) is set in about 1/2 in. The extra 1/2 in. on the back makes scribing to the wall much easier.
Now you"re ready to glue the plywood pieces (A, A1, A2) and the 2x4s (B) that make each standard. To make sure you glue the correct sides (A, A1, A2) together, study Fig. B. Cut the 2x4s to the same length as the plywood. Spread glue (about a 1/4-in. bead in a squiggly pattern) on both sides of the 2x4s and place them onto the plywood (Photo 6). Recess the rear 2x4 about 1/2 in. from the back. If your wall is uneven, this will make it much easier to scribe it to the wall later on. TIP: To keep the pieces from drifting as you clamp them, drive a finish nail through the plywood into the 2x4 to hold it in position. Set this nail just below the surface and fill the hole later.
Once the glue has set overnight, position each standard in your room to see how each one fits against the floor and the wall. A gap of 1/8 in. at places against the wall is OK; if the gap is any larger, the standard should be scribed to fit. If you live in an old house that"s settled considerably, check for a gap on the floor as someone holds each standard against the wall. If there"s a gap at the front, scribe the standard to the floor and sand to your mark with a belt sander. If you make any adjustments to the standards, mark them in the order you"ll install them—1, 2, 3 and so on.

The pins that secure the standards to the floor are nothing more than 1/4-in. x 3-in. lag screws with their heads cut off with a hacksaw. Carefully mark the hole centers as shown in Fig. B, then predrill a 3/16-in. hole. Turn the lag screws into the holes with an end wrench, leaving 1/2 in. of the shaft exposed (Photo 7). Now, cut the heads off the screws and file a slight taper near the end to help guide the pins into the holes you"ll be drilling later into the floor.

Glue the dentil pieces (D)

Our dentils (D) are made from colonial stop molding (also called Princeton style; Fig. A). First, rip off the square side so the stop is 1-1/8 in. wide (if you don"t own a table saw, have this done at the lumberyard). Now cut the molding into 7/8-in. long pieces with your miter saw to make each dentil. It"s slow-going but the finished look is worth it. The filler piece (D1) at the top side of the dentils (D) is the same molding with the square side toward the top of the dentil as shown in Photo 8. The backer board (D2) is 1x4 maple.
Nail the filler (D1) to the backer board using 1-1/4 in. brads every 6 in. Then glue the dentil pieces to D2 as shown in Photo 8, using just enough glue so it doesn"t ooze from the sides of the dentils. Let this piece sit for 24 hours before handling it.

We recommend cutting the shelves at the same time as the standards (see Cutting List in Additional Information, below). Cut the shelf fronts (M and M1) and glue them to the shelves (Photo 9). You can trim the completed shelves to exact length (the measurement between standards, minus 3/16 in.) when you"re ready to install them. This way, they can be prefinished along with the other pieces.
It"s a lot faster to stain and varnish in your shop than it is to painstakingly avoid spilling onto your walls and floor. And you can confine the odor of the finish to your workshop or garage; just be sure your work area is at least 60 degrees F. After the bookcases are completely installed, you can touch up any cut ends with stain and fill nail holes with colored putty. For a blotch-free even color on the birch, we applied wood conditioner before wiping with a pecan stain. Use a polyurethane varnish for durability.

Remove your baseboard where the bookcases will go. Pull the nails through from the backside with a pliers and set the baseboard aside. You"ll reinstall it later between the standards. To help you see the pin location marks for the standards, apply tape on the floor as shown in Photo 10. Next, carefully measure using Fig. C as your guide. Use a square so your measurements will be perpendicular to the wall, and drill the 5/16-in. dia. holes into the floor for the first standard (Fig. C).
Space the first standard 1/2 in. from the side wall (Photo 11a). This will provide enough space for the fluted front casing (Photo 14) to overhang equal amounts on each side of the standard. To hold the top of the standard away from the wall (Photo 11a and Fig. B), install a shim near the top as shown and secure the standard to the wall with a 5-1/2 in. drywall screw driven into a drywall anchor. Make sure the shim is thick enough so the standard is plumb (Photo 11a). Now cut temporary stringers from scrap 1x2, two pieces 32 in. long and one piece 36 in. long (Photo 11).
Drill the corresponding 5/16-in. dia. holes for the second standard into the floor and set it in place (Photo 11b). Nail a 32-in. temporary stringer from the first unit to the second, making sure the standards are perfectly parallel.
Once all the standards are in place, slip the top (C) into position (Photo 12) between the standards and the ceiling. When the front edge of the top is even with the fronts of the standards, screw it to the top of the standards (Fig. B) with 3/4-in. screws and brass angles. Then shim it tight to the ceiling. To lock the bookcases into position, screw the top to the ceiling joists with 3-in. drywall screws, making sure the backs of the standards are against the wall. Use at least six screws to secure the top directly to the joists. You can now remove the temporary stringers.


Miter the end of the dentil assembly, then cut it to length. Nail the assembly to the front of the standards with 6d finish nails. The 2-5/8 in. distance from the ceiling to the top of the dentil is critical. The bottom of the crown molding profile needs to align with the top of the dentils (Photo 16).
First, nail the dentil assembly to the standards as shown in Photo 13. It should be high enough that the crown molding, when installed, will just touch the top of the dentils (D). Our crown molding is 3-1/4 in. wide across its face, and its bottom edge sits 2-5/8 in. below the ceiling (Fig. A).
Next, nail the colonial stop (Fig. A) on each side of the standards (E in Fig. B). Nail each piece in place with 4d finish nails every 12 in., aligning it with the front of each standard. After the stop is nailed, nail the plinth blocks (F) at the base of each standard using 8d finish nails. To cover the exposed faces of the standards, nail the fluted casing (use 6d finish nails in pairs every 18 in.) to each standard (Photo 14). Fit it tightly between the plinth and the dentil assembly.
To give each fluted casing the look of a real column, glue and tack the cove molding (H), mitering the corners around each top (Photo 15). Now to finish the bookcase at the ceiling, miter the crown molding and nail it in place as shown in Photo 16.
NOTE: To enhance the built-in look of the project, we continued the crown molding around the entire ceiling. For more on crown molding installation, see Shortcuts for Trim Carpenters and How to Install Crown Molding: Three Piece Design

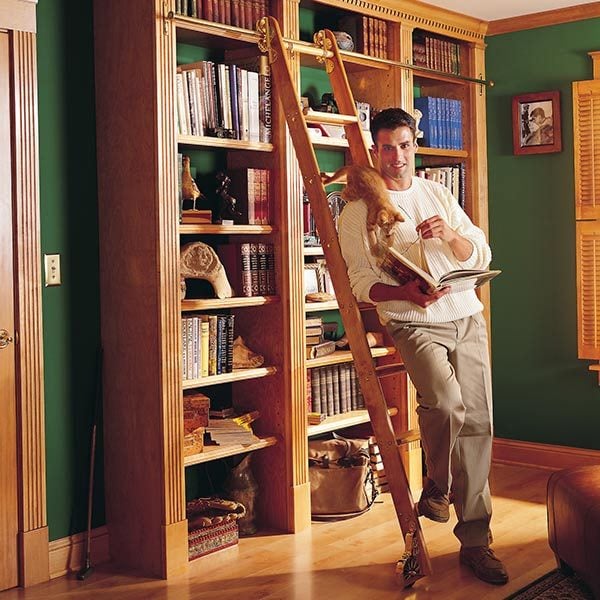
The rolling ladder is a handsome addition to any library. We purchased ours after sending a dimensioned sketch of our project. All the necessary hardware along with very clear instructions were included. The ladder is a safety hazard for small children, so adult supervision is advised.
You can find many types of rolling ladders for sale online with a search for “rolling library ladder.”
Original article and pictures take http://www.familyhandyman.com/woodworking/bookcase/how-to-build-a-classic-floor-to-ceiling-bookcase/view-all site
>
Комментариев нет:
Отправить комментарий