Here’s a workspace that’s huge and accessible from all sides yet folds up and stows away easily. If you don’t have room for a full-size permanent workbench but really need space to spread things out, this workbench is it. It opens to a solid 4 x 7-ft. surface with both wings up, yet closes and rolls into a small 4-ft. x 18-in. spot in a corner of the room. It’s a perfect workspace for the garage or basement. It’s also a great surface for making repairs, working on hobbies, cutting sewing patterns, wrapping gifts, folding laundry, doing stained glass crafts or even just holding a mechanic’s parts.
This project has no complex wood joints. Just straight cuts, careful measuring and some nailing and screwing.
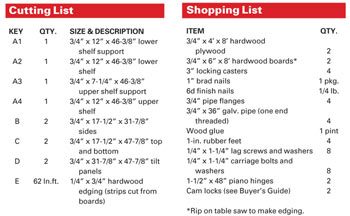
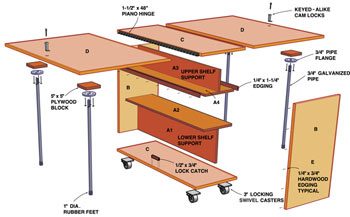
With this illustration, and the Cutting and Shopping Lists, you have the basics for building your own folding workbench.
You can see and print and enlarged version of Figure A and the Cutting and Shopping Lists in the Additional Information section below.
Cutting and Shopping Lists Exploded diagram of workbench
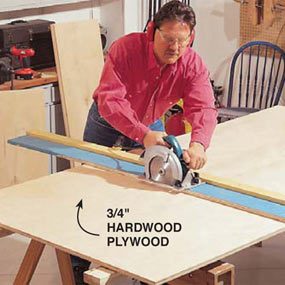
Cut all the pieces to size from two sheets of 3/4-in. birch plywood. Use a 40-tooth carbide blade or a 150- tooth plywood blade for a smooth cut. A straightedge cutting guide clamped to the plywood will give you factory-straight cuts.
Take a look at the Cutting List and cut all your pieces from 3/4-in.-thick hardwood plywood. I used birch plywood from a home center, but any flat plywood sheet will do. Avoid construction-grade plywoods because they’ll often have bows or warps that’ll make precise fitting impossible. I strongly recommend you use a guide (Photo 1) to cut the plywood
. You’ll have tighter-fitting joints and better glue bonds.
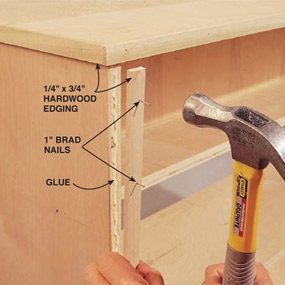
Once all the plywood pieces are cut, rip the 1/4-in. wide edge banding from 3/4-in. thick boards (or buy it precut from a home center or lumberyard if you don’t have a table saw).
Assemble the upper and lower shelves as shown in Fig. A and Photo 2 with carpenter’s glue and 6d finish nails. Note: Don’t alter the design of the shelves for this workbench. The large shelf supports (A1 and A3) on the bottom and top of the shelves keep the bench from racking out of square. Glue and nail the sides to the shelf ends, then let the assembly sit for an hour to let the glue dry before attaching the casters as shown in Photo 3.
Use 1-in. brads for attaching the hardwood edging
The thin hardwood edging is a necessary component of the bench; without it, the hinge screws would not hold as well and the plywood could delaminate along the edges. To apply the edging, start a few brads into each piece of wood edging, put glue on the plywood and tack each piece into position (Photo 4). Once the edging is tacked in place, nail it every 6 in. with the brads. When the glue is dry, sand the sharp corners of the edging.
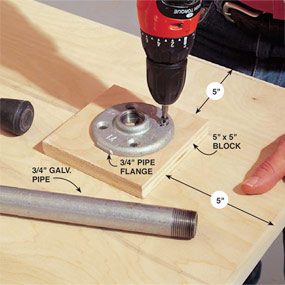
Screw the 3/4-in. pipe flanges onto 5-in. square reinforcing blocks cut from scrap plywood. Glue and screw the blocks to the underside of the front panels as shown in Fig. A.
Piano hinges are a pain in the neck—all those tiny screws. But all those screws give continuous support along the joint for a sturdy worktop. Be sure to align one hinge blade with the top (C) and the other with the top of panel D. Use a hinge center punch like the one shown or a Vix bit, a special drill bit that’s self centering. Screw the hinges securely in place with the screws provided.
Glue and screw the blocks to the underside of each panel (D) to support the 3/4-in. pipe flanges and pipe legs. I bought 3-ft. lengths of pipe, threaded on one side, and found that I needed to cut (with a hacksaw) about 1 in. off this length. This allowed room for the flanges and the rubber feet.
The locks serve a dual purpose. First, they keep little hands from getting into things and getting pinched, and second, they’ll keep everything inside from tipping out if the bench is jarred. To install them, drill the holes for the lock (Photo 7) and glue a wooden catch to the bottom of the shelf as shown in Fig. A. Measure the shaft of the lock once it’s installed to get the correct thickness for the block. We used a 1/2-in.-thick block for ours.
Remove the hardware to make painting or varnishing a whole lot easier. Label the panels in a hidden spot so you get the right on the right side when you assemble. Small variations from one panel to the next can show up on your hinge placement and locks.
Sand the entire bench with 150-grit sandpaper and use a power sander to knock down any high spots on the hardwood edging. Vacuum the dust, wipe the bench down with a tack cloth and apply your finish. Wait a few days after the last coat of finish to let it cure before you put your first scratches on the workbench.
Original article and pictures take http://www.familyhandyman.com/workshop/workbench/folding-workbench/view-all site
Digital Fashion Director, Glamour; Co-Founder, Jean Stories. New York
.
Nearly every person in fashion worships at the altar of denim. When we first knock on someone’s door, that someone is almost always wearing a pair of jeans—before they change into whatever more “fashion-y” look they’re feeling themselves in at the given time. In our circles, jeans so rarely gets the love they deserve, often because something shinier and more glittery gets our attention first. (You can find our picture next to the definition of “magpie” in your Merriam-Webster.)
But we love us some jeans. We wear them nearly every single day. And it’s time they get their due. So we called up a fashion person who we knew would feel us, one Florence Kane, who loves denim so very much that she started a whole website devoted to it with Jane Herman (her closet is coming later this week, don’t worry). Kane is now the Digital Fashion Director at Glamour, and among her Stella McCartney and Saint Laurent dresses, she has an untold number of jeans. Levi’s, 3x1, Amo, Mother, Gap—it’s all here. And while we dug through the many pairs and many chambray shirts and jackets (including an adorable pinned and patched Lee jacket that was her husband’s as a kid), Kane told us about her first ever pair, the brands she thinks are killing it right now, and why there’s no such thing as too many denim labels.
Original article and pictures take http://coveteur.com/2016/09/20/florence-kane-glamour-digital-fashion-director-closet/ site
I seriously LOVE Fabletics!! The clothes are such great quality and the PRICE!! Perfect for a fitness apparel addict like me…plus, your first outfit is only $25!! WHAT?! An entire outfit for $25!
Their VIP program is amazing and allows your to get and entirely new outfit each month starting at only $50. Let’s just say, I tend to buy more than one outfit!
These are my fifth pair of their leggings and I love how much compression the have and how they fit. These are one of my favorite pairs of capris I own, the color is amazing! Be sure to check out Fabletics if you haven’t yet, because they have SO MANY cute clothes!!
Ok so on to the workout!
This workout is a quick 5 minute tummy toning workout when you’re in need of a quick workout! If yo’ve seen my Pilates 5 Minute Ab Workout, you know I love quick efficient workouts for the abs. I hate doing thousands of crunches and find that there are so many other exercise that will target your abs even better.
This workout is full of planks that will get your heart rate up and engage every muscle in your body. Perform each exercise for one minute then move right on the next one.
Find your PRINTABLE version HERE! (Right click, and Save As…)
Find your PRINTABLE version HERE! (Right click, and Save As…)
Oh…and this is what happens when you try to do a photoshoot without putting the pups away…Chugi wanted in on the action too!
Original article and pictures take http://thelivefitgirls.com/2015/06/flat-abs-in-5/ site
Want a convenient place to start seeds, pot plants, and keep your gardening tools at arm’s reach? You need a potting bench!
But it’s easy to get overwhelmed by the array of options, materials, sizes and styles out there. We’ve picked out a few of our favorites to help you find the perfect fit for you, no matter your personal
sense of style, storage needs, or budget:
Repurposed: If you love taking junk and turning it into something both beautiful and practical, you’ll be inspired by this blogger’s DIY project. An old desk from Goodwill was turned into a gorgeous and original cottage-style potting bench.
Rustic: If you love an antiqued country look, this distressed-finish potting bench, made from acacia wood with a driftwood finish, won’t disappoint. Featuring a drawer, cupboard, slatted shelves and a removable bin, this solidly built piece gives you plenty of storage options. $499.99
Midcentury Metal: This sturdy but lightweight galvanized metal bench offers enough space for plants and tools, and reminds me a little of a Mad Men-era end table. $149.99
DIY: Handy? Check out these free beginner-friendly plans for a do-it-yourself potting bench that you can construct from cedar or redwood.
Foldable: If you need a versatile piece that can be tucked away into an out-of-the-way corner during the colder months, consider this wooden bench. It folds flat, or you could easily move it into the garage for off-season storage. $125
Original article and pictures take http://www.hgtv.com/landscaping/building-a-potting-bench/index.html site
","pageUrl":"http://www.instructables.com/id/No-tools-firewood-rack/","id":0,"text":"I made three of these. I used to store my split wood on what was essentially a wood ladder rack. But no matter what I did, the rack would always sink, tilt and eventually fall over. And I had to spend a fair amount of time criss-cross stacking the wood to keep everything stable. These racks work as advertised. You just can"t beat "em for the price. If I did the math right, each one holds a bit over 1/3 of a cord if your wood is cut to 16".","type":"post"},{"date":"Sat, 17 Sep 2016 00:00:00 GMT","images":[{"naturalHeight":130,"width":150,"diffbotUri":"image|3|-1764574084","url":"https://cdn.instructables.com/FQ6/LF0A/IT6831TM/FQ6LF0AIT6831TM.SQUARE2.jpg","naturalWidth":130,"height":150},{"naturalHeight":130,"width":150,"diffbotUri":"image|3|1508128128","url":"https://cdn.instructables.com/FBI/4RFO/IT6831ZS/FBI4RFOIT6831ZS.SQUARE2.jpg","naturalWidth":130,"height":150}],"humanLanguage":"en","author":"DYI student","authorUrl":"http://www.instructables.com/member/DYI%20student","diffbotUri":"post|3|1240485300","html":"This was awesome! My husband and I put this together in 15 min. We just bought our house so money is tight. We were online looking at some that average price were 2-3 hundred. This design is not only frugal but brilliantly engineered! Thanks for sharing, we are waiting for our wood to be delivered! ","pageUrl":"http://www.instructables.com/id/No-tools-firewood-rack/","id":1,"text":"This was awesome! My husband and I put this together in 15 min. We just bought our house so money is tight. We were online looking at some that average price were 2-3 hundred. This design is not only frugal but brilliantly engineered! Thanks for sharing, we are waiting for our wood to be delivered!","type":"post"},{"date":"Sat, 17 Sep 2016 00:00:00 GMT","humanLanguage":"en","author":"clasof56","authorUrl":"http://www.instructables.com/member/clasof56","diffbotUri":"post|3|-1197790667","html":"
looks to me like a project well done. and you will like how solid it is once you get some wood on it. and what a nice woodsy setting you have.
","pageUrl":"http://www.instructables.com/id/No-tools-firewood-rack/","id":2,"text":"looks to me like a project well done. and you will like how solid it is once you get some wood on it. and what a nice woodsy setting you have.","type":"post","parentId":1},{"date":"Wed, 17 Aug 2016 00:00:00 GMT","humanLanguage":"en","author":"JamesR227","authorUrl":"http://www.instructables.com/member/JamesR227","diffbotUri":"post|3|1927731166","html":"
Hey, we made one of these...and it works and looks GREAT!! Be sure to use the "wood-colored," brown or "rust" pressure-treated wood, looks quite nice.
","pageUrl":"http://www.instructables.com/id/No-tools-firewood-rack/","id":3,"text":"Hey, we made one of these...and it works and looks GREAT!! Be sure to use the "wood-colored," brown or "rust" pressure-treated wood, looks quite nice.","type":"post","parentId":1},{"date":"Wed, 17 Aug 2016 00:00:00 GMT","humanLanguage":"en","author":"clasof56","authorUrl":"http://www.instructables.com/member/clasof56","diffbotUri":"post|3|-486526767","html":"
hi james, thanks for the honest comment. glad you are enjoying the rack.
","pageUrl":"http://www.instructables.com/id/No-tools-firewood-rack/","id":4,"text":"hi james, thanks for the honest comment. glad you are enjoying the rack.","type":"post","parentId":3},{"date":"Wed, 17 Aug 2016 00:00:00 GMT","images":[{"naturalHeight":130,"width":150,"diffbotUri":"image|3|956623316","url":"https://cdn.instructables.com/F47/NP40/IRUZLRAO/F47NP40IRUZLRAO.SQUARE2.jpg","naturalWidth":130,"height":150}],"humanLanguage":"en","author":"Dkl22","authorUrl":"http://www.instructables.com/member/Dkl22","diffbotUri":"post|3|-935749260","html":"
Made another version with a rope in top to prevent the walls to tilt.
","pageUrl":"http://www.instructables.com/id/No-tools-firewood-rack/","id":5,"text":"Made another version with a rope in top to prevent the walls to tilt.","type":"post"},{"date":"Wed, 17 Aug 2016 00:00:00 GMT","humanLanguage":"en","author":"clasof56","authorUrl":"http://www.instructables.com/member/clasof56","diffbotUri":"post|3|1220290996","html":"
ah, i see you didnt use the parts list or put it together using instructions. landscape timbers work best as the base and they should be resting on the cement blocks for whole-rack stability. its a simple set up and works really good ....but good luck.
","pageUrl":"http://www.instructables.com/id/No-tools-firewood-rack/","id":6,"text":"ah, i see you didnt use the parts list or put it together using instructions. landscape timbers work best as the base and they should be resting on the cement blocks for whole-rack stability. its a simple set up and works really good ....but good luck.","type":"post","parentId":5},{"date":"Wed, 17 Aug 2016 00:00:00 GMT","humanLanguage":"en","author":"Dkl22","authorUrl":"http://www.instructables.com/member/Dkl22","diffbotUri":"post|3|-513438713","html":"
Yes, You're right. I did mine before I spotted Yours. I wasn't smart enough to figure that out from beginning :) So instead of taking all wood out again, I solved it with the rope
","pageUrl":"http://www.instructables.com/id/No-tools-firewood-rack/","id":7,"text":"Yes, You're right. I did mine before I spotted Yours. I wasn't smart enough to figure that out from beginning :) So instead of taking all wood out again, I solved it with the rope","type":"post","parentId":5},{"date":"Wed, 17 Aug 2016 00:00:00 GMT","images":[{"naturalHeight":130,"width":150,"diffbotUri":"image|3|-145951552","url":"https://cdn.instructables.com/FXQ/JDOH/IRHV31GD/FXQJDOHIRHV31GD.SQUARE2.jpg","naturalWidth":130,"height":150},{"naturalHeight":130,"width":150,"diffbotUri":"image|3|-464081470","url":"https://cdn.instructables.com/FZI/2S29/IRHV31IA/FZI2S29IRHV31IA.SQUARE2.jpg","naturalWidth":130,"height":150}],"humanLanguage":"en","author":"tgiraud","authorUrl":"http://www.instructables.com/member/tgiraud","diffbotUri":"post|3|-1984705036","html":"
In hindsight I should have built longer and taller. I ended up with 3x 4'tall by 8' wide. Will stretch it next year. Now I need to find an easy way to cover. Suggestions?
","pageUrl":"http://www.instructables.com/id/No-tools-firewood-rack/","id":8,"text":"In hindsight I should have built longer and taller. I ended up with 3x 4'tall by 8' wide. Will stretch it next year. Now I need to find an easy way to cover. Suggestions?","type":"post"},{"date":"Wed, 17 Aug 2016 00:00:00 GMT","humanLanguage":"en","author":"clasof56","authorUrl":"http://www.instructables.com/member/clasof56","diffbotUri":"post|3|2065750855","html":"
hi tgiraud, i have found the easiest way to cover is with some blue or
silver tarp, using holed bricks with a cord tied between two of
them...drape over ends of tarp to keep on in wind and rain. cheap, heavy enough, easy,
and works very well. you really dont need to cover completely...just
the top and a foot over the sides is plenty. gives it air. good luck.
","pageUrl":"http://www.instructables.com/id/No-tools-firewood-rack/","id":9,"text":"hi tgiraud, i have found the easiest way to cover is with some blue or silver tarp, using holed bricks with a cord tied between two of them...drape over ends of tarp to keep on in wind and rain. cheap, heavy enough, easy, and works very well. you really dont need to cover completely...just the top and a foot over the sides is plenty. gives it air. good luck.","type":"post","parentId":8},{"date":"Fri, 17 Jun 2016 00:00:00 GMT","humanLanguage":"en","author":"AndrewW220","authorUrl":"http://www.instructables.com/member/AndrewW220","diffbotUri":"post|3|1770037588","html":"
Looks awesome. Hey this might be a dumb question but do the 2x4's on the bottom move around a lot while stacking? How sturdy is this thing? I'd probbaly want to make one 16' long.
","pageUrl":"http://www.instructables.com/id/No-tools-firewood-rack/","id":10,"text":"Looks awesome. Hey this might be a dumb question but do the 2x4's on the bottom move around a lot while stacking? How sturdy is this thing? I'd probbaly want to make one 16' long.","type":"post","parentId":8},{"date":"Fri, 17 Jun 2016 00:00:00 GMT","humanLanguage":"en","author":"JasonM149","authorUrl":"http://www.instructables.com/member/JasonM149","diffbotUri":"post|3|-315829577","html":"
What lies across the bottom are not 2x4's. They are landscaping timbers. They are cheaper than (for me they were) or really close to the same price, but much more sturdy. If you use a 2x4, I would not trust it.
","pageUrl":"http://www.instructables.com/id/No-tools-firewood-rack/","id":11,"text":"What lies across the bottom are not 2x4's. They are landscaping timbers. They are cheaper than (for me they were) or really close to the same price, but much more sturdy. If you use a 2x4, I would not trust it.","type":"post","parentId":10},{"date":"Fri, 17 Jun 2016 00:00:00 GMT","humanLanguage":"en","author":"clasof56","authorUrl":"http://www.instructables.com/member/clasof56","diffbotUri":"post|3|1784448806","html":"
hi jason, you are absolutely correct. the bottom wood is a couple of landscape timbers...nice and solid. and little tweaks like you did with stones is always fun to hear about. no project is ever perfect from the get-go and hearing about changes is always good. thanks and enjoy!
","pageUrl":"http://www.instructables.com/id/No-tools-firewood-rack/","id":12,"text":"hi jason, you are absolutely correct. the bottom wood is a couple of landscape timbers...nice and solid. and little tweaks like you did with stones is always fun to hear about. no project is ever perfect from the get-go and hearing about changes is always good. thanks and enjoy!","type":"post","parentId":10},{"date":"Fri, 17 Jun 2016 00:00:00 GMT","humanLanguage":"en","author":"JasonM149","authorUrl":"http://www.instructables.com/member/JasonM149","diffbotUri":"post|3|2119798146","html":"
Yeah, I filled the holes with stones so the 2x4's would have less give when there wouldn't be a lot of wood stacked on top. Also, this stacks probably about 1.2 chords of wood, when doing a diaganal cut.. My picture, no on this post, but another, is a whole chord.
","pageUrl":"http://www.instructables.com/id/No-tools-firewood-rack/","id":13,"text":"Yeah, I filled the holes with stones so the 2x4's would have less give when there wouldn't be a lot of wood stacked on top. Also, this stacks probably about 1.2 chords of wood, when doing a diaganal cut.. My picture, no on this post, but another, is a whole chord.","type":"post","parentId":10},{"date":"Fri, 17 Jun 2016 00:00:00 GMT","humanLanguage":"en","author":"clasof56","authorUrl":"http://www.instructables.com/member/clasof56","diffbotUri":"post|3|1335399727","html":"
hi andrew...the 2x4's on the ends are just loose until you start stacking wood up against them. the more you stack, the stronger the ends get. on a full rack the ends are really tough and strong, but you can still tap them narrower or wider if you need to move them. if you build this on a stable base, its as strong and stable as any woodrack i have ever seen. i have found that length is no problem at all, in fact i like longer ones and i have a double that works perfectly.
the bottom pieces dont move at all.
","pageUrl":"http://www.instructables.com/id/No-tools-firewood-rack/","id":14,"text":"hi andrew...the 2x4's on the ends are just loose until you start stacking wood up against them. the more you stack, the stronger the ends get. on a full rack the ends are really tough and strong, but you can still tap them narrower or wider if you need to move them. if you build this on a stable base, its as strong and stable as any woodrack i have ever seen. i have found that length is no problem at all, in fact i like longer ones and i have a double that works perfectly. the bottom pieces dont move at all.","type":"post","parentId":10},{"date":"Fri, 17 Jun 2016 00:00:00 GMT","images":[{"naturalHeight":130,"width":150,"diffbotUri":"image|3|350157142","url":"https://cdn.instructables.com/FPR/2C09/IPTZRLHE/FPR2C09IPTZRLHE.SQUARE2.jpg","naturalWidth":130,"height":150}],"humanLanguage":"en","author":"JasonM149","authorUrl":"http://www.instructables.com/member/JasonM149","diffbotUri":"post|3|-1908094178","html":"
Super easy and quick. After I put the 2x4's in I also put stones all around them . Thanks. You saved me hours.
","pageUrl":"http://www.instructables.com/id/No-tools-firewood-rack/","id":15,"text":"Super easy and quick. After I put the 2x4's in I also put stones all around them . Thanks. You saved me hours.","type":"post"},{"date":"Tue, 17 May 2016 00:00:00 GMT","humanLanguage":"en","author":"chelyos","authorUrl":"http://www.instructables.com/member/chelyos","diffbotUri":"post|3|468778905","html":"
This design saved the day! I had one day to build a firewood stacker at my mom's cabin, an argument with her about the shed she wanted, a half hour before the lumber yard closed by the time we sorted it out, and no tools. Now all the wood I split is is safe - thanks so much!
","pageUrl":"http://www.instructables.com/id/No-tools-firewood-rack/","id":16,"text":"This design saved the day! I had one day to build a firewood stacker at my mom's cabin, an argument with her about the shed she wanted, a half hour before the lumber yard closed by the time we sorted it out, and no tools. Now all the wood I split is is safe - thanks so much!","type":"post","parentId":15},{"date":"Tue, 17 May 2016 00:00:00 GMT","humanLanguage":"en","author":"clasof56","authorUrl":"http://www.instructables.com/member/clasof56","diffbotUri":"post|3|239089224","html":"
hi chelyos, so glad you are finding the rack useful for mom. its a fast and permanent solution for sure. thanks for the comment on your experience.
","pageUrl":"http://www.instructables.com/id/No-tools-firewood-rack/","id":17,"text":"hi chelyos, so glad you are finding the rack useful for mom. its a fast and permanent solution for sure. thanks for the comment on your experience.","type":"post","parentId":16},{"date":"Sun, 17 Apr 2016 00:00:00 GMT","humanLanguage":"en","author":"iplus10","authorUrl":"http://www.instructables.com/member/iplus10","diffbotUri":"post|3|1193724368","html":"
This is absolutely brilliant! I bought all the parts from Lowes yesterday and will assemble it today. However, I have a silly question. First off, I'm a new firewood collector, so apologies in advance lol. If I have pieces of wood that are pretty small in diameter, do I still need to split them before burning them in a fireplace?
They are as big as the small ones shown in the pic uploaded in this post: http://cdn.instructables.com/FM4/R8RQ/IE7JB40L/FM4R8RQIE7JB40L.LARGE.jpg
","pageUrl":"http://www.instructables.com/id/No-tools-firewood-rack/","id":18,"text":"This is absolutely brilliant! I bought all the parts from Lowes yesterday and will assemble it today. However, I have a silly question. First off, I'm a new firewood collector, so apologies in advance lol. If I have pieces of wood that are pretty small in diameter, do I still need to split them before burning them in a fireplace? They are as big as the small ones shown in the pic uploaded in this post: http://cdn.instructables.com/FM4/R8RQ/IE7JB40L/FM4R8RQIE7JB40L.LARGE.jpg","type":"post","parentId":15},{"date":"Sun, 17 Apr 2016 00:00:00 GMT","humanLanguage":"en","author":"clasof56","authorUrl":"http://www.instructables.com/member/clasof56","diffbotUri":"post|3|1969979104","html":"
i Iplus10....no, you dont have to split to burn. i used to work hard
splitting but with age have learned. if you look at my stacks you wont
see anything that is split. just give it time to dry. i use
pinelighter...the heart of a pine tree, split into small pieces to start
an oak fire with ease. three or four pieces the size of fat pencils
will start large oak pieces easily. when you stack your wood, its good
to keep one end small stuff and the rest big. then you will have easy
access instead of having the small stuff buried. i cant tell what kind of wood you have there...do you know?
","pageUrl":"http://www.instructables.com/id/No-tools-firewood-rack/","id":19,"text":"i Iplus10....no, you dont have to split to burn. i used to work hard splitting but with age have learned. if you look at my stacks you wont see anything that is split. just give it time to dry. i use pinelighter...the heart of a pine tree, split into small pieces to start an oak fire with ease. three or four pieces the size of fat pencils will start large oak pieces easily. when you stack your wood, its good to keep one end small stuff and the rest big. then you will have easy access instead of having the small stuff buried. i cant tell what kind of wood you have there...do you know?","type":"post","parentId":18},{"date":"Sun, 17 Apr 2016 00:00:00 GMT","humanLanguage":"en","author":"iplus10","authorUrl":"http://www.instructables.com/member/iplus10","diffbotUri":"post|3|-676048362","html":"
I believe that this wood came from a maple tree. It has been sitting outside since November. I was going to move this batch inside the garage today to make room for some more fresh cut wood from my neighbor to put in its place. Is 6-months time enough to season it? I figure it can season some more in the garage over the summer.
","pageUrl":"http://www.instructables.com/id/No-tools-firewood-rack/","id":20,"text":"I believe that this wood came from a maple tree. It has been sitting outside since November. I was going to move this batch inside the garage today to make room for some more fresh cut wood from my neighbor to put in its place. Is 6-months time enough to season it? I figure it can season some more in the garage over the summer.","type":"post","parentId":18},{"date":"Sun, 17 Apr 2016 00:00:00 GMT","humanLanguage":"en","author":"clasof56","authorUrl":"http://www.instructables.com/member/clasof56","diffbotUri":"post|3|1341999598","html":"
hi, if its maple then its nice to burn but hard to split. remember, that to dry and season, the wood needs air circulation. inside a garage might not be the best place for that. there are places online that will tell you how good or bad different woods are for the fireplace. oaks are my favorite but i grab maple when i can as its so hard and does make a nice fire. good luck.
","pageUrl":"http://www.instructables.com/id/No-tools-firewood-rack/","id":21,"text":"hi, if its maple then its nice to burn but hard to split. remember, that to dry and season, the wood needs air circulation. inside a garage might not be the best place for that. there are places online that will tell you how good or bad different woods are for the fireplace. oaks are my favorite but i grab maple when i can as its so hard and does make a nice fire. good luck.","type":"post","parentId":18},{"date":"Sun, 17 Apr 2016 00:00:00 GMT","images":[{"naturalHeight":130,"width":150,"diffbotUri":"image|3|-216067972","url":"https://cdn.instructables.com/FUN/TNI0/INRCLWVE/FUNTNI0INRCLWVE.SQUARE2.jpg","naturalWidth":130,"height":150}],"humanLanguage":"en","author":"iplus10","authorUrl":"http://www.instructables.com/member/iplus10","diffbotUri":"post|3|1534319912","html":"
Sorry, not sure why the link didn't work. Here's a picture of my stack.
","pageUrl":"http://www.instructables.com/id/No-tools-firewood-rack/","id":22,"text":"Sorry, not sure why the link didn't work. Here's a picture of my stack.","type":"post","parentId":18},{"date":"Sun, 17 Apr 2016 00:00:00 GMT","images":[{"naturalHeight":130,"width":150,"diffbotUri":"image|3|305347010","url":"https://cdn.instructables.com/FMX/T392/INOW2OPW/FMXT392INOW2OPW.SQUARE2.jpg","naturalWidth":130,"height":150}],"humanLanguage":"en","author":"lovinlocust","authorUrl":"http://www.instructables.com/member/lovinlocust","diffbotUri":"post|3|922933231","html":"
It took me some time to get this project started but I found all of the material at my home and on the farm, I also found and cut my own pieces to put vertical to help with support. Thanks again for the awesome idea and look forward to adding onto my stack
","pageUrl":"http://www.instructables.com/id/No-tools-firewood-rack/","id":23,"text":"It took me some time to get this project started but I found all of the material at my home and on the farm, I also found and cut my own pieces to put vertical to help with support. Thanks again for the awesome idea and look forward to adding onto my stack","type":"post"},{"date":"Sun, 17 Apr 2016 00:00:00 GMT","humanLanguage":"en","author":"clasof56","authorUrl":"http://www.instructables.com/member/clasof56","diffbotUri":"post|3|444174597","html":"
yeah man, nice start for sure. glad you like it. i will be out chainsawing today.
","pageUrl":"http://www.instructables.com/id/No-tools-firewood-rack/","id":24,"text":"yeah man, nice start for sure. glad you like it. i will be out chainsawing today.","type":"post","parentId":23},{"date":"Thu, 17 Mar 2016 00:00:00 GMT","humanLanguage":"en","author":"lovinlocust","authorUrl":"http://www.instructables.com/member/lovinlocust","diffbotUri":"post|3|600620371","html":"
I love this and was wondering if you could make this as long as you need. I was thinking about making this 25/30ft long, just use some of the 2x4's in the middle to strengthen it?
","pageUrl":"http://www.instructables.com/id/No-tools-firewood-rack/","id":25,"text":"I love this and was wondering if you could make this as long as you need. I was thinking about making this 25/30ft long, just use some of the 2x4's in the middle to strengthen it?","type":"post","parentId":23},{"date":"Thu, 17 Mar 2016 00:00:00 GMT","humanLanguage":"en","author":"clasof56","authorUrl":"http://www.instructables.com/member/clasof56","diffbotUri":"post|3|-2119147055","html":"
hi lovinlocust, i would think that length is no problem. several of the people who have built this have put up pics showing longer racks. as long as you have a good base to put it on and stack your wood straight, then a double or triple or quad should be fine. i think one builder did a quad.
","pageUrl":"http://www.instructables.com/id/No-tools-firewood-rack/","id":26,"text":"hi lovinlocust, i would think that length is no problem. several of the people who have built this have put up pics showing longer racks. as long as you have a good base to put it on and stack your wood straight, then a double or triple or quad should be fine. i think one builder did a quad.","type":"post","parentId":25},{"date":"Thu, 17 Mar 2016 00:00:00 GMT","humanLanguage":"en","author":"lovinlocust","authorUrl":"http://www.instructables.com/member/lovinlocust","diffbotUri":"post|3|1339435912","html":"
Thanks I am going to get started as soon I can get the material needed. I have been thinking of ideas for stacking in the timber where i cut my wood and just leave it there stacked and covered. This is the best and cheapest method I have came across..
","pageUrl":"http://www.instructables.com/id/No-tools-firewood-rack/","id":27,"text":"Thanks I am going to get started as soon I can get the material needed. I have been thinking of ideas for stacking in the timber where i cut my wood and just leave it there stacked and covered. This is the best and cheapest method I have came across..","type":"post","parentId":25},{"date":"Wed, 17 Feb 2016 00:00:00 GMT","images":[{"naturalHeight":130,"width":150,"diffbotUri":"image|3|-1672543390","url":"https://cdn.instructables.com/FFT/G8YJ/IKZQ5Y9Z/FFTG8YJIKZQ5Y9Z.SQUARE2.jpg","naturalWidth":130,"height":150}],"humanLanguage":"en","author":"PeterL121","authorUrl":"http://www.instructables.com/member/PeterL121","diffbotUri":"post|3|-869551852","html":"
What an amazing idea. Thank you so much for this. It def took longer to stack the firewood than putting it together.
","pageUrl":"http://www.instructables.com/id/No-tools-firewood-rack/","id":28,"text":"What an amazing idea. Thank you so much for this. It def took longer to stack the firewood than putting it together.","type":"post"},{"date":"Wed, 17 Feb 2016 00:00:00 GMT","humanLanguage":"en","author":"mattandlisa","authorUrl":"http://www.instructables.com/member/mattandlisa","diffbotUri":"post|3|-383802399","html":"
My wife and I made this rack out of lumber around the house! So easy and fast to put together. We even got two other projects done today! Great thinking on this one! Cheers!
","pageUrl":"http://www.instructables.com/id/No-tools-firewood-rack/","id":29,"text":"My wife and I made this rack out of lumber around the house! So easy and fast to put together. We even got two other projects done today! Great thinking on this one! Cheers!","type":"post","parentId":28},{"date":"Wed, 17 Feb 2016 00:00:00 GMT","humanLanguage":"en","author":"clasof56","authorUrl":"http://www.instructables.com/member/clasof56","diffbotUri":"post|3|90445962","html":"
ah yes, the old "run what you brung"...hahha its always nice to be able to repurpose stuff thats just laying around and make it useful. glad you are enjoying your new rack.
","pageUrl":"http://www.instructables.com/id/No-tools-firewood-rack/","id":30,"text":"ah yes, the old "run what you brung"...hahha its always nice to be able to repurpose stuff thats just laying around and make it useful. glad you are enjoying your new rack.","type":"post","parentId":29},{"date":"Sun, 17 Jan 2016 00:00:00 GMT","images":[{"naturalHeight":130,"width":150,"diffbotUri":"image|3|2114610408","url":"https://cdn.instructables.com/FYD/AL6I/IKBFMQ9S/FYDAL6IIKBFMQ9S.SQUARE2.jpg","naturalWidth":130,"height":150}],"humanLanguage":"en","author":"TimP64","authorUrl":"http://www.instructables.com/member/TimP64","diffbotUri":"post|3|1914671425","html":"
Great firewood rack. I spent $17.10 on 2/06/16 and made it in less than ten minutes, it took longer to move the wood.
","pageUrl":"http://www.instructables.com/id/No-tools-firewood-rack/","id":31,"text":"Great firewood rack. I spent $17.10 on 2/06/16 and made it in less than ten minutes, it took longer to move the wood.","type":"post"},{"date":"Sun, 17 Jan 2016 00:00:00 GMT","humanLanguage":"en","author":"clasof56","authorUrl":"http://www.instructables.com/member/clasof56","diffbotUri":"post|3|82378324","html":"
hi Tim, looks like a perfect rack to me. nice job. glad you are finding it useful.
","pageUrl":"http://www.instructables.com/id/No-tools-firewood-rack/","id":32,"text":"hi Tim, looks like a
perfect rack to me. nice job. glad you are finding it useful.","type":"post","parentId":31},{"date":"Sun, 17 Jan 2016 00:00:00 GMT","humanLanguage":"en","author":"k0wens","authorUrl":"http://www.instructables.com/member/k0wens","diffbotUri":"post|3|-216092506","html":"
You said that sometimes the ground will become unstable and the rack will lean. Ever had one completely fall over? The most convenient place for my wood rack has it right up against a wood fence. A concern for any wood rack, store bought or otherwise, is it toppling over and causing property damage.
","pageUrl":"http://www.instructables.com/id/No-tools-firewood-rack/","id":33,"text":"You said that sometimes the ground will become unstable and the rack will lean. Ever had one completely fall over? The most convenient place for my wood rack has it right up against a wood fence. A concern for any wood rack, store bought or otherwise, is it toppling over and causing property damage.","type":"post","parentId":31},{"date":"Sun, 17 Jan 2016 00:00:00 GMT","humanLanguage":"en","author":"clasof56","authorUrl":"http://www.instructables.com/member/clasof56","diffbotUri":"post|3|-1048558502","html":"
hi Kowens, no, i have never had a rack fall over. but it all depends on what kind of surface you are building your rack on. if the surface is soft and spongey, then you might need to toughen it up with some gravel or whatever. sometimes at the end of a season, one of my racks might have a little lean to it. but then i just put some sand or gravel under it to level it and go from there. but overall, its a really maintenance free set up. good luck.
","pageUrl":"http://www.instructables.com/id/No-tools-firewood-rack/","id":34,"text":"hi Kowens, no, i have never had a rack fall over. but it all depends on what kind of surface you are building your rack on. if the surface is soft and spongey, then you might need to toughen it up with some gravel or whatever. sometimes at the end of a season, one of my racks might have a little lean to it. but then i just put some sand or gravel under it to level it and go from there. but overall, its a really maintenance free set up. good luck.","type":"post","parentId":33},{"date":"Sun, 17 Jan 2016 00:00:00 GMT","humanLanguage":"en","author":"k0wens","authorUrl":"http://www.instructables.com/member/k0wens","diffbotUri":"post|3|2070035748","html":"
Thanks for the quick reply! If I had a perfectly flat area that wasn't my driveway or my deck, I wouldn't have come across this in the first place! Whatever I go with is going on the, currently, cold hard ground. I had purchased a metal rack from a hardware store, but realized that once I loaded the wood.. it was going to sink. On top of the initial cost, I was going to have to invest in some pavers to put it on. Concern about them cracking under the weight lead to a pretty brief Google search right here! I think I can counter a bit of the leveling issues/bowing of the timbers by adding more cinder blocks for support. It's the theory I'm running with, anyway! Thanks, again!
","pageUrl":"http://www.instructables.com/id/No-tools-firewood-rack/","id":35,"text":"Thanks for the quick reply! If I had a perfectly flat area that wasn't my driveway or my deck, I wouldn't have come across this in the first place! Whatever I go with is going on the, currently, cold hard ground. I had purchased a metal rack from a hardware store, but realized that once I loaded the wood.. it was going to sink. On top of the initial cost, I was going to have to invest in some pavers to put it on. Concern about them cracking under the weight lead to a pretty brief Google search right here! I think I can counter a bit of the leveling issues/bowing of the timbers by adding more cinder blocks for support. It's the theory I'm running with, anyway! Thanks, again!","type":"post","parentId":33},{"date":"Thu, 17 Dec 2015 00:00:00 GMT","images":[{"naturalHeight":130,"width":150,"diffbotUri":"image|3|573618918","url":"https://cdn.instructables.com/FF8/SXDW/IJ1RRJQ3/FF8SXDWIJ1RRJQ3.SQUARE2.jpg","naturalWidth":130,"height":150}],"humanLanguage":"en","author":"hhhhhhmm","authorUrl":"http://www.instructables.com/member/hhhhhhmm","diffbotUri":"post|3|-909489101","html":"
Very cool, modified it since we had pipes for the bottom, but your example was it, thanks!
","pageUrl":"http://www.instructables.com/id/No-tools-firewood-rack/","id":36,"text":"Very cool, modified it since we had pipes for the bottom, but your example was it, thanks!","type":"post"},{"images":[{"naturalHeight":130,"width":150,"diffbotUri":"image|3|982014934","url":"https://cdn.instructables.com/FHQ/7MKK/IHKYJQAJ/FHQ7MKKIHKYJQAJ.SQUARE2.jpg","naturalWidth":130,"height":150}],"humanLanguage":"en","author":"britishrob","authorUrl":"http://www.instructables.com/member/britishrob","diffbotUri":"post|3|796848595","html":"
Thanks for the great, simple design for not a lot of money....
hi Britishrob and Snowberry, glad you tried it...have a happy burning season.
","pageUrl":"http://www.instructables.com/id/No-tools-firewood-rack/","id":38,"text":"hi Britishrob and Snowberry, glad you tried it...have a happy burning season.","type":"post","parentId":37},{"humanLanguage":"en","author":"Snowberry","authorUrl":"http://www.instructables.com/member/Snowberry","diffbotUri":"post|3|-345940876","html":"
Wow excellent idea, used a similar idea with pallets, but your method makes more sense. Will be using this for my selling wood next year. Thanks
","pageUrl":"http://www.instructables.com/id/No-tools-firewood-rack/","id":39,"text":"Wow excellent idea, used a similar idea with pallets, but your method makes more sense. Will be using this for my selling wood next year. Thanks","type":"post","parentId":37},{"images":[{"naturalHeight":130,"width":150,"diffbotUri":"image|3|-1306259502","url":"https://cdn.instructables.com/F1Z/TA83/IGWO2ULN/F1ZTA83IGWO2ULN.SQUARE2.jpg","naturalWidth":130,"height":150}],"humanLanguage":"en","author":"caseyholycross","authorUrl":"http://www.instructables.com/member/caseyholycross","diffbotUri":"post|3|-50354661","html":"
Simple, affordable, and way better than some sheet metal assembly that is way too flimsy. Plus, in a year or two, it'll blend right in with my weathered fence. Thanks for sharing!
","pageUrl":"http://www.instructables.com/id/No-tools-firewood-rack/","id":40,"text":"Simple, affordable, and way better than some sheet metal assembly that is way too flimsy. Plus, in a year or two, it'll blend right in with my weathered fence. Thanks for sharing!","type":"post"},{"humanLanguage":"en","author":"clasof56","authorUrl":"http://www.instructables.com/member/clasof56","diffbotUri":"post|3|528374836","html":"
yeah man, glad you are giving it a try..its easy, solid and gets stronger as you add wood to it.
","pageUrl":"http://www.instructables.com/id/No-tools-firewood-rack/","id":41,"text":"yeah man, glad you are giving it a try..its easy, solid and gets stronger as you add wood to it.","type":"post","parentId":40},{"humanLanguage":"en","author":"Heathenlife501","authorUrl":"http://www.instructables.com/member/Heathenlife501","diffbotUri":"post|3|1634633784","html":"
Wow! Very impressive! I bought a metal rack, about 10 years ago when I bought my house, but I don't think it will last much longer. Will definitely give this a try. Love the idea!
","pageUrl":"http://www.instructables.com/id/No-tools-firewood-rack/","id":42,"text":"Wow! Very impressive! I bought a metal rack, about 10 years ago when I bought my house, but I don't think it will last much longer. Will definitely give this a try. Love the idea!","type":"post","parentId":40},{"humanLanguage":"en","author":"One_Man-J","authorUrl":"http://www.instructables.com/member/One_Man-J","diffbotUri":"post|3|965959443","html":"
So I have a full cord of wood arriving soon and wanted to ask how many of these will I need to hold the entire cord of wood?
","pageUrl":"http://www.instructables.com/id/No-tools-firewood-rack/","id":43,"text":"So I have a full cord of wood arriving soon and wanted to ask how many of these will I need to hold the entire cord of wood?","type":"post","parentId":40},{"humanLanguage":"en","author":"clasof56","authorUrl":"http://www.instructables.com/member/clasof56","diffbotUri":"post|3|-878017392","html":"
hi one man...since a face cord of wood is 2x4x8...one rack should get er done...or very close.
","pageUrl":"http://www.instructables.com/id/No-tools-firewood-rack/","id":44,"text":"hi one man...since a face cord of wood is 2x4x8...one rack should get er done...or very close.","type":"post","parentId":43},{"images":[{"naturalHeight":130,"width":150,"diffbotUri":"image|3|-1953896172","url":"https://cdn.instructables.com/F0G/HSC7/IG5EDTSS/F0GHSC7IG5EDTSS.SQUARE2.jpg","naturalWidth":130,"height":150},{"naturalHeight":130,"width":150,"diffbotUri":"image|3|468424270","url":"https://cdn.instructables.com/F69/K2M4/IG5EDTST/F69K2M4IG5EDTST.SQUARE2.jpg","naturalWidth":130,"height":150}],"humanLanguage":"en","author":"Sue-AnnH","authorUrl":"http://www.instructables.com/member/Sue-AnnH","diffbotUri":"post|3|-622353992","html":"
Thank you for the information. I (a 61-year old woman) was able to make a firewood rack, using your instructions. I spent $17.20 at Lowes. I already had sand to help level it and the concrete blocks, so all I needed was the 2x4s and the landscape timbers. So much cheaper than buying a metal one that may or may not last past one season.
","pageUrl":"http://www.instructables.com/id/No-tools-firewood-rack/","id":45,"text":"Thank you for the information. I (a 61-year old woman) was able to make a firewood rack, using your instructions. I spent $17.20 at Lowes. I already had sand to help level it and the concrete blocks, so all I needed was the 2x4s and the landscape timbers. So much cheaper than buying a metal one that may or may not last past one season.","type":"post"},{"humanLanguage":"en","author":"clasof56","authorUrl":"http://www.instructables.com/member/clasof56","diffbotUri":"post|3|-1326646120","html":"
hi sue-ann, looks like a good job to me! and i see your helper checking everything twice...hahah. i never have had any of mine wear out over many years. i have ten of them going now so am ready for winter...and now you too!!
","pageUrl":"http://www.instructables.com/id/No-tools-firewood-rack/","id":46,"text":"hi sue-ann, looks like a good job to me! and i see your helper checking everything twice...hahah. i never have had any of mine wear out over many years. i have ten of them going now so am ready for winter...and now you too!!","type":"post","parentId":45},{"humanLanguage":"en","author":"Sue-AnnH","authorUrl":"http://www.instructables.com/member/Sue-AnnH","diffbotUri":"post|3|-2065440451","html":"
Living in Florida, this will probably last me more than a year. I have a fire pit and a fireplace. We do a fire on the Wednesday before Thanksgiving, so this will be easy to get to the wood.
I had Lowes cut the 2 x 4s (10 feet long) in half, but they would not make a 45 degree cut. I told him it wasn't a deal breaker.
Now I will have to get a tarp and figure out how to keep it on, since we get a little wind.
Thank you so much for posting the instructions as I was able to do it myself, and it was so much cheaper than purchasing a metal one.
","pageUrl":"http://www.instructables.com/id/No-tools-firewood-rack/","id":47,"text":"Living in Florida, this will probably last me more than a year. I have a fire pit and a fireplace. We do a fire on the Wednesday before Thanksgiving, so this will be easy to get to the wood. I had Lowes cut the 2 x 4s (10 feet long) in half, but they would not make a 45 degree cut. I told him it wasn't a deal breaker. Now I will have to get a tarp and figure out how to keep it on, since we get a little wind.
Thank you so much for posting the instructions as I was able to do it myself, and it was so much cheaper than purchasing a metal one.","type":"post","parentId":45},{"humanLanguage":"en","author":"clasof56","authorUrl":"http://www.instructables.com/member/clasof56","diffbotUri":"post|3|1485351645","html":"
hi sue-ann. yes, keeping a tarp on in some wind is tricky. what i do works really well and lasts forever. get 4 holed bricks at lowes...you know, the bricks with three holes thru them...take a piece of light rope and tie between 2 bricks with about three feet of rope in between. make two sets. put tarp on pile and drape line over tarp with brick hanging on each side and line holding down tarp. one set on each end just inside each 2x4. works great even in high winds. bricks are cheap, heavy enough to work well, and light enough to move or remove easlily. i find that a tarp that covers and hangs down each side about six inches is all you need and lets the pile dry well. if you put one taller piece of wood on top center of pile, the tarp will angle down from that to each end and drain rain. good luck and you did good!
","pageUrl":"http://www.instructables.com/id/No-tools-firewood-rack/","id":48,"text":"hi sue-ann. yes, keeping a tarp on in some wind is tricky. what i do works really well and lasts forever. get 4 holed bricks at lowes...you know, the bricks with three holes thru them...take a piece of light rope and tie between 2 bricks with about three feet of rope in between. make two sets. put tarp on pile and drape line over tarp with brick hanging on each side and line holding down tarp. one set on each end just inside each 2x4. works great even in high winds. bricks are cheap, heavy enough to work well, and light enough to move or remove easlily. i find that a tarp that covers and hangs down each side about six inches is all you need and lets the pile dry well. if you put one taller piece of wood on top center of pile, the tarp will angle down from that to each end and drain rain. good luck and you did good!","type":"post","parentId":45},{"images":[{"naturalHeight":130,"width":150,"diffbotUri":"image|3|2064002476","url":"https://cdn.instructables.com/F7X/1A0T/IG3Z07MQ/F7X1A0TIG3Z07MQ.SQUARE2.jpg","naturalWidth":130,"height":150},{"naturalHeight":130,"width":150,"diffbotUri":"image|3|-2144849792","url":"https://cdn.instructables.com/FXB/TID5/IG3Z07MR/FXBTID5IG3Z07MR.SQUARE2.jpg","naturalWidth":130,"height":150},{"naturalHeight":130,"width":150,"diffbotUri":"image|3|547660994","url":"https://cdn.instructables.com/FLB/REWB/IG3Z07NH/FLBREWBIG3Z07NH.SQUARE2.jpg","naturalWidth":130,"height":150},{"naturalHeight":130,"width":150,"diffbotUri":"image|3|385183704","url":"https://cdn.instructables.com/F9R/42O1/IG3Z07O1/F9R42O1IG3Z07O1.SQUARE2.jpg","naturalWidth":130,"height":150},{"naturalHeight":130,"width":150,"diffbotUri":"image|3|849259174","url":"https://cdn.instructables.com/FVD/6JCG/IG3Z07OC/FVD6JCGIG3Z07OC.SQUARE2.jpg","naturalWidth":130,"height":150}],"humanLanguage":"en","author":"RayP15","authorUrl":"http://www.instructables.com/member/RayP15","diffbotUri":"post|3|1873033687","html":"
Excellent design and thanks for the great idea Clasof56! I modified your dimensions to fit a half chord that had to stay below a 32" high railing on my apartment deck (grumpy landlord). I ended up only needing four 2"x4"x12' s (split in halves to form four 6' beams) and one 2"x4"x10' s (quartered to have four 30" arms), and three cinder blocks. I purchased them all at Home Depot for around $25. I then hung two tarps on the side of the railing, stacked the wood and the covered with the tarp. Originally I had purchased and set this up for a full chord (doubling the above) but decided on a half chord. So I used some of the leftover 2x4's to hold the tarp down on the deck.
","pageUrl":"http://www.instructables.com/id/No-tools-firewood-rack/","id":49,"text":"Excellent design and thanks for the great idea Clasof56! I modified your dimensions to fit a half chord that had to stay below a 32" high railing on my apartment deck (grumpy landlord). I ended up only needing four 2"x4"x12' s (split in halves to form four 6' beams) and one 2"x4"x10' s (quartered to have four 30" arms), and three cinder blocks. I purchased them all at Home Depot for around $25. I then hung two tarps on the side of the railing, stacked the wood and the covered with the tarp. Originally I had purchased and set this up for a full chord (doubling the above) but decided on a half chord. So I used some of the leftover 2x4's to hold the tarp down on the deck.","type":"post"}],"tags":[{"score":0.64,"count":1,"label":"Firewood","uri":"http://dbpedia.org/resource/Firewood"}],"participants":23},"type":"article","title":"Firewood rack using no tools","tags":[{"score":0.78,"count":3,"label":"Wood","uri":"http://dbpedia.org/resource/Wood","rdfTypes":["http://www.w3.org/2002/07/owl#Thing"]},{"score":0.65,"count":3,"label":"Firewood","uri":"http://dbpedia.org/resource/Firewood"},{"score":0.58,"count":2,"label":"Tool","uri":"http://dbpedia.org/resource/Tool","rdfTypes":["http://www.w3.org/2002/07/owl#Thing"]}],"humanLanguage":"en","pageUrl":"http://www.instructables.com/id/No-tools-firewood-rack/","html":"
Building a no-tools-needed firewood rack
A stable, strong, easily-movable, cheap firewood rack is a thought-provoking project. This is what i have used for years and it works extremely well.
It easily holds a face-cord of heavy, wet wood with no problem and is very stable.
This is what you need:
2 or 3 concrete blocks
2 landscape timbers
2 2x4s - 8 or 10 footers cut in half.
total material cost about 20 bucks
I think the pics say it all but some tips:
- place 2 concrete blocks holes up on a stable surface, 3 if support needed in center (not often).
- place timbers across outside edges of blocks with all width of each timber completely on block.
- place 2x4 uprights in holes in blocks. If on dirt put a few
small rocks or pebbles in holes first to help drain water from 2x4' ends.
- its designed so the 2x4's are leaning out at the top. it's
very strong like this. if you find the 2x4s are spread too wide, you
can tap them closer together on a full rack as there is not that much weight on them. the last pic shows my new double rack. one more block but 4 less 2x4 pieces and stronger because of center blocks. if you enlarge the last pic, you can really see how much weight this set-up will hold. and i could put a lot more on it but its over my head..hahah
If you have any doubts about whether or not this works like i say, just read a few comments from other members, real people just telling it like it is.
I cut a piece of plastic tarp about 4' wide and 10' long to cover wood... i take a couple of holed bricks and tie light 3' rope from one to the other and lay over tarped ends to keep tarp on in wind. all of this works really well together. rack gets stronger with more wood and is very stable. everything comes apart to move to another spot or put in storage (or use for other projects). Rack is high enough off ground to blow leaves from underneath or spray for bugs. Its nice to be able to easily move a woodrack as sometimes the ground under it becomes unstable and the rack will lean. Or sometimes you just find a better place and moving individual pieces is so much easier than moving the whole rack at once. One more thought: if you use 8' 2x4s, if you cut them in half at a 45 degree angle, you get more length and also the angle will help them drain at the top.
Anyway, once you have set this rack up and used it a bit, its one of those things that you just grin each time you look at it and wish other things you make would work as well. Enjoy
Original article and pictures take http://www.instructables.com/id/No-tools-firewood-rack/ site


![Picture of 12688101_1125488074141893_6248429029368897999_n[1].jpg](https://cdn.instructables.com/FYD/AL6I/IKBFMQ9S/FYDAL6IIKBFMQ9S.LARGE.jpg)


