When you think of a British garden shed, it’s easy to picture something that’s ultra traditional, however, as you can see, this particular unit defies convention. Looking like the cross between a greenhouse and a motor home, this bizarre British garden shed is much more than just neat.
The Ship Shed
If there’s something about this next shed that looks strangely familiar, yet you can’t quite put your finger on it, keep looking – see it yet? Believe it or not, someone has re-purposed the front half of a boat in making it a most unique (yet functional) backyard garden shed. Very cool.
The Reclaimed Wood Shed
Speaking of up-cycled products becoming garden sheds, this unit might not be as eccentric as a re-purposed bow of a boat, however, the mixture of multi-colored recycled woods gives it an extremely charming presence that makes it all kinds of neat.
Shed Some Light
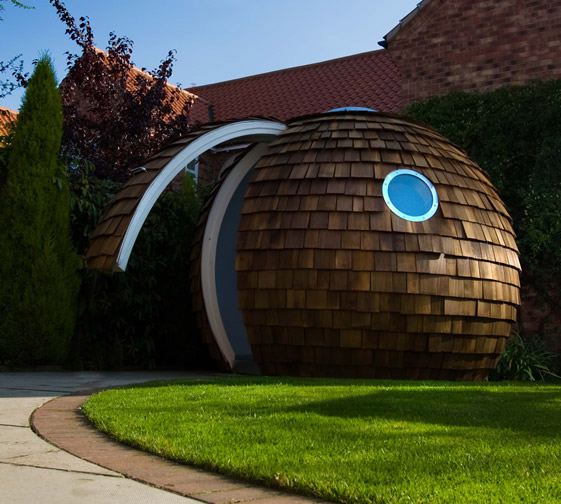
Although this might not be the most shocking garden shed on the block, one thing is for sure, there is absolutely no lack of character in this lighthearted (light-hearted?) structure. Between the bold and bright colors, the clean lines and the angled roof that appears to be all glass (for added light), this neat shed is unassumingly grand.
The Tire Shed
Making the list as another of the garden sheds made from up-cycled materials, this backyard bunker was constructed from recycled car tires! While lumber was likely used to construct the shed’s frame, as you can see in the picture, it is strips of
rubber tires that complete the entire exterior. Pretty wild!
The Guest Shed
Believe it or not, this is not a high-priced home; this is the garden shed of a high-priced home. Considering the fact that this particular unit is nicer than most homes across the world, we wouldn’t be surprised if this spiffy garden shed had its own guest shed.
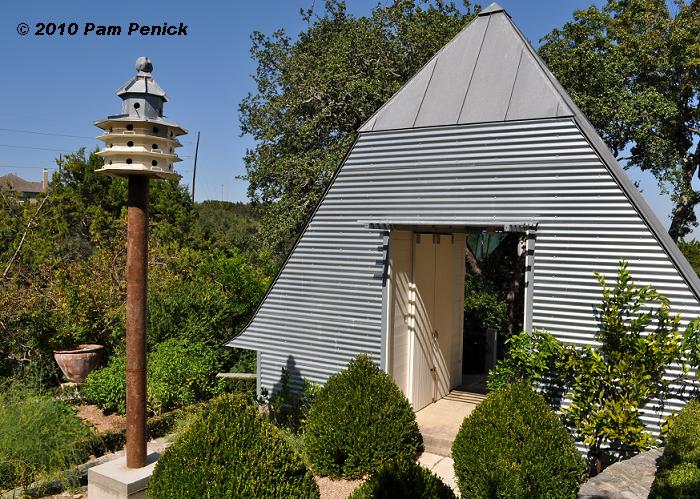
The Pyramid Shed
Although the name of this particular shed might not be the most creative (what else would you call it?), the shed itself is ultra unique. Of course, based on the lush green landscape that surrounds this bizarre fixture, it’s no surprise that the owner took extreme pride in their garden shed, as well as, the garden itself.
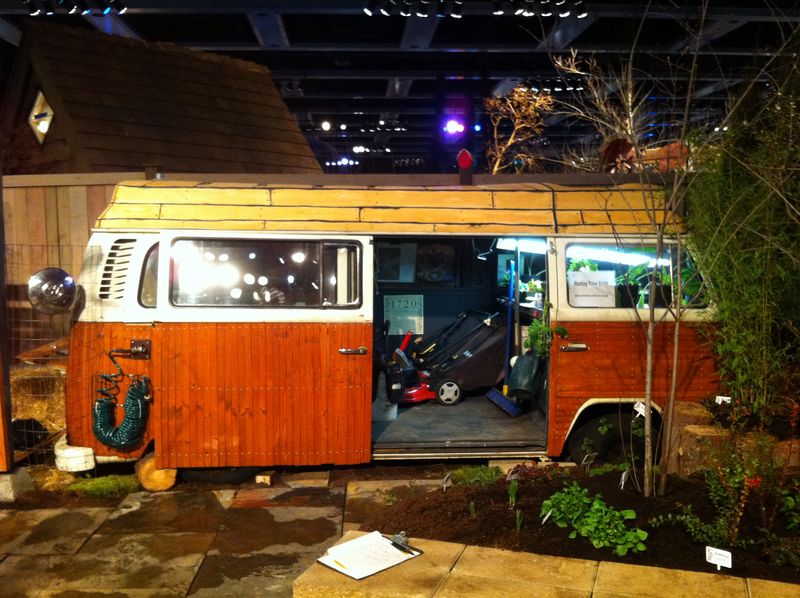
The VW Shed
Perhaps the most unique re-purposing of all is this old-school Volkswagen bus turned into a backyard garden shed. Of course, with four walls already built and a sliding door already in place, it didn’t take much effort; however, this is still an extremely funky garden shed that’s every bit of neat.
The Neatest of the Neat
While the other sheds on this list have earned the description of “neat” because of their creative wow factor, this simple shed deserves the same description because it is neatly organized. Although the other sheds might look cool on the outside, chances are good that the insides are the same as any other garden shed across the world – cluttered. Not this neat one!
Start by gathering vinegar and baking soda from your pantry. You can also pick up some essential oil to add a fresh touch. Then, head on over to that dingy, dirty toilet...
Gross, right? I"m embarrassed to even show it to you, but you need to see how it started to appreciate how awesome this homemade cleaner actually is.
Step 1: Spray in Vinegar
I poured my vinegar into an empty spray bottle so it would be easier to get at all the nooks and crannies of the toilet . I didn"t want to have to dive in there, so this was a much more "hands-off" cleaning method.
Once my bottle was ready to go, I gave the dirty bowl a few strong squirts, covering every grimy angle.
Step 2: Add Drops of Essential Oil
Technically, I didn"t have to do this step since it"s not needed for the cleaning process, but boy, does it smell nice! I like using lavender, tea rose, or any citrus scent for a really fresh and clean smell.
Step 3: Sprinkle in Baking Soda
Next, I sprinkled 2 tablespoons of baking
soda around the walls of the toilet bowl. That was enough for my mess, but be as liberal as necessary with your baking soda.
Get ready for bubbles! Once the baking soda hit the vinegar, my toilet bowl started fizzing and breaking down the nasty build-up all by itself! For a really stubborn stain, you may have to let it sit for a few minutes, or repeat steps 1 and 3. If you leave it for an hour, it will even take off the lime scale!
Step 4: Brush Away Loose Grime
A light scrubbing with a toilet brush knocked off the loosened build-up that wasn"t washing away on its own. I really just added this step for good measure, but most of the time you won"t even need to scrub.
Step 5: Flush!
After that, I just tapped the flusher and watched all my sorrows (and the gross toilet build-up) wash away!
This homemade cleaner is seriously the best toilet bowl cleaner I have ever used. Call me crazy, but I think few things make you feel as accomplished as seeing your sparkling clean toilet bowl. Ahhhh!
Original article and pictures take http://www.hometalk.com/17250743/green-toilet-bowl-cleaner?utm_source="pinterest&utm_campaign=emlt&utm_medium=brand&date=20161027" site
The photo below depicts a rare specimen who"s stake has survived a whopping three years. This is akin to a 300 year-old Galapagos tortoise. The problem of premature breakage and lost spikes has plagued all but the remotest and most forgotten of our lights.
Don"t like where you put that light? Want to move it, do you? Well here"s your shaft, but the spike stays in the ground!
Not watching where you"re going? Leg brushed up against the light? That"ll be a broken spike!
Dogs got into your garden? Ran into one of the lights? You better believe that spike"s a goner!
To sum up: Lights: good. Spikes: cheap Chinese crap.
Between the Mostly Excellent Light and the Spike of Counted Sorrows lies the Shaft of Mediocrity. Meh, it doesn"t care one way or the other if it lasts three days or three years. It sits there in the ground, mostly good, but then it may decide to crack or split or calve off a rounded bit of itself like a Greenland glacier birthing icebergs in summer.
Between our squirrel-mad dogs rampaging through the landscaping and my oafish galumphing, it"s a wonder any spikes survived
. However, those few unlucky survivors were quickly and efficiently dispatched during Handan"s frequent and unpredictable changes-of-heart concerning design elements and lighting placement.
Last year, Handan suggested I fashion new spikes from cedar to replace the lost Spikes of Inferiority. Down into my lair I went and returned with enough cedar stakes to slay several platoons of vampires. But the undead would have to wait, as these spikes were for the soil, not cold, unbeating hearts.
They worked well...for a year. But this year, a few of them started to snap when we moved them. Mostly though, they remained strong and resolute - so much so that the Shafts of Mediocrity began to shatter like the adolescent delusions of young adults entering the real world after two decades of moonbeams and snowflakes.
With the Pond Project in full swing this year, we needed a solution. As always, Handan hit upon the answer while I was off chasing bugs and chuckling like a dunderhead. Her idea was to get a few cedar 4x4s and cut them into 4 inch cubes. Let me clarify: her idea was for *me* to get a few cedar 4x4s and for *me* to cut them into 4 inch cubes.
Next I needed to drill holes into the tops of the cubes into which the lights would fit. I measured the diameter of the protrusion at the bottom of one of the lights: 11/16 inch. Really? This kind of drilling is best done with Forstner bits - and I have two full sets of them, ranging from 1/4 inch up to 1 1/2 inches. But guess which size I didn"t have? That"s right! Gold star for you! I didn"t have 11/16 inch, so off to Amazon I went and ordered one. When it arrived, I got to work. I used my drill press and set up stop blocks, so I could quickly position each piece. I set a vacuum just above the piece, since Forstner bits create whole ecosystems of wood shavings and debris. Then I drilled the cedar blocks, having set the depth of the drill press to the length of the protrusion at the base of the lights.
When they were all cut and drilled, I thought we were ready to go depositing them around the garden. I was mistaken.
Handan wanted me to stain the blocks, but as I am inherently lazy, I immediately countered her request by telling her how cool and New Englandy the blocks would look after a year in the elements. She was having none of it. Back into the dungeon I went, can of Minwax Dark Walnut stain in hand. Sometime later, I emerged from the vapors with stained blocks. I had to admit she was right about that. [Ha! I am always right! -Handan]
I then got to work building the pillars. I made groups of four and glued them together.
Then I stained them in the same manner as the blocks.
When the stain had dried, we were ready to give them their lights and place them in the garden, but before we get to that, I want to tell you about another problem these lights suffer from: solar panel degradation. Since the panels are made of plastic, after one year in the elements, the plastic begins to haze. After two or three years, the plastic yellows and warps. This cuts down on the solar cells" ability to gather light and charge the batteries, since the yellowed plastic is blocking a lot of usable sunlight.
I had read some posts online about people using clear nail polish to refresh the solar panel, but I wanted to experiment further. I tested acetone, cheap nail polish, expensive nail polish and glossy lacquer.
I don"t have enough photo space here on Hometalk to show all of the tests, but you can click over to our blog post to see the full results.
After the solar panels were refreshed and we had put all the lights into their cubes, Handan placed them around the garden...
Original article and pictures take http://www.hometalk.com/18074666/diy-cedar-cube-landscape-lights site
Over the past few months, I have been inundated with emails about my potting shed. Most people want to know where they could purchase the same kit. When I explain that the shed is Joe’s original design, they want specifics.
So with a lot of help from Joe, here is a post that has been a long time coming. Additional photos and information can be found in “The Potting Shed” tab above.
Before there was a potting shed, there was me — on a mission to start seeds in advance of the planting season, and Joe — on a mission to reclaim the kitchen and dining room from trays and flats of new sprouts. Surveying my long and leggy seedlings, I said, “If I had a potting shed, I’d be dangerous.”
Little did I know that that sentence, a seed traveling on waves of sound, would eventually settle into one of the folds of Joe’s brain, taking root and springing into action.
With a strong sense of style and design, plus an uncanny ability to think and analyze and see in 3-D, multiplied by math skills, Joe began to fill pages and pages of a legal pad with his ideas. If it were up to me, I probably would have purchased one of those greenhouses sold in catalogs. Joe, on the other hand, envisioned a shed that would not only blend with the style of the house, but one that would be beautiful by itself.
One thing that we learned early on is that when designing a potting shed, it’s very easy to get carried away with wants overtaking needs. There are toys and gadgets for every aspect of greenhouse gardening, but our primary need was to have a place that allowed me to start seeds, as well as a place that could hold yard tools and pool supplies. Once we figured out other necessities, it was time to build.
The Location:
Using the parameters set out by our local municipality, we placed the shed in a corner of the backyard, a corner that had full access to southern exposure — an essential element during the winter months when young seedlings need light.
The Floor Plan:
The shed roughly measures 10’ x 10’. As you open the door, you are standing in the shed area, where there is room for the lawn mower and an assortment of
yard tools hanging on the walls. Above this area is the loft, where we store pool supplies and terra cotta pots over the winter. The shed side. The loft space above the shed area.
On the left side is the potting area. This area is partly under a covered roof (the north side) and glass (the south side). In this area, you will find my potting bench and shelves filled with plastic pots and trays for seed starting.
The potting side.
This area is also where the front of the shed bumps out, an area that is completely under glass. A piece of white lattice acts as a low table for holding flats of seedlings. Beneath this lattice is a bed of rocks, which helps with drainage after watering the new plants.
The seed starting area.
The Foundation:
The foundation has a poured concrete footing and two courses of 8” x 16” cement blocks. The floor is simple cement patio blocks, which were recycled from our old patio. The bumped out area in the front is four courses high of cement blocks, which were then covered with decorative fieldstone.
The Construction:
The structure is all-wood construction, using 2” x 4”, 2” x 6”, and 2” x 8” lumber. The exterior walls, roof, and loft floor are constructed of plywood sheets. The roof is covered with decorative shingles and then topped with a cupola.
There are many materials for the actual greenhouse area, such as Plexiglass and Lexan, both of which can help diffuse sunlight. We chose shatterproof glass, purchased from a local glazier, for aesthetic reasons. The tracks that hold the glass were purchased through a greenhouse supply catalog.
The interior was painted white to help reflect sunlight.
Electricity:
This was essential since there are so many items in the shed that require power. The heat mats (since seeds require bottom heat before they require sunlight), the space heater (necessary for cold winter nights), lighting (for evening visits to check on the little ones), and the radio (for music). While we wired the shed, we also had some outlets added to the shed’s exterior for electric yard tools.
Water:
We chose not to have running water in the shed, mostly because it required having a pipe travel a distance from the house to the shed — and in an area where the ground freezes, it just didn’t make sense. Besides, carrying jugs of water is a nice workout.
Humidity:
Humidity has always been the biggest issue for me. Although there are electric humidifiers available, I decided to make good use of what I had. I have found that a tray of water on the heat mats, as well as spilled water on the cement block floor, can create enough humidity — maybe not optimal, but enough.
Ventilation:
There are electric vents that can open automatically, but I chose the manual kind. There are two vents, a thin rope tied to each of the levers. The ropes then hang down so I can pull them to open the vents, tie them to mounted cleats to keep the vents open, or untie to close.
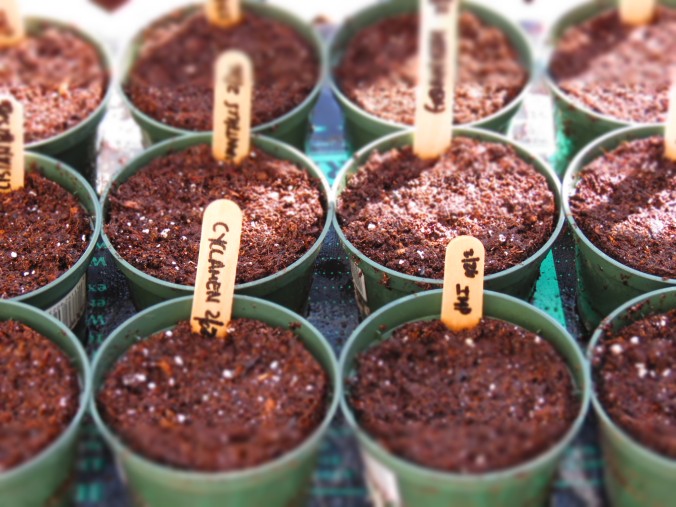
Preparing For Planting:
I usually start seeds in February, which is based on the last frost date in my Zone (6). Before I start any seeds, I have to help the shed retain heat. To do this, I hang plastic sheets to separate the shed side from the potting side. In addition, a plastic sheet is hung to create a false ceiling so that heat does not escape through the loft area.
Essential Tools:
Some items, I have learned, are essential for successful seed starting in the shed.
A thermometer to help measure both maximum and minimum temperatures, as well as humidity.
Heat mats to provide heat for newly planted seeds.
A thermostat/timer for the heat mats to help regulate the bottom heat.
A timer for the space heater to help regulate heat.
Here"s a pot that has been burnt to heck. You don"t even want to know what I was trying to cook! Let"s just say that I needed a super powered cleaner, and a fresh scent would definitely help.
Step 1: Chop Up Two Lemons
I cut my lemons into eights, but you can cut them into quarters or slices, as long as you end up with enough pieces to cover the bottom of the pan.
Step 2: Add Water
I added enough water to cover the whole burnt bottom of the pan. It"s no use trying to cover the lemons - they float! As long as the burnt area is covered, the lemons will do
their job.
Step 3: Bring to a Boil
I brought the water to a rolling boil. You can even see the burnt specks coming off the bottom of the pot as the lemons swam around.
Step 4: Let Water Cool & Dump It Out
After I dumped out the lemons and dirty water, I was left with a thin brown layer on the bottom of the pot. All I had to do was scrub it lightly with a brush, and all the leftover grime fell away.
Step 5: Rinse out Your Pot
A few rinses later, and my crud-caked pot was good as new! Now, wasn"t that easier than scrubbing with steel wool til your fingers are raw?
It"s hard to believe, but that really is the same pot! This is one magic trick I will definitely be doing again.
Original article and pictures take http://www.hometalk.com/17630473/easy-way-to-clean-a-burnt-pot-or-pan?date="20161010&utm_source=pinterest&utm_campaign=emlt&utm_medium=brand&date=20161112" site