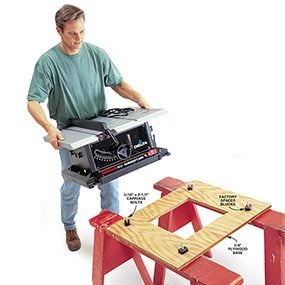
The plywood widens the base making the saw more stable. Plus you can quickly screw the plywood down to sawhorses, benchtops or other places you set the saw.
A “must do” with any new portable table saw (when you"re not using a leg set) is to attach a 3/4-in. plywood base with a hole cut in the center. This simple base allows you to clamp or screw the table saw to sawhorses, which provide a wide foundation for added stability. This also raises the saw off the ground to a comfortable working height. The hole in the bottom lets the sawdust fall through and helps keep the saw running cool. But that"s not all the base has to offer. Drill a couple of 1/2-in. holes on one side so you can hang the saw from hooks fastened to the workshop or garage wall when you"re finished using it.
Cut the plywood base a few inches wider and longer than the base of your saw, and then cut a 1-sq.-ft. hole in the center. Center your saw on the plywood and mark the mounting holes. Drill a 1/8-in. hole through the plywood at each mark. Flip the piece over and drill 1-in. dia. holes about 1/4 in. deep to recess the carriage bolt heads. Next, drill 5/16-in. holes in the center of the recesses. Pound in the carriage bolts, slip the saw over the bolts (use spacers if they come with the saw) and fasten the saw to the base with washers and nuts.
Every table saw user has horror stories about near misses and not-so-near misses. No doubt about it: Table saws can be dangerous. Always approach them with respect. Use your blade guard whenever possible and always wear safety glasses and hearing protection. Read your owner"s manual and make sure your saw is properly adjusted.

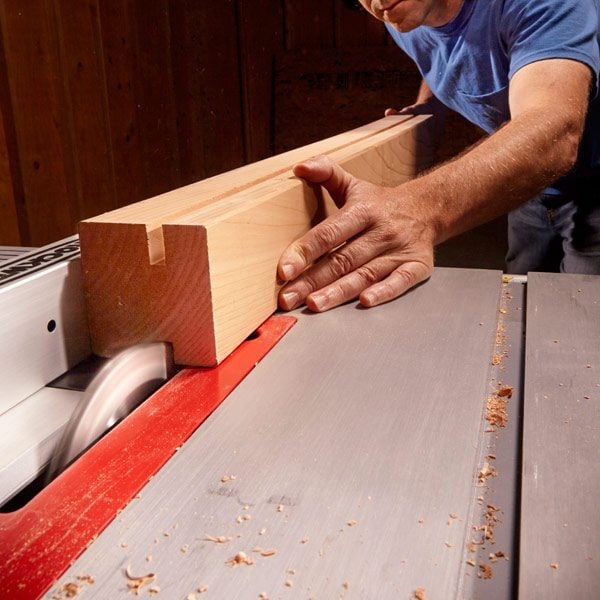
Clamped block allows you to make repetitive crosscuts without risking a kickback. Caution: We removed the blade guard for this photo; use yours!
Dangerous kickback can occur when you crosscut directly against a rip fence. Kickback happens when the part of the board between the fence and the blade gets pinched, and the blade, spinning toward you, catches it and hurls it back at you.
You can prevent this hazard with a simple block. Cut and clamp a block to the side of your rip fence and then position the fence the correct distance


Cut accurate dadoes without a dado blade by making successive passes over the blade. The tough part here is to get a tight fit (Photo 3). Screw a 1x3 fence extension to your miter gauge and make a saw kerf in it. For a tight fit, trace the thickness of the board onto the homemade miter gauge fence extension (see Photo 1). Then follow the Photos 1 and 2. Try this method on a test piece to get the hang of it.

Cut long boards confidently with an easy-to-make outfeed jig screwed to your plywood base. Be sure to have the highest point of the jig even with the saw table. The gradual incline of the jig (about 12 degrees) helps guide sagging pieces and slowly bring them up as you push your board through the saw. Ordinary rollerstyle outfeed supports don"t work well for long boards because they have a tendency to tip over when the board sags and hits the stand beneath the roller. This jig works especially well for long, thin pieces such as siding, which tends to sag and separate as you cut.


If you’ve ever covered plywood edges with solid wood, you know how hard it is to position the edging flush with the plywood surface. Next time, try this: Start with edging that’s about 1/8 in. wider than the thickness of the plywood. That way, you can attach the edging fast, without worrying about a flush fit. To trim off the excess edging, clamp or screw a tall “floating fence” to your table saw fence. Then position the floating fence so it’s flush with the outer edge of the blade.

Cutting thin strips can be dangerous. There’s no space between the blade and the fence for a push stick, and on some table saws you have to remove the blade guard. Five minutes and a 6-in.-wide scrap of plywood or particleboard are all you need to cut safely and quickly. Just screw a wooden “heel” to the scrap and you’ve got a sliding guide that lets you leave the guard in place and keeps your fingers safe. Add a handle to make it easier to pull the guide backward after each cut.

To cut a straight edge on any board, all you have to do is mount the crooked board to a larger carriage board and run the whole assembly across your table saw. You can fasten the crooked board with screws or—if you don’t want to put screw holes in the board—hold it firmly in place with 4-in.-long screwed-down cleats at both ends. Set your saw’s fence to match the width of the carriage board. That way, you can tell exactly where the blade will cut the crooked board.

A dado blade in a table saw is the fastest way to cut notches, or “rabbets,” along the edge of a board. And here’s a way to make the process even faster: Set the blade to cut slightly wider than the rabbet width. Then clamp or screw an auxiliary fence to the saw’s fence. Now—instead of fussing with dado adjustments—you can precisely adjust the width of the rabbet by moving the fence and allowing the dado blade to cut into the auxiliary fence.
Original article and pictures take http://www.familyhandyman.com/tools/table-saws/table-saw-tips-and-techniques site
>
Комментариев нет:
Отправить комментарий