Not everyone needs a garden shed. But, if you"ve no more space on your garage wall for that new leaf rake, if you can"t find your potting trowel because it fell behind the kids" bikes, and if your car has that forlorn, neglected look since the brand-new snowthrower moved in last fall, it"s time to face the undeniable truth—your outdoor tools need a home of their own.
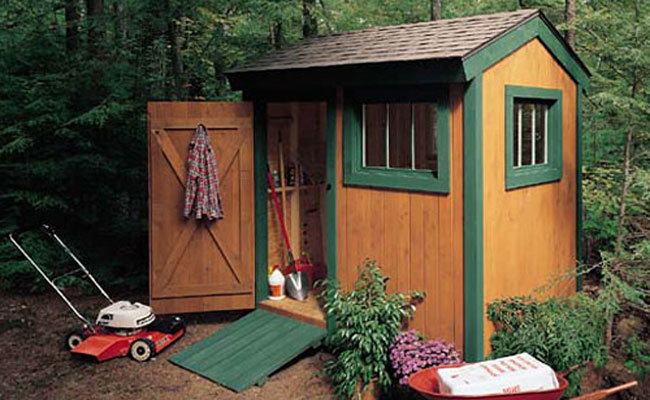
The design of your garden shed can take any form, from a simple lean-to to a large free-standing building. Ours occupies a modest 6 x 8-ft. area—enough for a variety of tools, but not so large that it dominates a backyard landscape. The straightforward design is easy to expand—up to about 8 x 12 ft.—to suit your storage needs. Before you begin work, contact your local building codes office and find out about necessary permits or other requirements for this type of building.
Our shed uses standard framing techniques and materials. It"s sheathed with 1/2-in. C/D plywood and sided with 1 x 6 tongue-and-groove cedar boards. The exterior trim is rough-sawn cedar.
In most cases, a shed of this size will not require an elaborate foundation—it"s fine to simply rest the structure on four corner blocks that sit on the ground. Some excavation is inevitable to provide a level and firm base, but there"s really no need to dig below the frost line. If the building settles unevenly, simply jack up a low corner and place cedar shims between the corner block and floor framing. We used 7-1/2 x 12 x 16-in. solid concrete blocks at the corners.
To bring light into our shed, we installed 24 x 32-in. barn-sash windows. If you can"t find these stocked by a local supplier, something similar can usually be ordered.
Step 1: Site Work

Site Work
Begin by marking out the building"s location in your yard. For a structure of this size, it"s simplest to build a lightweight frame that"s the exact size of the shed, then use the frame to mark the site.
Use 3/4-in.-thick pine to build your frame. Cut the sides to the exact dimensions of the floor, and use one screw in each corner to fasten the sides into a rectangle. Screw a diagonal brace between two sides of the frame to hold it square.
Clear the building site and level any obvious high spots. Place the frame in the site and adjust its position until you"re happy with the location of the shed. Drive stakes into the ground to mark each corner, stretch string between them (Photo 1) and then remove the frame.
Use a wooden frame to find the best spot for your shed. Drive a stake at each corner and use string to delineate the site.
Step 2: Site Work

Find the highest corner of the site and excavate for the first foundation corner block. Plan on having 3 to 4 in. of block exposed above grade. Dig out an

Now you"re ready to position the first block, aligning its edges with the layout string. Check that the block is level across its length and width, and adjust the crushed stone as required.
Dig a hole for the first block at the highest point in the grade. Add gravel, install the block, align it with the string, and level it.
Original article and pictures take http://www.popularmechanics.com/home/how-to-plans/sheds/1275876 site
">
Комментариев нет:
Отправить комментарий