When it"s tough to keep a board aligned with the fence, pull out a featherboard for smooth, straight cuts. Featherboards have a series of wooden “fingers” that hold wood tightly against the saw fence.
The fingers are slightly flexible and cut at an angle, so they allow you to push the wood through while maintaining firm, even pressure. They also dig in and hold wood in place if it starts to kick back. They"re a great “third hand” when you want the perfect rip. Just push the featherboard firmly against the piece of wood 1 to 3 in. before the saw blade, then clamp it tightly to the saw table.
It should be fairly easy to push the wood forward but hard to pull it back. And when you"re ripping large boards, add a second clamp for extra-firm pressure.
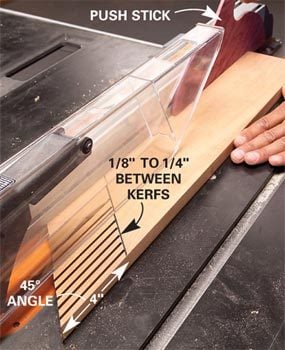
Make your own featherboards from a 2-ft. length of knot-free 1x4. Cut one end at 45 degrees. Then cut a series of 4-in.-long kerfs every 1/8 to 1/4 in. (narrower on stiff hardwoods, wider on softwoods)—thin enough so the long fingers flex slightly.

Trying to rip the last few feet of a long board without a helper or support at the other end is virtually impossible. An expensive roller support can solve the problem. But if you don"t have one, set up a temporary outfeed support with clamps, two 2x4s and plywood. The 2x4s clamped to the saw table keep the plywood perfectly in line with the table surface. The boards you"re cutting will slide onto the support without getting stuck.
To construct a temporary outfeed table, clamp two 8-ft.-long 2x4s to the saw table, cantilevering them approximately 5 ft. over the outfeed side. Then screw or clamp 1/4-in. plywood to the underside of the 2x4s.
Keep in mind that this works only with contractor-size and larger table saws with heavy steel or iron tables. It could cause lighter bench-top saws to tip or bend.

The narrow width of most miter gauges offers poor support when you"re crosscutting, especially when you"re cutting at an angle. For better support, screw a wood fence to the miter gauge. (Most gauges have holes for this purpose.)
Use a straight 1x3 or 1x4, and make it high enough so that the blade won"t cut it completely off. Then it"s easy to add a removable stop block for making multiple cuts or change the angle and make miter cuts with the same fence. However, always double-check the accuracy of the miter gauge with a square or protractor before making any cuts.
To avoid binding and kickbacks when you"re cutting, always push the workpiece and fence completely past the blade. Then turn the saw off before pulling the fence back and removing newly cut pieces.

Keeping a long, heavy board or a full sheet of plywood tight against a short fence is a challenge, especially when you work alone. It"s all too easy for the wood to wander away from the fence, ruining the cut or causing the blade to bind and leave burn marks along the edge. To avoid these problems, clamp a long level or a long, straight board to the fence. The longer the fence, the easer it is to keep the wood firmly against it.

Wood with knots or wavy grain and wood that has been dried unevenly will often warp badly as you rip it. If the halves bend outward, one will push against the fence and cause burn marks, a kickback or an uneven cut.
If this begins to happen, clamp a smooth, straight length of 3/4-in. wood against the fence, ending at the center of the saw blade. This half fence gives the trapped piece (the section between the blade and the fence) room to bend without pushing back against the blade. Keep several push sticks at hand so you can work around the clamps and complete the cut smoothly.
If the two halves bend toward each other as they"re being cut—pinching the splitter at the end of the blade guard—turn the saw off and wedge a shim between the two pieces. Then complete the cut.

If you find your hand within a foot of the table saw blade, it"s time to reach for a push stick. This essential table saw accessory is notched to hook solidly over the end of the board. You can then push it on through and hold it down firmly at the same time. It allows you to complete a perfectly straight cut while keeping your hands well away from the blade.

It"s best to keep at least these two styles handy. Use the long, narrow push stick for smaller, lighter boards and for narrower cuts. And use the broad, flat push stick for wider, heavier boards when you need to apply more downward pressure.
As a rule, use 1/2-in. plywood for general-purpose push sticks. It"s light and tough and won"t split as easily as most solid wood. But don"t hesitate to make several different thicknesses and styles to use in special situations. Customize your push sticks with different handles, shallower notches (for 1/4-in. plywood, for instance), or strips of rubber or sandpaper for better grab.

To make a series of identical narrow strips for shelf edging, you don"t need to remove the blade guard or move the fence for every cut. Just attach a short strip of wood slightly thinner than the width of the rip cut to the end of a 4-ft. 1x6. Then hold the board against it and push the jig through. The jig keeps your hands well away from the blade, and you can rip as many pieces as you need without ever moving the fence.
To make the jig, attach a 5-in.-long strip of wood, 1/16 in. narrower than the width of the desired rip, to the end of a 1x6 as shown. Basically you"re creating a horizontal push stick. Add a handle near the end of the jig to give yourself better control as you run the jig through the saw.

The prettiest pieces of wood at the lumberyard aren"t always straight and smooth. But cleaning up those rough edges isn"t difficult. To straighten out a crooked board (with minimum waste), simply screw it solidly to a straight strip of plywood. Then run the board through the saw with the plywood against the fence. Your board will now have a straight, smooth side to hold against the fence when you"re ripping it to width.
Plywood straightedges are also handy for ripping tapers. Simply mark the desired taper on your board, align it with the edge of the plywood, screw it in place, and cut.
Make the sliding plywood straightedge from a 1-ft. x 8-ft. strip of 3/4-in. plywood. Attach the rough board to the plywood with screws driven (predrilled) through a waste section. If there"s not enough waste area, screw up through the plywood into the rough board and fill the small holes later. Or consider using special surface-mounted hold-down clamps, available from woodworking stores.
Original article and pictures take http://www.familyhandyman.com/tools/table-saws/table-saw-tips-and-tricks/step-by-step#step7 site
">
Комментариев нет:
Отправить комментарий