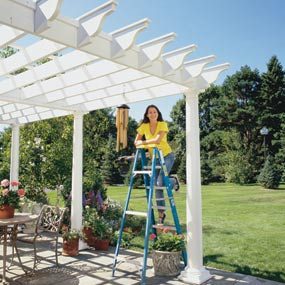
Here’s a summer project designed to keep you cooler on even the hottest of days. The classical columns support an overhead wooden lattice that works like a big shade tree, letting only a portion of the sun’s radiance shine through.
What looks like the toughest part of this project is actually the easiest—the graceful, solid-looking columns. They’re not wood at all but a hollow-core composite material with amazing structural strength and durability. We’ve designed the project so you simply slip these columns over treated 4x4 posts embedded in concrete. When screwed to the wooden posts, these columns provide a stable, solid base for the overhead lattice framework.
These paintable precast columns are available by special order at home centers. They come in a wide variety of diameters and heights and architectural styles.
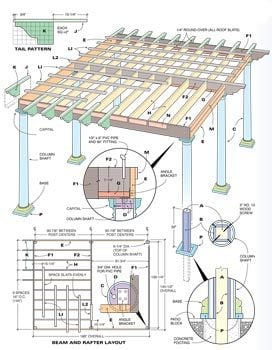
Pressure-treated dimensional 2x8s and 2x10s make up the majority of the upper framework, and the decorative end pieces are cut with a jigsaw from our pattern. The whole project can be built in a couple of weekends, with another weekend for staining and painting.
We built our pergola over an existing stone patio; that saved a lot of patio work. If you’re planning to install a patio as part of your overall project, you’ll need to allow extra time.
Because this project is made to stand independent of the house, you can either locate it right near your house as we did or let it stand alone in the garden. You can also consider using wood chips or gravel as a floor or even pour a concrete slab underneath. By keeping it unattached (about 4 in. from the eaves), you don’t have to deal with moving existing gutters or matching eaves. You also don’t have to mess with frost footings (in colder climates). However, if you have clay soil, it’s best to dig to frost depth (if greater than 24 in.) for your footings to prevent frost heave.
Our existing patio was built over a sand and compacted gravel base, so we removed only the stones necessary to dig the 12-in. diameter holes to secure the posts. You’ll most likely have a different situation.
If you’ll be adding a patio later, be sure to pour all the footings at the finished patio height. Keep in mind any slope you’ll include in the patio. Most patios slope about 1/8 in. per foot to drain.
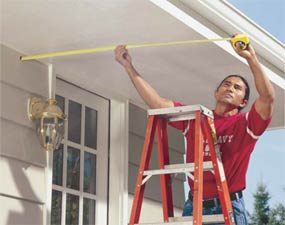
If you plan to build your pergola close to the house, first measure the projection of your eaves as shown in (Photo 1). Keep the center of the posts nearest the house at least 7 in. farther from the house than this measurement.
To keep the posts in alignment, stake your post locations using remote stakes with a string. With the stakes driven beyond the work area (Photo 2), you’ll be able to undo the string while you dig and then reattach it later to check for alignment. To check for left-to-right placement parallel to the house, just measure the distance from one of the remote stakes and write this measurement on a note pad. To make sure the layout is square, adjust the diagonal measurements of the postholes so they’re equal.
As you dig your holes, put the soil in a wheelbarrow and find a place to relocate it away from your site. Save any gravel or sand to reinstall pavers. Note: You may need to move a post slightly. We shifted one post near the house to create an entry along the steps.
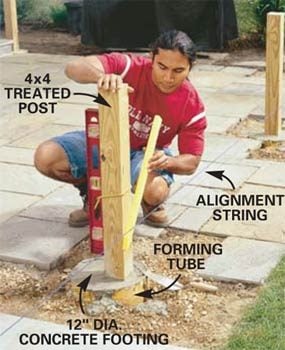
Dig the postholes a minimum of 2 ft. deep and 12 in. in diameter. Dig 24-in. tubes into the holes, add your 60-in. posts and pour concrete around them. Plumb your posts and align them with your outer string line. Allow the concrete to harden for a couple of days, then trim the posts to 32 in.
Before you dig any holes, call your local utilities or 411 to mark any buried cable or gas lines. Once you’re sure there are no buried utilities in the area, dig your holes with a hand-held posthole digger or rent a power auger. You’ll also need a shovel to widen the hole. Dig until it’s at least 24 in. deep.
Reconnect your layout string to make sure the holes are aligned. Cut your forming tubes (Photo 2) and insert them into the holes. Level the tops of the forming tubes until they’re flush with the patio surface. If you mix the concrete on site, you’ll need about five bags of Quikrete or Sakrete concrete mix per hole, for a total of 30 bags. (That’s enough to have your home center or lumberyard deliver it to the site. If you call for a ready-mixed delivery, ask for 1/2 cubic yard.)
As you set your posts, reposition your string line about 1-3/4 in. to allow for the post thickness and then align the posts with your string line (Photo 2) as you pour in the concrete.
Note: If you have a post that’s 1/2 in. out of whack, don’t sweat it. You’ll be able to align the tops of the columns later when you install the overhead beam. Once the posts are embedded in concrete, let the concrete harden for a minimum of two days.
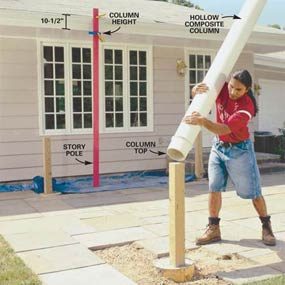
Lift the columns (upside down) over the 4x4 posts to mark the bottoms for trimming. Attach a story pole to the house to establish a reference point.
We wanted the roof of the pergola to align with the fascia of the house for a custom, fluid look. To keep the roof of the pergola even and level across the whole topside, you’ll need to cut each post exactly. Just clamp or nail a board temporarily to the fascia as shown in (Photo 4). Measure down 10-1/2 in. from the top of your fascia board for the cutoff height of your columns (95 in. for ours).
To make sure we cut the bottom only (we didn’t want to have to wait another two weeks for a new column), we flipped the columns end for end, slipped them over the posts and marked the bottoms of each column—and numbered them as well.
Note: To make cutting the columns easier, lay them on sand bags or mulch bags to keep them from rolling or vibrating as you cut. Transfer your length mark completely around the column base with a combination square that’s set from the bottom of the post.
I found the jigsaw a lot safer, quieter and less dusty than a circular saw. This composite polymer is only about 1/2 in. thick but pretty hard, so expect to eat up a new blade on each column.
Once you’ve cut each column, fatten the posts with 1x4s as shown in (Photo 7). Predrill each column with a combination pilot and countersink bit (three holes 6 in. from the bottom and another three 30 in. from the bottom). Also drill four evenly spaced holes 1-1/4 in. from the top of each column to secure the plugs (Photo 6). Now slip each column over its post. Strap a level near the base of each column (the column begins to taper slightly after 32 in. from the bottom) and screw into the wood beneath. Tighten or loosen opposing pairs to “plumb up” each column. Next, slip the molded base over the top of the column and then slip the capital on as well. It’s best not to fasten these in place until the project is nearly completed.
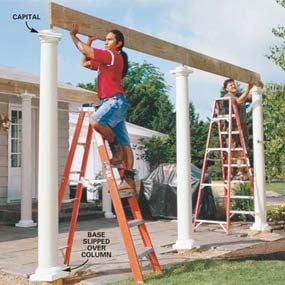
Measure the length of the front and back 2x10 beams (E), making them 3 in. less than the outside of the column tops, and cut them to length.
Note: If you have a column that won’t quite straighten up, you can have someone push it straight up and down and then fasten it in place with the steel brackets from above.
Next, measure and cut the side beams (F1) and screw them to the ends of the front beams. Now cut the center beam (F2) 3 in. shorter than the side beams and fasten it to the posts and the front and back beams (E) with 3-in. deck screws.
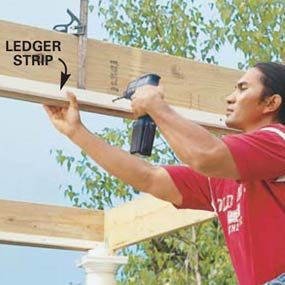
Once all the 2x10 beams are in place, cut your 1x2 ledgers and screw them 1/2 in. up from the bottom of each beam F1 and F2 with 2-in. deck screws every 8 in. Now measure each 2x8 flat rafter (referred to as “flat” because they have no pitch) and cut it to length. Ideally these should all be the same length, but if you had problems with your post positioning earlier, you may have to adjust them.
Mark 16-in. centers along the beams F1 and F2. Rest each rafter on the ledgers (Photo 12) and screw them in place one at a time from the backside of each beam, aligning them with your marks. Where the rafters meet the center beam (F2), angle the 3-in. deck screws through the beam and into the rafter (Photo 13). When you’ve finished the rafters, secure each capital to the underside of the beams with 2-1/2 in. deck screws (Photo 14). Predrill the capitals.
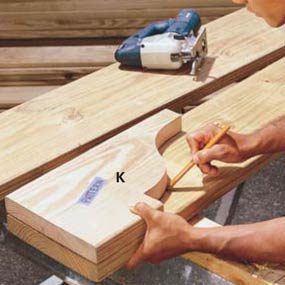
Cut the decorative rafter tails (J) using the grid template shown in (Fig. A). For consistency, mark your first one as the pattern and trace this piece each time. Sand the gentle curves with a belt sander or portable drum sander.
Now cut the tail tops (K) from 5/4 decking. Round over the cut ends with a hand plane or a router (Photo 17). Ease the edges of the tails and the tops with 100-grit sandpaper and then apply a solid-color stain. Make sure the treated wood pieces are dry to the touch before you prestain them. If they feel cool, let them dry in a shady spot for two days before applying the solid-color stain. Rushing the process could cause the stain to blister or roll off.
Once the stain is dry, screw the tops to the tails with 2-1/2 in. deck screws (allow the top to overhang 3/4 in.) and fasten them over the tops of each flat rafter and beam end as shown in (Photo 16) and (Fig. A).
You’ll need to cut the tail top short on the assemblies that project from the corners and screw them in place from the backside of the front beam.
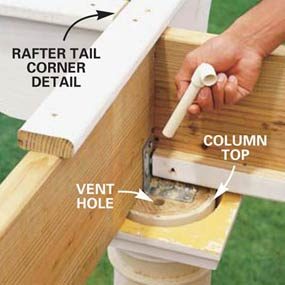
Drill 3/4-in. holes and insert 6-in. long 1/2-in. PVC pieces with 90-degree fittings attached. These little pipes act as ventilators to help slough off any excess moisture that may get into the columns.
Cut and nail (8d galvanized finish nails) the 1x4 fascia strips (M) flush to the top of the beams and in between each pair of tails (Photo 20). Next, screw the lattice strips across the rafter tops, letting them project 3 in. past the fascia.
Now cut the sub-base pieces from treated 2x4. Screw the corners together with 3-in. deck screws. If you haven’t already done so, fit the patio stones back against the footings and glue the subbase

Before you paint the columns, mix auto body filler and spread it over the screw holes along the column (Photo 19). Let the filler dry and then sand it flush. Prime the columns, and then paint them with a good-quality exterior trim paint. Don’t use paint on the rest of the pergola; instead roll and brush the wood portions with solid-color stain.
Original article and pictures take http://www.familyhandyman.com/garden-structures/how-to-build-a-pergola/step-by-step site
>
Комментариев нет:
Отправить комментарий