In the winter we use the back door in the kitchen to enter our house, but there is never a place to take off our shoes since the door would open straight into the cabinets. Now we can fully open the door and make room for everyone. The kitchen is also the room where everyone seems to congregate, so it’s nice to have a place were people can gather around and eat snacks or serve meals!
Building an Island might sound a little scary, but it’s not as hard as you might think! I’m going to walk you through the whole process. You just have to take it one step at a time!
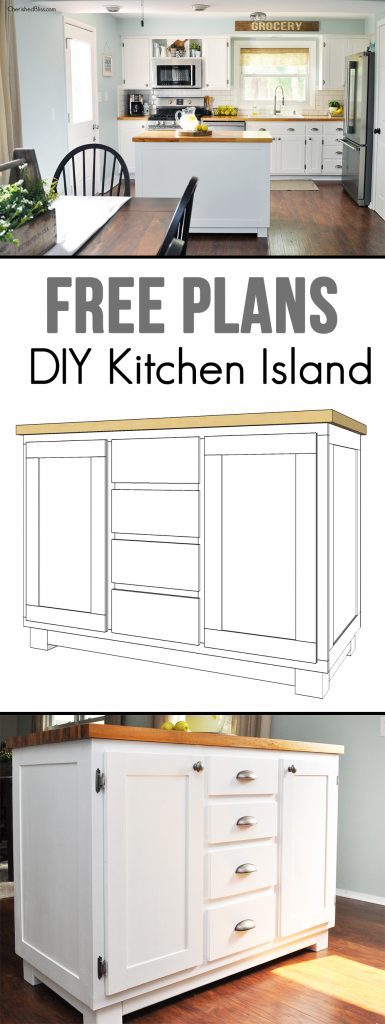
How to build a DIY Kitchen Island
Supplies:
Circular Saw
Kreg Rip Cut
Miter Saw
Kreg Jig
Pocket Hole Screws
Clamps
Drill and/or Impact Driver
Sander
Finish Nailer
Wood Filler
Sander
Painting Supplies
Lumber Shopping List:
(2) 4’x8’sheet 3/4″ Plywood (ripped down)
(1) 1x4x6
(5) 1x2x6
(1) 4’x8′ sheet 1/4″ Plywood (ripped down)
(1) 4×4 (make sure it’s untreated)
(2) 2x3x8
(1) 2’x4′ sheet of 1/2″ plywood (ripped down)
Cut List: (I recommend cutting as you go to ensure a square project)
– Cabinet Base (3/4″ plywood)

– Shelves and Drawer Boxes (3/4″ Plywood):

– (2) 1×4’s @ 15 3/4″
– (1) 1×4 @ 13 1/2″
– (4) 1×2’s @ 22 1/2″
– (2) 1×2’s @ 48 1/2″
– (4) 1×2’s @ 27 3/4″
– (3) 1×2’s @ 13 1/2″
– (1) 1/4″ sheet of plywood @ 46 1/2″ x 30″
– (4) 1/4″ strips @ 2 1/2″ x 22 3/4″
– (6) 1/4″ strips @ 2 1/2″ x 25 3/4″
– (2) 1/4″ strips @ 2 1/2″ x 48 1/2″
– (2) 1/2″ plywood @ 15″ x 28 1/4″ (doors)
– (4) 1/4″ strips @ 2 1/2″ x 23 1/4″
– (4) 1/4″ strips @ 2 1/2″ x 15″
– (4) 4×4’s @ 3 1/2″
– (2) 2×3’s @ 40″
– (2) 2×3’s @ 14 1/4″
– (4) 1/2″ plywood @ cut to size for drawer faces with minimum 1/4″ extra around perimeter of opening.
Notes:
The majority of this island is put together with pocket holes to which I will refer to as “PH” in the plans below. I used my Kreg Jig to create these pocket holes along with the appropriate size Kreg pocket hole screws.
Before we get started I want to mention that I think it’s best to make cuts as you go. Sometimes you might get off a 1/16″, and it will throw off the rest of your cuts. That’s just a tip of mine. If you cut with awesome precision then you might be able to make all your cuts first, but I’m not that good!
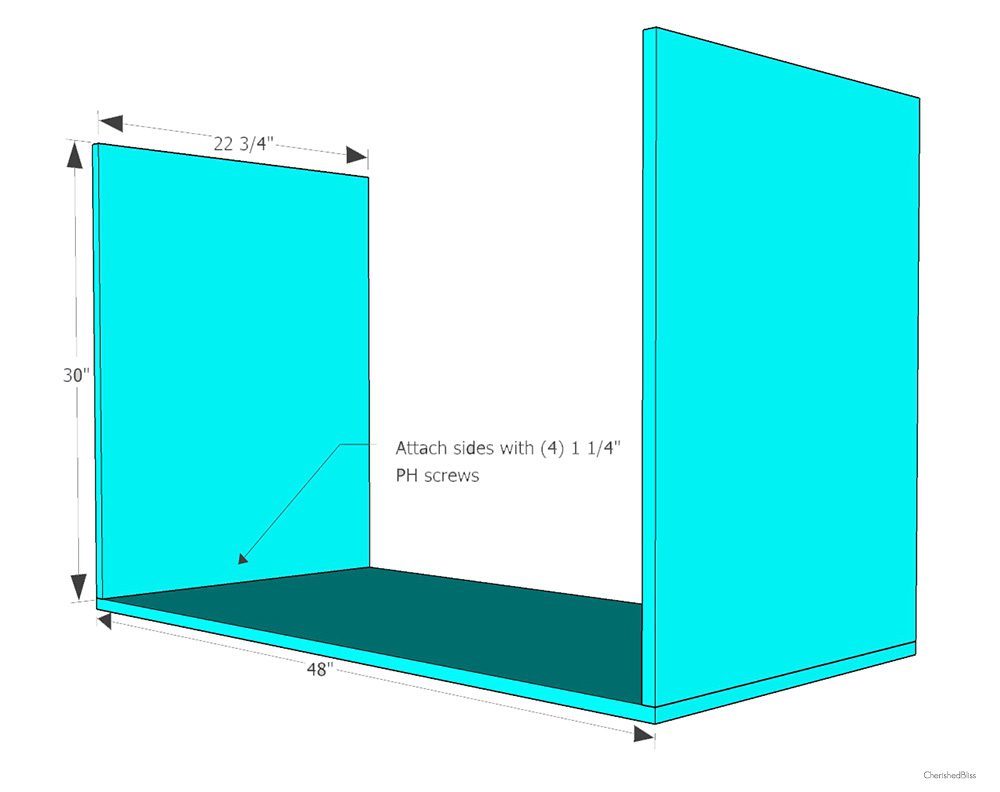
First make the cuts for the box of the island.
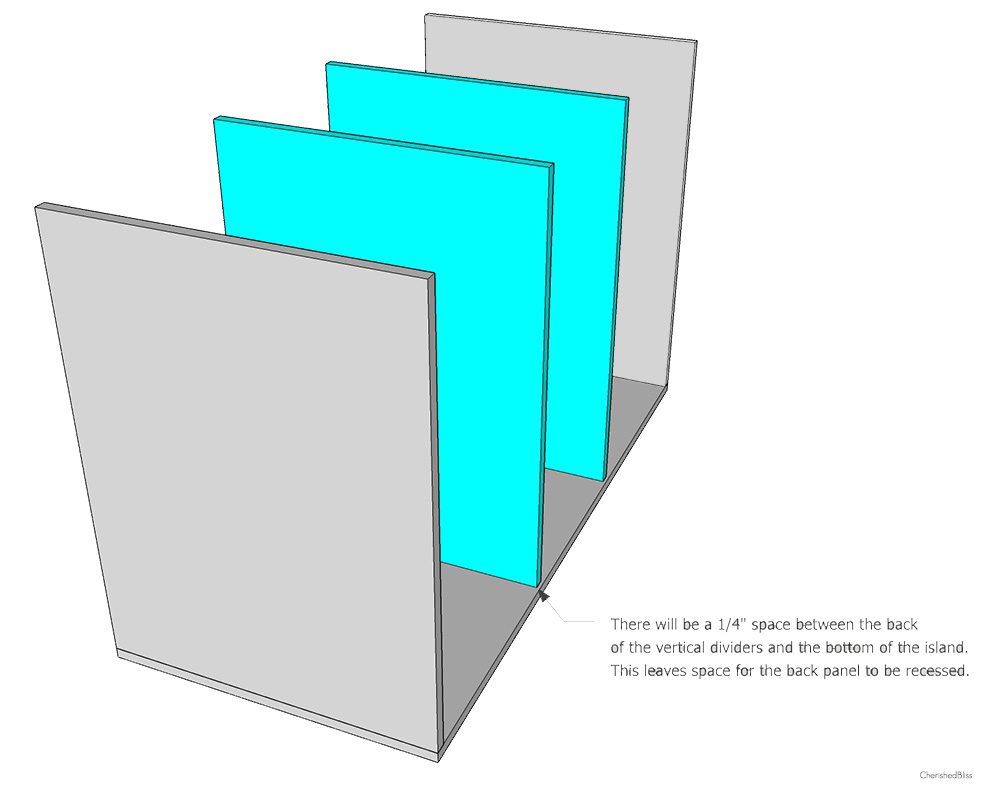
Then I moved on to the dividers which will hold the drawers. For this step I made sure my pocket holes were facing towards each other on the inside. That way I don’t see them since the drawers fill that space. Also the dividers are 1/4″ shorter from from to back that the sides of the island. This leaves a recessed space where I placed the back panel. See image below. It doesn’t matter what side the recess is on, but once it’s in place, that needs to remain the back side.
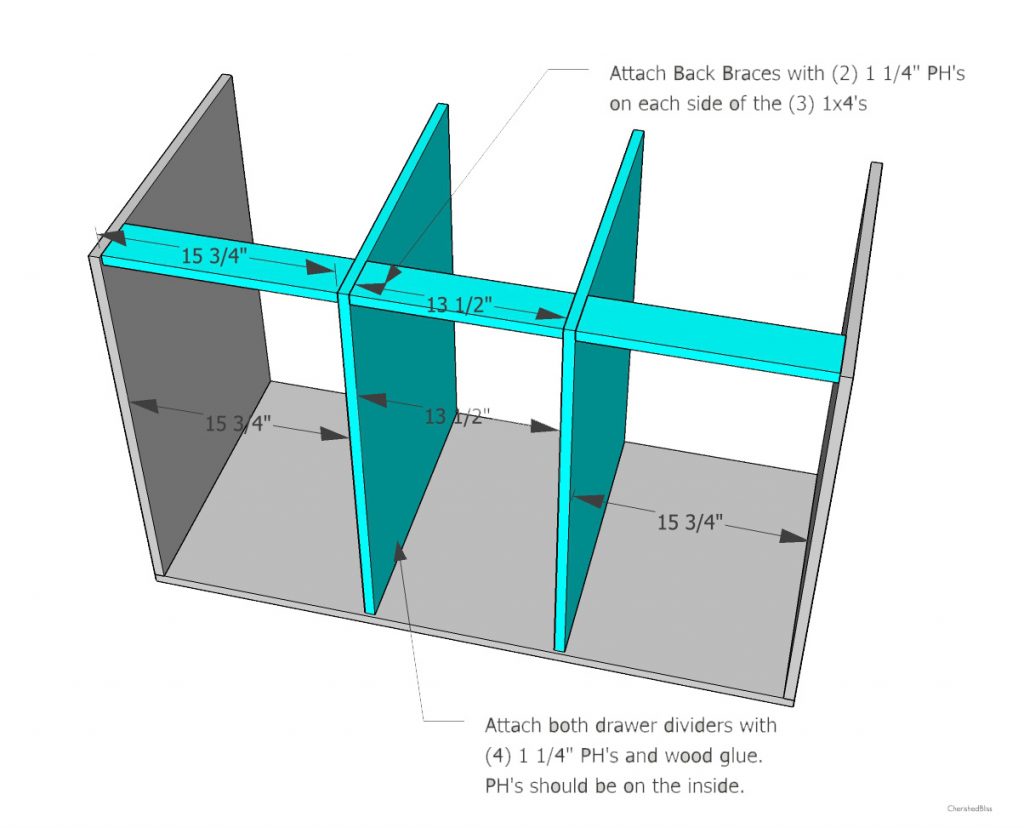
Once I had my dividers in place I attached the braces in the back to insure that the dividers didn’t bow or break off.
Next up I added the shelf brackets with my nail gun and wood glue. I didn’t permanently attach the shelves just in case I ever wanted to remove them.

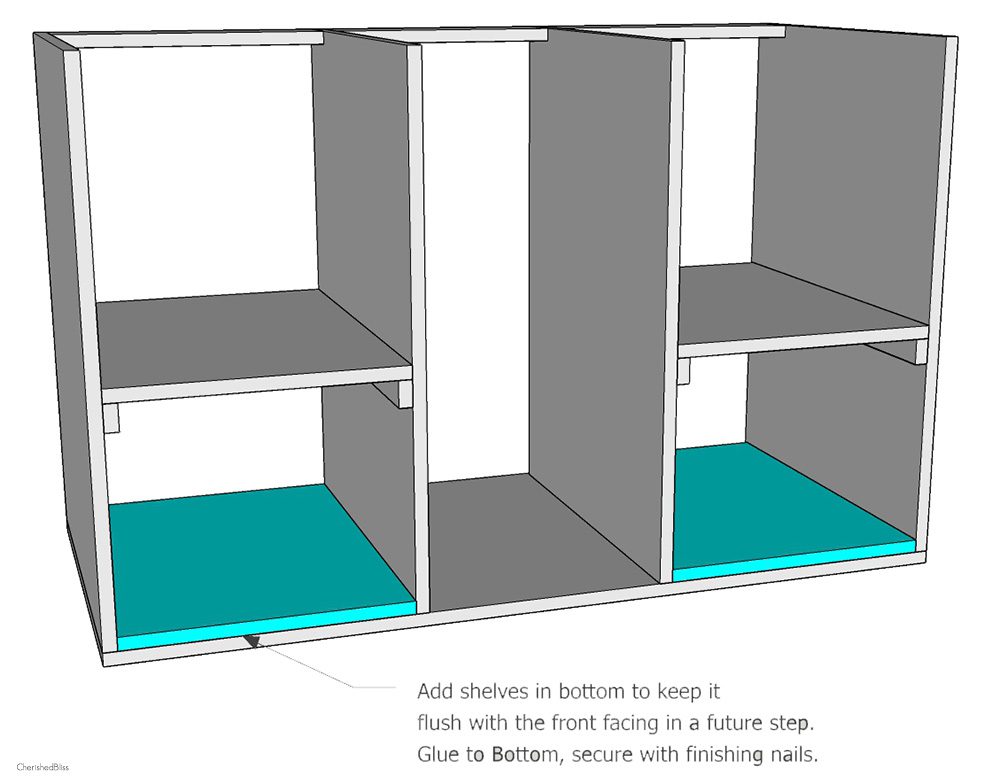
Because I wanted to have the bottom of the cabinet flush with the face framing, I added another shelf in the bottom of each cabinet space. Just a little note, before I completed this step it would have been easier to install the leg frame here, but I actually changed up some of my ideas mid way so it didn’t work out for me, but it could for you! That way the screws could be hidden by the extra shelf rather than countersinking and using wood filler.
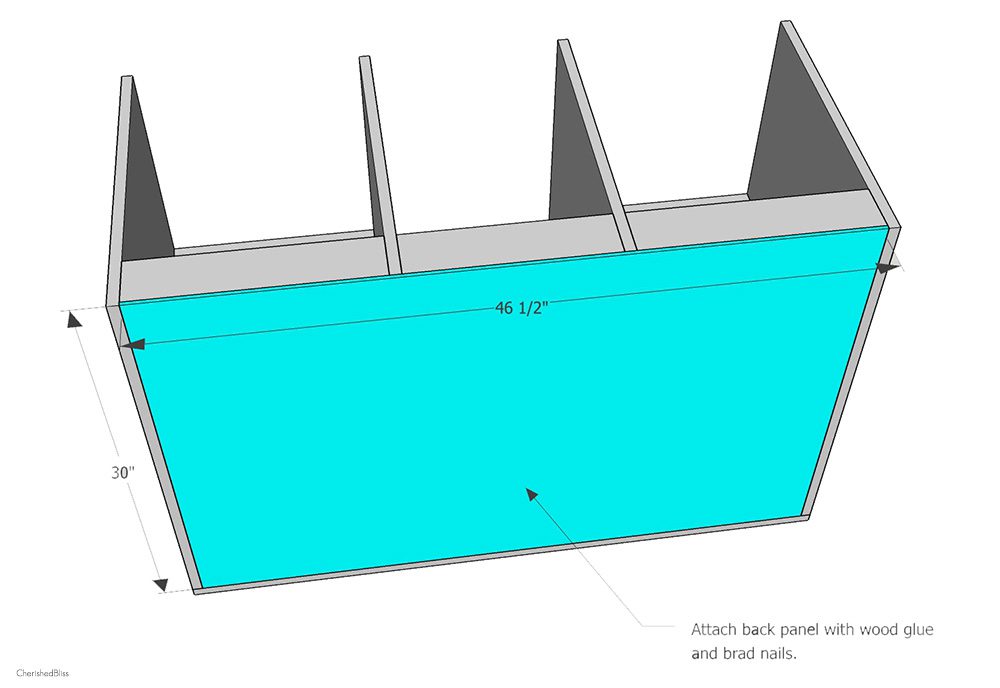
I added my back panel in. I decided to recess this to avoid all the extra unfinished edges on the sides of the island. I nailed into the braces on the back, around the sides and bottom, then on the vertical drawer dividers and the shelf brackets.
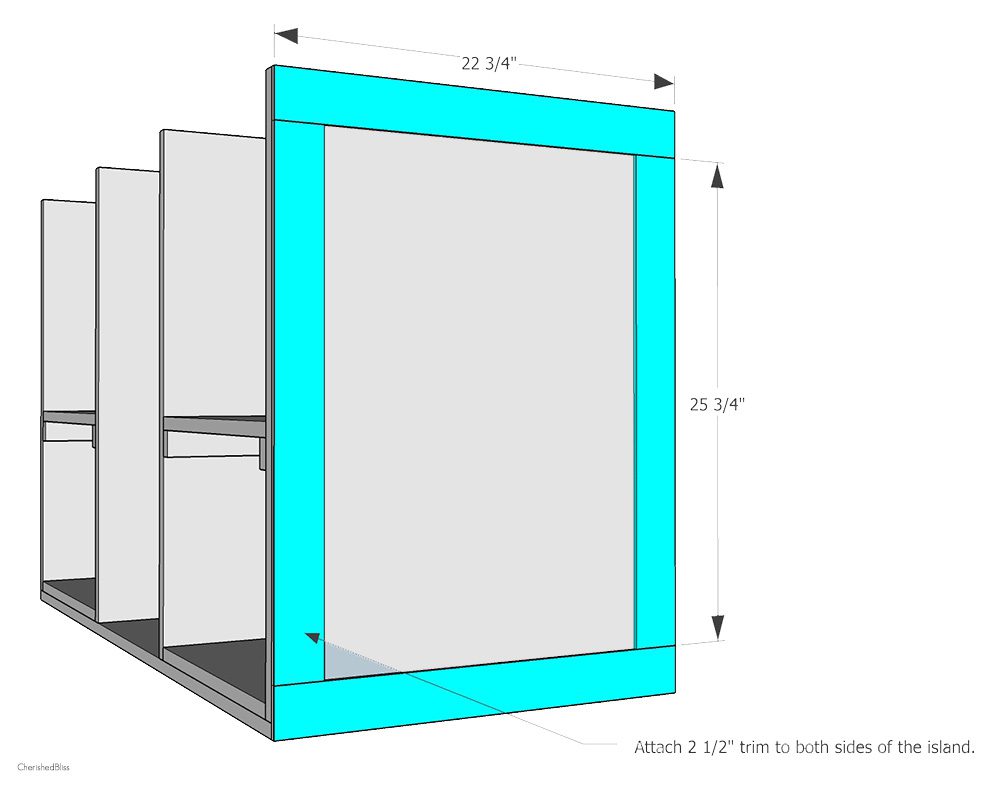
I attached the side trim first using wood glue and brad nails. This is definitely important to cut to size because I wanted it to be flush with all sides. I repeated the same process on the opposite side.
Then I added the trim to the back. I made sure to fill all spaces and gaps with wood filler and sand flush.

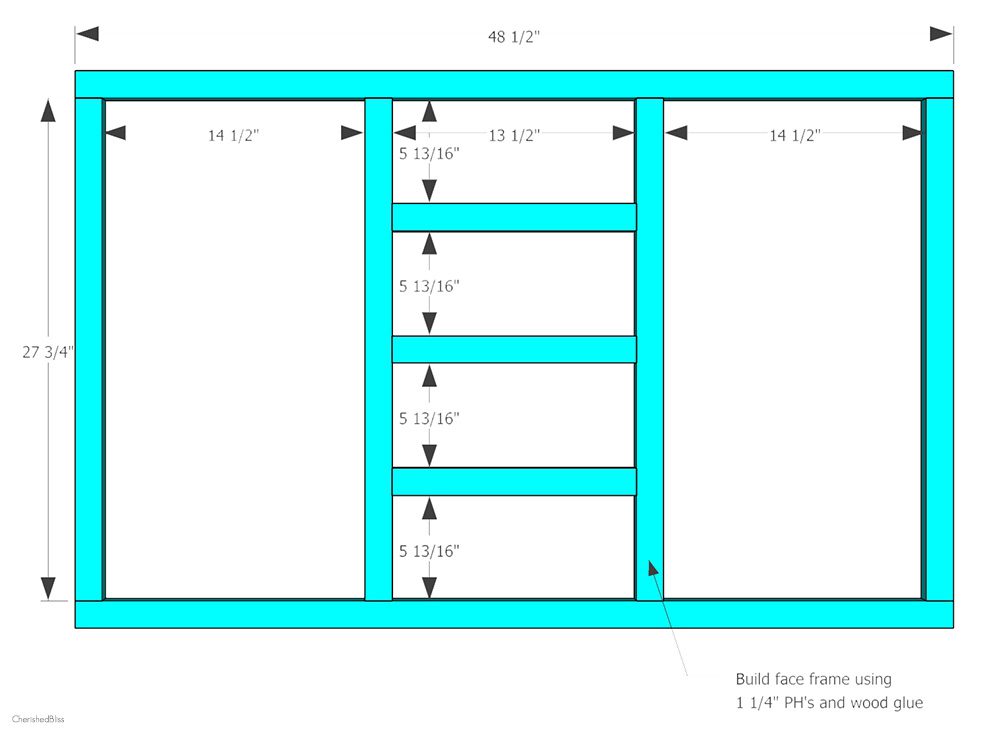
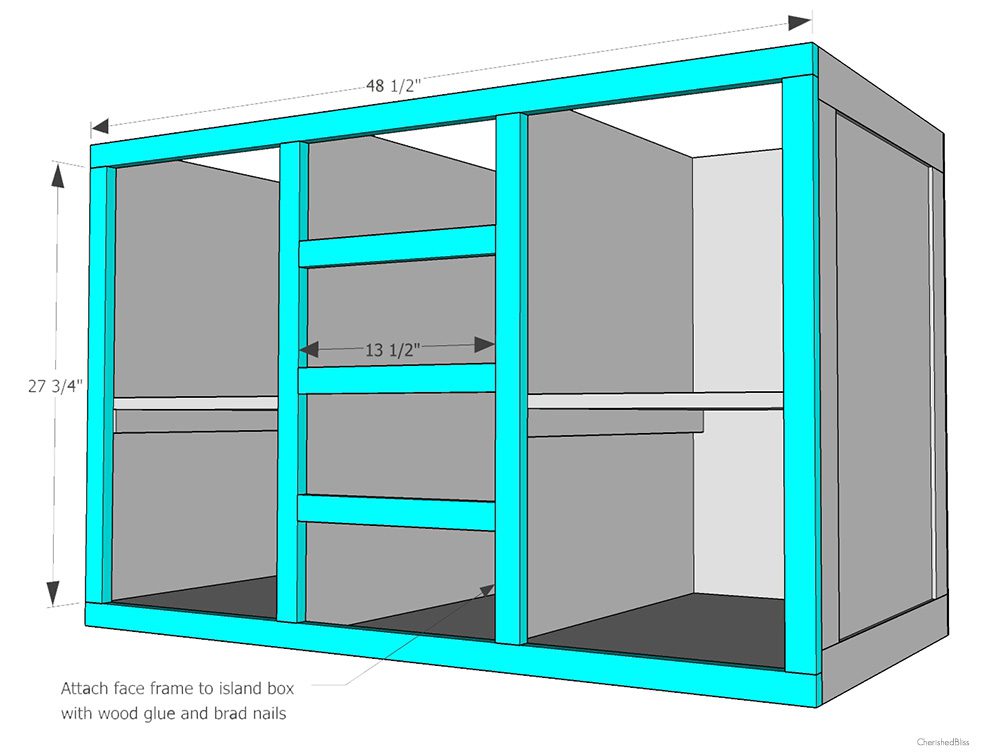
I built my face frame separately to make sure it was sturdy when attaching it to the cabinet. I attached all pieces with PH’s and wood glue. Since these are 1×2’s I had a little bit of a hard time not splitting the wood. With pocket holes it needs to have two on the ends so that it doesn’t just twist, but that was the cause of splitting the wood. So what I did was put the pocket holes on opposite sides so one on the top part of the 1×2, and on the other side it went on the bottom part so that it wasn’t able to pivot. I also used wood glue to help it set. When building this facing I was constantly checking the measurements to keep it all flush. It’s always better to measure 3 times and cut once!
Once I had my face frame built, I attached it to the front of the cabinet base with wood glue and brad nails.
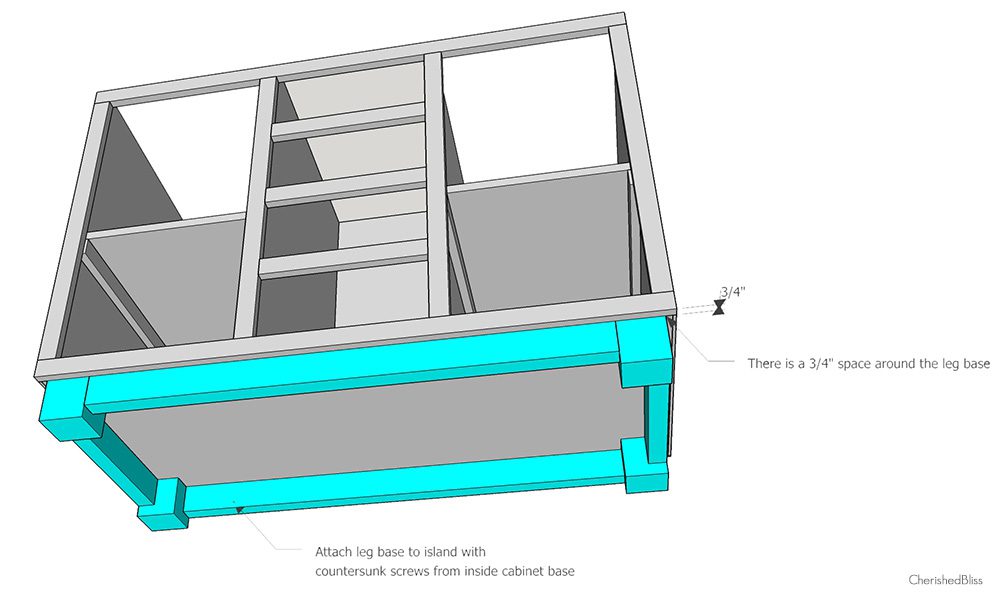
Next I build the leg frame. I built this separately so again, I made sure I had all my measurements correct before making the cuts. I built the frame with pocket holes on the back side of the 2×3’s. When attaching I countersunk screws from the bottom shelf of the cabinet base straight in to the 4×4’s. But it is an option to complete this step before installing those extra shelves in the bottom

I used the doors from our previous cabinet, but they are easy to build if necessary. I actually had to build the one on my new cabinet by the stove. It’s just made with 1/2″ plywood and then using the 1/4″ trim pieces to obtain the shaker style.
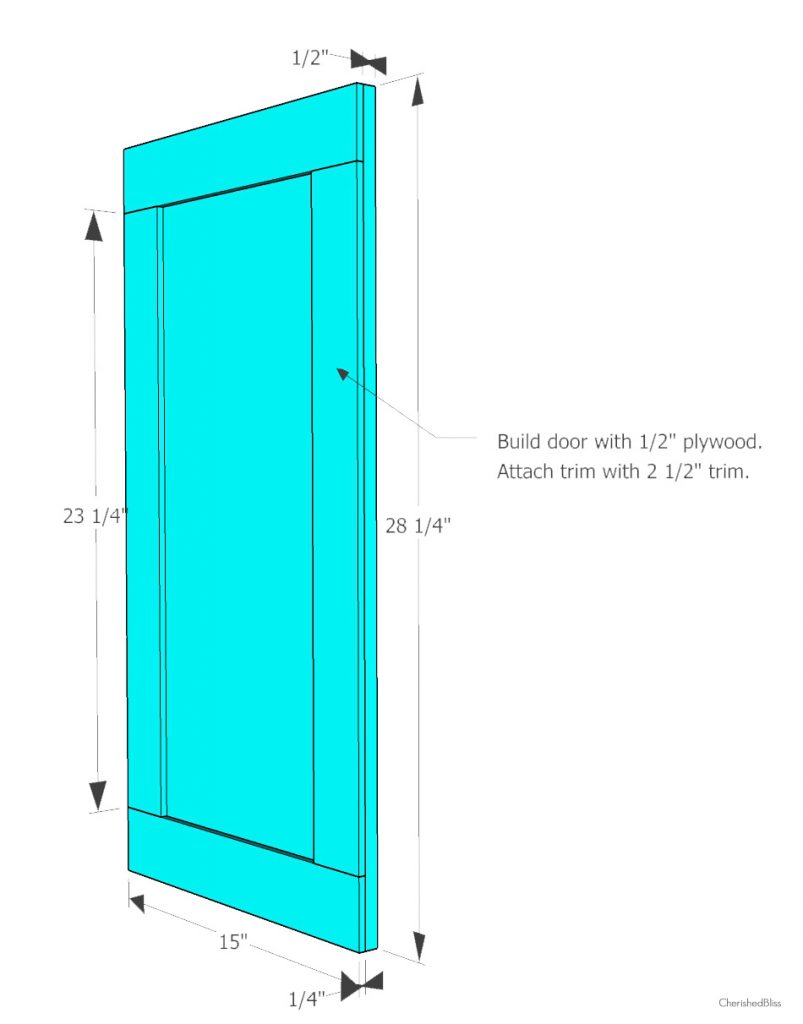
Attach your doors with hinges.

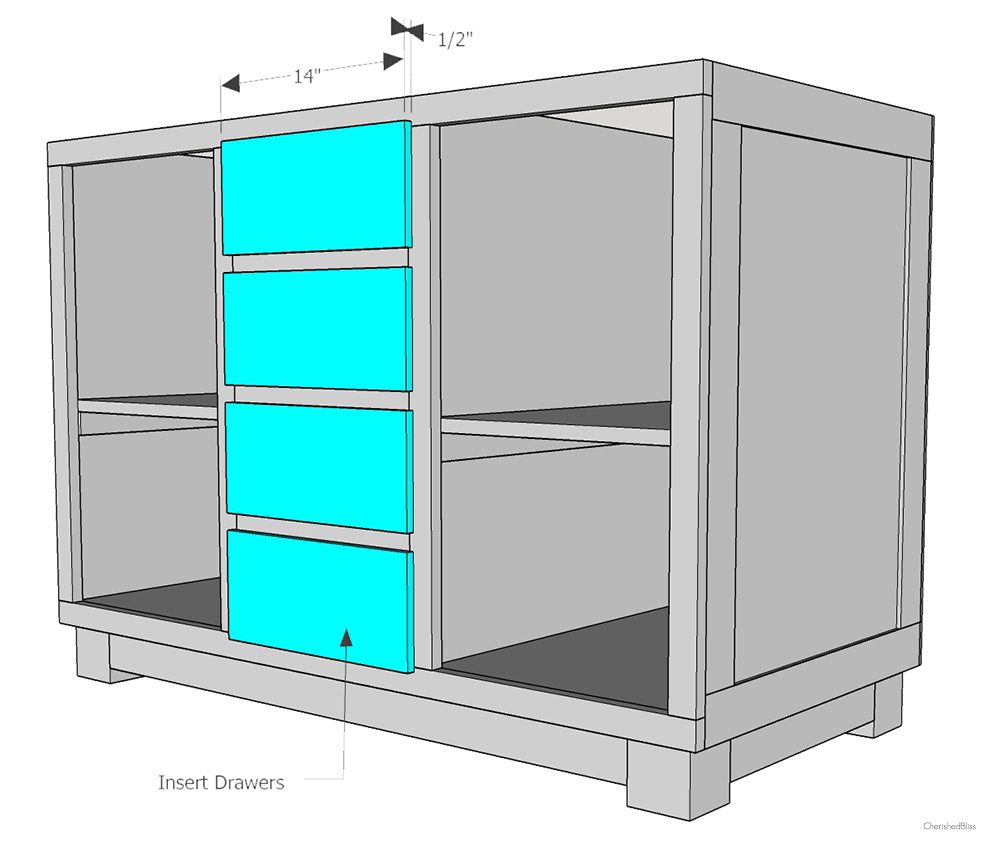
Next I built the drawer boxes. I basically followed this tutorial from Ana White, except I did not leave a space for the drawer face. I wanted my drawer face to be in front of the facing of the cabinet to match the rest of my kitchen. The I attached my drawer faces to the drawer boxes, once they were installed in the island to make sure nothing was crooked. Drawers are probably the hardest part because the measurements do need to be pretty exact. I especially recommend cutting as you go here. No matter how much I squared the island along the way, nothing about the drawers turned out perfect. It’s an art that gets better with practice. By the time I installed my 4th drawer I had it down! Practice makes perfect!
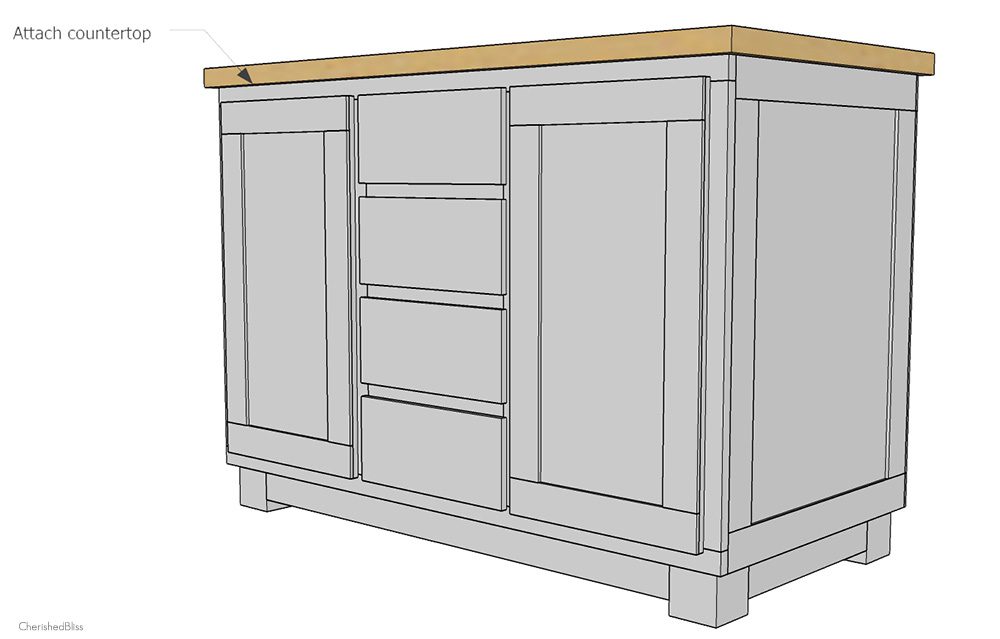
Now all that’s left is to install the countertop. We used the butcher block we had on our previous cabinets.
We love everything about this island! It’s great storage and we love having a place to stand around.

Be sure and check out my other kitchen renovation posts:
","discussion":{"numPages":1,"confidence":0.365,"diffbotUri":"discussion|3|-795687068","pageUrl":"http://cherishedbliss.com/how-to-build-a-diy-kitchen-island/","numPosts":15,"type":"discussion","title":"How to Build a DIY Kitchen Island","posts":[{"date":"Wed, 24 Jun 2015 10:32:00 GMT","humanLanguage":"en","author":"Kelly says","diffbotUri":"post|3|-1652753212","html":"It turned out AWESOME, Ashley! Woo Hoo.
","pageUrl":"http://cherishedbliss.com/how-to-build-a-diy-kitchen-island/","id":0,"text":"It turned out AWESOME, Ashley! Woo Hoo.","type":"post"},{"date":"Wed, 24 Jun 2015 12:51:00 GMT","humanLanguage":"en","author":"Meegan","authorUrl":"http://meeganmakes.com","diffbotUri":"post|3|-1424616171","html":"Your kitchen looks amazing. The island is the perfect add
","pageUrl":"http://cherishedbliss.com/how-to-build-a-diy-kitchen-island/","id":1,"text":"Your kitchen looks amazing. The island is the perfect add","type":"post"},{"date":"Wed, 24 Jun 2015 15:13:00 GMT","humanLanguage":"en","author":"Lucy Akins","authorUrl":"http://www.craftberrybush.com","diffbotUri":"post|3|-915815365","html":"Holy wow…it looks amazing…thank you so much for the detailed plans…those are really helpful.
","pageUrl":"http://cherishedbliss.com/how-to-build-a-diy-kitchen-island/","id":2,"text":"Holy wow…it looks amazing…thank you so much for the detailed plans…those are really helpful.","type":"post"},{"date":"Wed, 24 Jun 2015 18:49:00 GMT","humanLanguage":"en","author":"Valerie | From Valerie"s Kitchen says","diffbotUri":"post|3|646164835","html":"You are such a rock star to build that yourself! It looks fabulous!
","pageUrl":"http://cherishedbliss.com/how-to-build-a-diy-kitchen-island/","id":3,"text":"You are such a rock star to build that yourself! It looks fabulous!","type":"post"},{"date":"Thu, 25 Jun 2015 12:22:00 GMT","humanLanguage":"en","author":"Lu says","diffbotUri":"post|3|1253900166","html":"I love the kitchen island. I would love to build this for my craft room. Do you have the plans in a PDF file? I could not find the plans. Thanks for sharing. Blessings.
","pageUrl":"http://cherishedbliss.com/how-to-build-a-diy-kitchen-island/","id":4,"text":"I love the kitchen island. I would love to build this for my craft room. Do you have the plans in a PDF file? I could not find the plans. Thanks for sharing. Blessings.","type":"post"},{"date":"Thu, 25 Jun 2015 17:21:00 GMT","humanLanguage":"en","author":"Amy Anderson","authorUrl":"http://modpodgerocksblog.com","diffbotUri":"post|3|690252663","html":"This is GORGEOUS! I am so impressed. I want to make immediately.
","pageUrl":"http://cherishedbliss.com/how-to-build-a-diy-kitchen-island/","id":5,"text":"This is GORGEOUS! I am so impressed. I want to make immediately.","type":"post"},{"date":"Mon, 17 Aug 2015 20:56:00 GMT","humanLanguage":"en","author":"Darla Acton says","diffbotUri":"post|3|-1397665225","html":"I would like for my son to build this for me in Woods class at school. Is there a PDF version of the plans? Thanks Darla Acton
","pageUrl":"http://cherishedbliss.com/how-to-build-a-diy-kitchen-island/","id":6,"text":"I would like for my son to build this for me in Woods class at school. Is there a PDF version of the plans? Thanks Darla Acton","type":"post"},{"date":"Sat, 02 Jan 2016 15:55:00 GMT","humanLanguage":"en","author":"The Average Dan says","diffbotUri":"post|3|-584015181","html":"Thanks for posting these plans. We used them as the starting point for a kitchen island we built for my wife. We took the two bottom drawers and made it one big drawer and we also took the right cabinet and changed it to a tip-out garbage bin. We also added a 14″ drop leaf to use as a sitting area. We mixed in some reclaimed wood where we could. Check our the pics here: https://drive.google.com/folderview?id=0BxgOEWsRpescM2VtS0p6N2FxZEE&usp=sharing
Thanks again! Your plans helped make this project a reality.
","pageUrl":"http://cherishedbliss.com/how-to-build-a-diy-kitchen-island/","id":7,"text":"Thanks for posting these plans. We used them as the starting point for a kitchen island we built for my wife. We took the two bottom drawers and made it one big drawer and we also took the right cabinet and changed it to a tip-out garbage bin. We also added a 14″ drop leaf to use as a sitting area. We mixed in some reclaimed wood where we could. Check our the pics here: https://drive.google.com/folderview?id=0BxgOEWsRpescM2VtS0p6N2FxZEE&usp=sharingThanks again! Your plans helped make this project a reality.","type":"post"},{"date":"Sun, 03 Jan 2016 18:15:00 GMT","humanLanguage":"en","author":"The Average Dan says","diffbotUri":"post|3|1758592460","html":"
http://dicksworkshop.blogspot.com/
","pageUrl":"http://cherishedbliss.com/how-to-build-a-diy-kitchen-island/","id":8,"text":"http://dicksworkshop.blogspot.com/","type":"post","parentId":7},{"date":"Mon, 18 Jan 2016 07:55:00 GMT","humanLanguage":"en","author":"Ashley says","diffbotUri":"post|3|2046205779","html":"Hey Dan! Thanks so much for sharing the pictures with me! It makes me so happy to see what others create with the plans! Love the changes you made, genius way to hide the trash can, and that drop leaf creates so much more space! I LOVE it! Happy Building!
","pageUrl":"http://cherishedbliss.com/how-to-build-a-diy-kitchen-island/","id":9,"text":"Hey Dan! Thanks so much for sharing the pictures with me! It makes me so happy to see what others create with the plans! Love the changes you made, genius way to hide the trash can, and that drop leaf creates so much more space! I LOVE it! Happy Building!","type":"post","parentId":7},{"date":"Fri, 12 Feb 2016 16:06:00 GMT","humanLanguage":"en","author":"kathy says","diffbotUri":"post|3|-1383143848","html":"Dan..tnx for the pics..it helped me understand a little more what was going on..Ashley did a pretty good job with the plans but never having built anything before the pics & close ups would have been more informative for me
","pageUrl":"http://cherishedbliss.com/how-to-build-a-diy-kitchen-island/","id":10,"text":"Dan..tnx for the pics..it helped me understand a little more what was going on..Ashley did a pretty good job with the plans but never having built anything before the pics & close ups would have been more informative for me","type":"post","parentId":7},{"date":"Sun, 03 Apr 2016 17:44:00 GMT","humanLanguage":"en","author":"Kely says","diffbotUri":"post|3|1039297433","html":"How much did you spend on the materials? Thank you!
","pageUrl":"http://cherishedbliss.com/how-to-build-a-diy-kitchen-island/","id":11,"text":"How much did you spend on the materials? Thank you!","type":"post"},{"date":"Mon, 04 Apr 2016 18:30:00 GMT","humanLanguage":"en","author":"Ashley says","diffbotUri":"post|3|-457455132","html":"Hi Kely, I’m not entirely sure. I bought the materials with this along with a bunch of other items. If I had to guess I would say around $150 ish depending on what you already have on hand.
","pageUrl":"http://cherishedbliss.com/how-to-build-a-diy-kitchen-island/","id":12,"text":"Hi Kely, I’m not entirely sure. I bought the materials with this along with a bunch of other items. If I had to guess I would say around $150 ish depending on what you already have on hand.","type":"post","parentId":11},{"date":"Mon, 29 Aug 2016 05:54:00 GMT","humanLanguage":"en","author":"Madison says","diffbotUri":"post|3|-2038808230","html":"Wow! This came out great! I always wanted a kitchen island, and since we’re moving, we’ll probably have enough space for one! Thanks for another great blog post!
","pageUrl":"http://cherishedbliss.com/how-to-build-a-diy-kitchen-island/","id":13,"text":"Wow! This came out great! I always wanted a kitchen island, and since we’re moving, we’ll probably have enough space for one! Thanks for another great blog post!","type":"post"},{"date":"Mon, 14 Nov 2016 14:12:00 GMT","humanLanguage":"en","author":"LJ says","diffbotUri":"post|3|-849810560","html":"What did you do so the drawers would slide out ?
Original article and pictures take http://cherishedbliss.com/how-to-build-a-diy-kitchen-island/ site
">
Комментариев нет:
Отправить комментарий