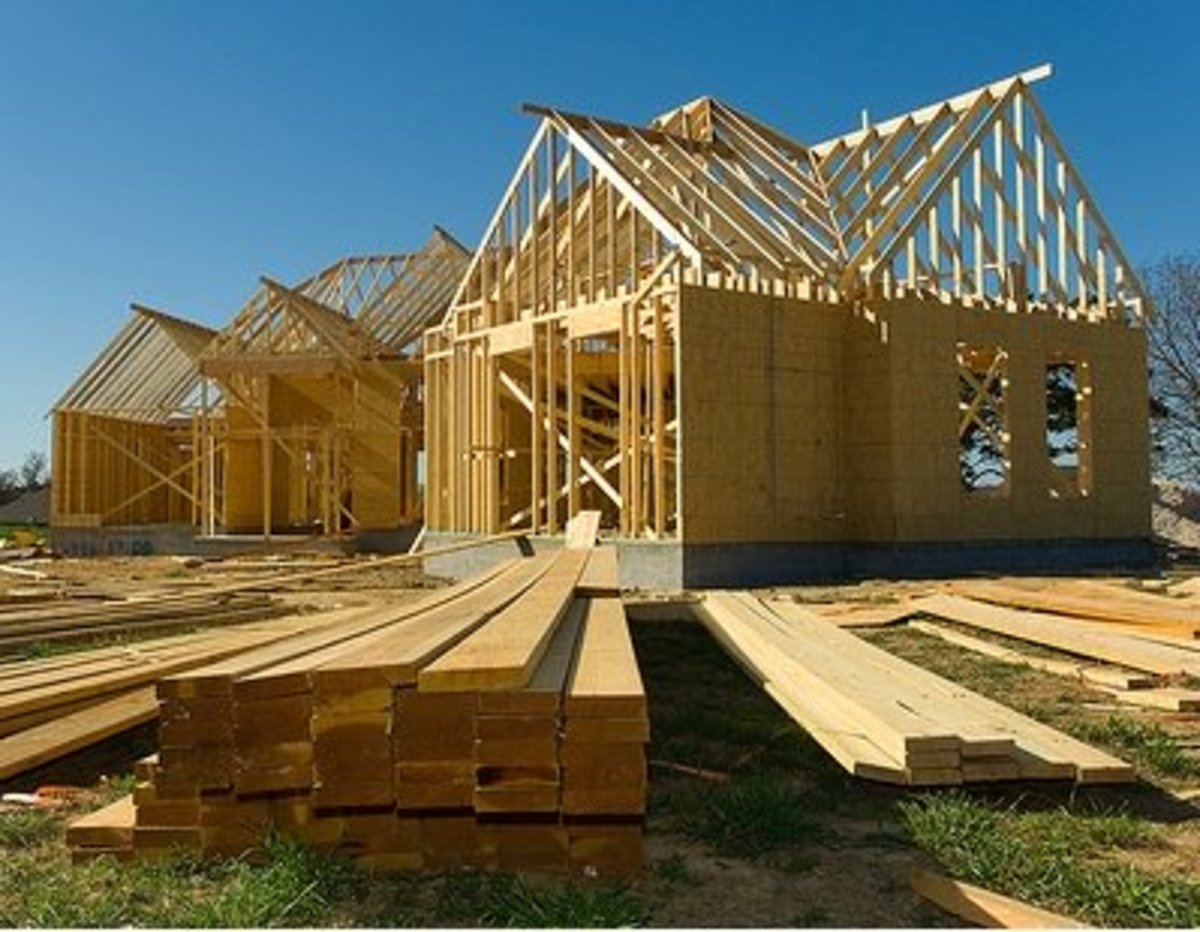

You may refer to a truss as the rafter, but it"s basically the skeleton of the roof, carrying the weight of the frame and supporting the walls of the building. Trusses are very important to preventing the walls from bending or flexing, more so important for buildings and homes with more than two stories.
The building trusses are usually connected together with galvanized metal plates and connected together in a triangle shape. Most of the time, for smaller buildings and houses, trusses are made of timber because it"s reliable and easy to work with, but it"s not uncommon for trusses to be made of aluminum, steel, or another material. Most of the time what material the trusses will be made of will depend on the budget of the project.
If you"re making your own truss, you need to make sure that you lay out everything before you get started. You want to make sure that you have all the right tools, materials, and equipment, and you need to make sure that you know what you"re doing.
If you have any doubt, it may be safer for your to higher a contractor to make and set up the trusses.
There are a few different methods of building trusses, below you"ll find basic instructions to build a hip roof truss, which is going to be your average building truss. In order to get started, make sure that you have the following things:
- 2x6 or 2x8 timber
- 2x4 timber
- Galvanized steel connector plates (gusset plates)
- Screws (at least 1-1/2 inch)
- 3 inch deck screws
Choosing the Timber for the Trusses
- The thickness of the timber that you want to use will depend on how much weight the truss will support. Generally, 2x6 or 2x8 size timber is used, but for smaller home additions, sheds, and buildings, 2x4s may be sufficient.
- Purchase the highest quality timber that you can for the top chords (two pieces of timber that determine the roof"s pitch) and the outer segments of the bottom cords (bottom pieces of the truss that form the bottom of the triangle) of the trusses. These will support the most weight, causing the most stress on the wood.
- Check to make sure that the lumber is straight when you look from one end to the other. If the lumber is curved, you want to make sure to put the curve facing downward, so that when the weight is put on the truss, the curve is flattened out. You don"t want to have the bottom of the curve on the top, as it will just bend further with the weight.

Measuring, Cutting, and Building
- Measure and cut the timber that you"ll use for the triangle portion of the truss to the appropriate size of the roof that meets the proper building codes for one truss.
- Once all of the timber has been cut, fit the pieced together to make sure that the dimensions butt tight together. If the pieces fit properly, use this truss as a pattern for the rest of the trusses required for the building.
- Use galvanized steel connector plates (gusset plate) to secure the timber in a triangular shape with screws that are at least 1-1/2 inch long.
- Add a 2x4 brace to dissect the center of the triangle to add more support at the 90 degree angle from the bottom of the center of the angle to the top of the truss. Depending on the design of the truss, the length and angles of the braces will vary.
- Secure the truss to the frame and leave an appropriate overhang. The overhang will depend on the size of the building or house and the pitch of the roof.
- Attach the truss to the frame every 2 feet, securing them with 3 inch deck screws. Brace the trusses in place and check for plump prior to securing the frame.
- Sheathing added on top of the trusses will provide final support to the roof trusses.
Building Trusses to Code
When building trusses, you need to make sure that you comply with any architectural specifications. Make sure that your lumber is according to code. For the most part, you want to stick with timber that contains between 7% to 19% moisture and is fire retardant.
You want to check building codes to make sure that the:
- The lengths and measurements for the truss are accurate
- The pitch and angles are appropriate
- The interior braces are screwed into the correct parts of the triangle and at accurate angles
- The size timber you"re using is recommended for the size building or addition
- The truss design is adequate for the roof design in accordance to the National Design Specification for Wood Construction, the National Design Standard for Metal Plate Connected Wood Truss Construction, and the Code of Jurisdiction.

Installing a Truss
You have to install a truss manually, either by a forklift or crane depending on the size of the truss and height of the building. The truss should be carried and moved vertically in order to reduce stress on the joints.
Trusses that are installed manually should be slid into place over the sidewall and rotated into place using poles. The longer the span, the more people that you"ll need in order to reduce strain on the truss. Make sure that the trusses are supported at the joints and the peak while being raised and moved.
As mentioned above, you want to use one truss for every two feet, unless otherwise specified.
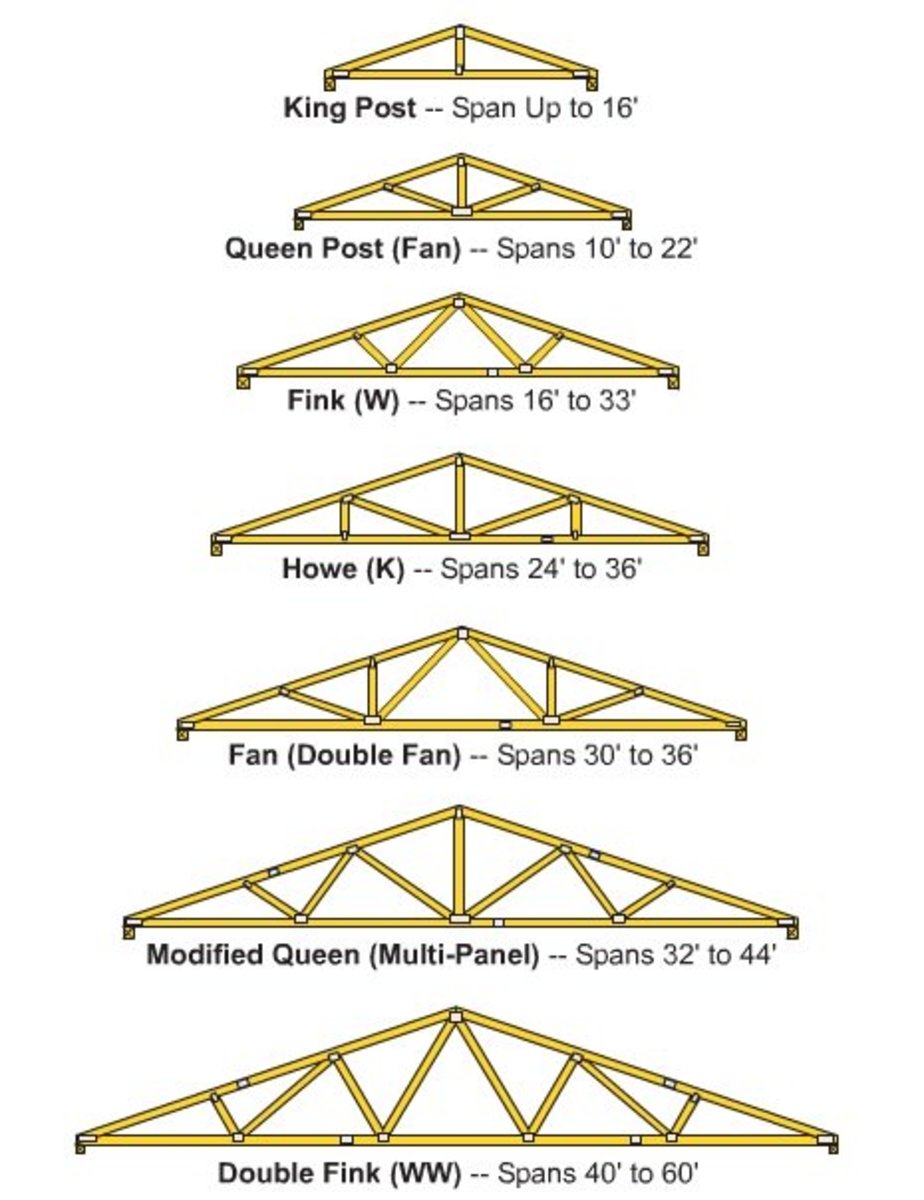
Types of Roof Truss Designs
Click thumbnail to view full-size
Jeff Whitley: Trusses do provide lateral stability for walls. When wind hits the broadside of a wall, the force transfers half down to the anchor bolts in the bottom plate and half up into the roof system.
The roof diaphragm (typically 7/16" plywood) transfers the load down into the perpendicular walls, and into those anchors and the foundation.
This is why trusses must be strapped down for uplift, and also have blocking attached to wall top plates.
Personally, I recommend buying manufactured trusses. They are fast and efficient, deliver, and will give you a report showing the bearing and uplift of each different truss.
Buildings are not engineered just to stand under normal conditions. They are designed to withstand a 50-year earthquake or wind event (There is a 2% chance each year of such an event.)
You don"t know if it was built right until it is tested.
I helped my Dad and Uncle build a 30"X30" garage 45 years ago. The roof was pretty light, 1"X4" pine lathe under regular tin. The ole time corrugated barn tin. SO, there aren"t a lot of weight on it. We built the trusses very simple, one King Post in the center, and 2 angle braces on either side of the post. They used, simply 3/8" plywood gussets, VERY SMALL, just barely covering the cracks where the wood came together. NO glue, and they only used 8 penny nails, hand nailed, of course. Over the years, things have been stored

YES It is rather Amazing how well trusses work.
However The REAL work is actually in the ENGINEERING process which is VITAL to its success. The engineering process makes certain that there is more than ample upright support to allow for weight deflection principals for the intended span of any given installed truss. These weight deflection principals take into consideration the overall weight of the roof decking and roofing material that will be used and also the fact that multiple roofing layers might eventually be added to the overall weight factor. Its all about MATH!
I appreaciate the information and I also agree with Ghost32. I ran into the same problem attaching the metal plates so I contacted a local welding shop to fabricate a clamping frame that I could use a 20 ton hydralic jack with. I constructed 13 24" span double fink style trusses using 2x4 lumber. I used them to construct a small 24"x24" workshop with no center support wall. They"ve held up great and no sag.
Recently a friend of mine constructed a building similar to mine. He also built his own trusses using 7/16 plywood, nails and waterproof glue on both sides. Although his building has been in use for slightly more than a year, his trusses are holding up remarkably well.
Interesting. I"ve built the shell of our new home in rural Arizona single handed (only the exterior stucco has to wait for warmer weather) but did have the trusses built by a local specialty company. A few comments and/or questions:
1. I"d never even heard of fire retardant timber for trusses. That"s a new one on me!
2. The trusses were delivered in a pile, a bit before they were needed. I hoisted them in place by myself, over the sidewall as you state (how else??), but with no support until they reached the center bearing wall. So the "lead half" did tend to flex sideways at the mending plate joints just a tad, but not enough to threaten structural stability. Conclusion: It"s true enough that they "should" be moved vertically to prevent stressing, but "have to"? Nah. I don"t "have to" do much, and getting help or equipment just to hoist a truss...don"t think so. :)
3. Your hub mentions attaching mending plates, but not "how". One reason I went with having them made was because I suspect doing that correctly involves presses that can "flat-push" the plates into the timber. Over the years, the few I"ve added via sledgehammer have been tough to apply--one side is all set, but when you hit the other side, the first one pops back out, and so on and so forth. Any clues? After all, I might need to know that someday.
3. Yes, ours are place two feet on center.
4. I now know the design used by the company is a Modified Queen (Multi-Panel), and according to your chart, that makes sense. They"re low pitch (as I specified), 2 in 12, and 36 feet in length--right in the ballpark for the Modified Queen. (Though I didn"t trust that totally and did build the center bearing wall prior to truss installation.)
5. Your article mentions that 2" x 4" lumber may be okay for smaller projects. Well, I have to say, yes, I"ve seen bigger timber used...but 90% of all the attics I"ve seen, and all but one of the residential structures, have been built with 2" x 4" timber. Maybe it"s just that I only know folks from the cheap side of the tracks?
Overall, thanks for a solid article!
Sign in or sign up and post using a HubPages Network account.
Original article and pictures take http://mlowell.hubpages.com/hub/Build-Roof-Trusses site
">
Комментариев нет:
Отправить комментарий