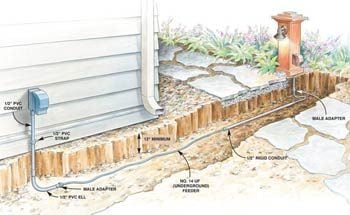
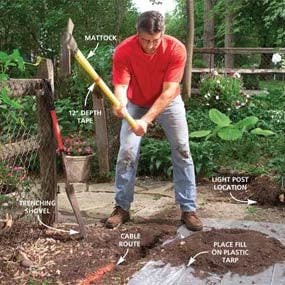
Mark the cable route from the power source (house outlet) to the position of the remote outlet with spray paint. Dig a 12-in. deep trench connecting the two points and the 2-ft. deep posthole for the light.
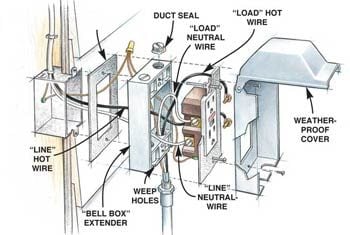
Get started by determining where you want the electrical post positioned and then find the nearest existing outlet to supply the power. That outlet must be GFCI protected. We used the closest outlet on the house, but garage outlets are also good candidates. By code, those outlets should be GFCI protected. To make sure the “feeder” outlet you choose is protected, look for the characteristic GFCI buttons, or if it"s a standard outlet, check it with a GFCI tester. Standard outlets still may be GFCI protected by being linked to another GFCI outlet elsewhere in the house. If yours isn"t protected, simply replace the standard outlet with a new GFCI outlet using the techniques we show in Photo 13 and Figure A. Another option is to cut in, mount and wire a new outside GFCI outlet, feeding it from an outlet mounted on an inside wall in the house. Sometimes that"s easier than digging a long trench to a more distant power source.
You also have to make sure the new outlet/light won’t overload the circuit you tie into, and that the box is big enough to handle the additional wire. To determine whether the circuit you want to use can handle the additional electrical demand, first shut off the circuit in the main panel. Then go through the house turning on lights and other electrical items. Add up the wattage of everything that stays off (the items on the circuit). Then add on the wattage of the post light plus the wattage of items continuously powered by the outlet. We recommend a maximum connected load of 1,440 watts for a 15-amp circuit and 1,920 watts for a 20-amp circuit (the amperage is stamped on the breaker or fuse). If the total wattage exceeds these amounts, find a different circuit. If you"re not sure, call in a licensed electrician to help with

To figure the minimum box size required by the National Electrical Code, add: 1 for each hot and neutral wire entering the box, 1 for all the ground wires combined, 1 for all the clamps combined and 2 for each device (switch, receptacle or combination device) installed in the box. Multiply this figure by 2 for 14-gauge wire and 2.25 for 12-gauge wire to get the minimum box volume in cubic inches. Plastic boxes have the volume stamped inside.
Once you"ve selected a power source, choose the easiest path for a 12-in. deep trench for the new cable. Give trees a wide berth to avoid chopping through roots. Approach sidewalks or paths at right angles for easier tunneling and make sure to plan a 3-ft. long straight section of trench on one side of the walkway. That"s so you"ll have room for driving the conduit beneath it (Photo 2). Mark the route with paint and then call the utility companies to mark any underground lines. (Don"t forget the telephone and cable company if those lines are underground.) Last you"ll need to get an electrical permit. Your local building inspections department either grants those or will direct you to a state office. The inspector will want to see the trench with the cable in place before you fill it back in, and then again for a final inspection after the project is finished.
The best digging tools to use for the trench itself are a mattock and a trenching shovel (Photo 1). That way you"ll be able to dig a fairly narrow trench to avoid moving the mountains of dirt you would with a conventional shovel.
Pile the dirt on a strip of plastic next to the trench. That keeps dirt out of the grass and/or makes cleanup on adjoining patios much easier. Dig trenches that approach walkways a few inches deeper to allow for driving the conduit (Photo 2). After the trench is finished, dig a posthole at the end of the trench about 2 ft. deeper than the trench to receive the light pole post.
Original article and pictures take http://www.familyhandyman.com/electrical/outdoor-lighting/how-to-install-outdoor-lighting-and-outlet/step-by-step site
>
Комментариев нет:
Отправить комментарий