
Don"t let the size of this project fool you. It may be big, but you can build it in a weekend. The cabinet is just a basic box: nothing more than simple framing covered with plywood. Installing the doors is exactly like installing sliding closet doors. You only need inexpensive hollow-core doors and sliding door hardware.
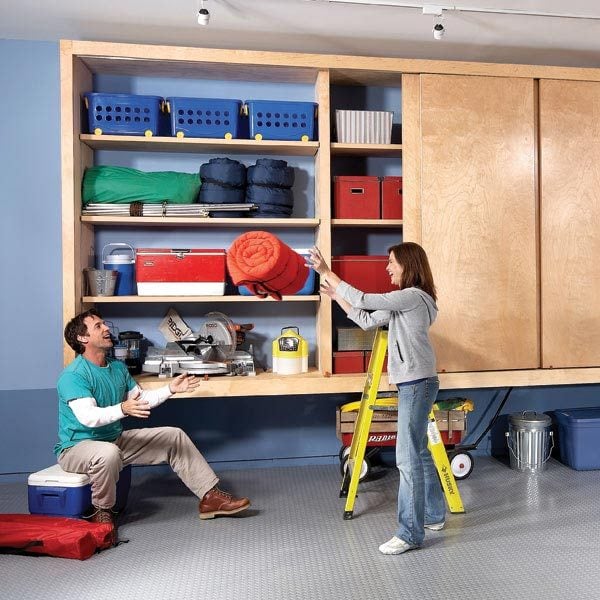
At 7 ft. tall, 2 ft. deep and 16 ft. long, this cabinet not only holds a ton of stuff, but also handles bulky items that other cabinets can"t: camping gear, bench-top tools, outdoor toys. You can even hang off-season clothes inside on hooks. The big sliding doors keep it all neatly hidden and provide instant, easy access.
Using birch doors and trim and AC plywood on the partitions, the project cost us just over $1,000. Simply substituting oak or lauan doors and replacing the AC plywood with oriented strand board (OSB), you could trim the cost by a quarter.
How fast is this project? If you stick to it, you could complete most of it in a day. Plan a second day to complete the details and get started on the finishing. In addition to standard hand tools like a tape measure, level, framing square and Speed Square, you"ll need a circular saw and drill. A power miter saw and pneumatic trim nailer would simplify the trim work but aren"t necessary.
We designed this cabinet to accommodate six doors and fit against the right wall, but you can easily modify it to suit your needs. You can make the cabinet wider or narrower by changing the number or size of the doors. Reverse the plan if you want to mount it against the left wall instead. You could also build the cabinet tight to the ceiling, but you"ll have to reverse the order of construction. To do that, start by fastening the ceiling frame to the studs and to the ceiling. Then mount the uprights to the walls. And finally build the base, including the plywood floor, and bolt it to the uprights and the wall.
If you have block or concrete walls in your garage, attach the base, uprights and top frame with lag shield anchors and lag screws or expanding concrete anchors. If you build the cabinet against open studs, you"ll have to install horizontal blocking between the studs in areas where the uprights don"t align with an existing stud.


The most critical part of the project is getting the base square, level and straight before you screw it to the wall. If your wall is bowed (like ours), you"ll have to shim behind the frame before bolting it to the wall.
Start by snapping a level chalk line on the wall to indicate the top of the lower frame. We positioned our cabinet about 24 in. above the floor. Next, use a stud finder to locate and mark the studs. Cut temporary 2x4 legs that rest on the floor and extend to 3-1/2 in. below the chalk line, and then screw them to the wall. Make another set of legs about 1/4 in. shorter than the first set to support the front edge and add a cleat to each one (Photo 1). Assemble the base (Figure A) with nails or screws and rest it on the legs. Attach the front legs through the cleat with screws and attach the base to the wall with a temporary screw at each end.
Using a level, adjust the height of the front legs by shimming under them until the frame is level from front to back on both ends. Next, nail small blocks of 1/2-in. plywood to both ends of the base and stretch a string or chalk line between them. Use a third block of 1/2-in. plywood to check the distance between the front 2x4 and the string (Photo 1). Add shims between the wall and the frame as needed to create a consistent 1/2-in. space between the string and the front 2x4. If your wall is straight, you won"t have to add any shims. Lag-screw the frame to the studs (Photo 1). Finish the base by nailing on the plywood.

Cut the 2x2s to length and screw them together to form the frames for the uprights. To provide maximum rigidity, spread a bead of construction adhesive on the face of the 2x2s before nailing plywood to one side of each frame. To ensure the frames are square, be careful to cut the plywood square and line it up with the frame before nailing. Use the measurements in Figure A to locate the partitions, and make square layout lines on the plywood base with a framing square. Use a 4-ft. level to extend the layout lines up the wall.
Where uprights don"t align with wall studs, use screw-in drywall anchors to secure them (Photo 2). These anchors aren"t supporting the cabinet. They simply hold the uprights in position until the top is installed.
Since the uprights hold up the base, they have to be securely bolted to the base. With a spade bit, drill a 3/8-in. hole through the bottom 2x2, base plywood and 2x4 frame. Connect the outside uprights to the base with 6-in. hex-head machine screws, washers and nuts, and the center uprights to the base with 4-in. versions. You"ll repeat this process at the top after installing the top frame (Photo 3).

The top frame has the same dimensions and layout as the base frame but is made from 2x2s instead of 2x4s. As you cover the frame with plywood, use the plywood edges as a guide to make it straight and square.
Locate and mark the studs along the line where the top will be. Then lift the top onto the uprights (plywood side down), align the ends and lag-screw the frame to the wall. If your situation is like ours, with just a narrow 6-in. space (Photo 3) between the cabinet top and the ceiling, this part is no fun. But it"s crucial that the top be securely fastened to studs. Add shims between the wall and the frame if there are gaps. Then bolt the top to the uprights and nail the second side of the plywood to all the uprights (Photo 3). We used birch plywood on the exposed left side to match the doors. This outside plywood piece is 6 in. longer than the interior plywood to cover the top and bottom framing.

Start by cutting trim boards to cover the uprights and nail them on with 2-in. finish nails (Photo 4). Trim a 3-1/2- in.-wide board to fit tight against the wall. Complete the trim by cutting and installing the top and bottom (horizontal) boards to fit between the ends.
Mount the door track 1 in. from the back side of the top trim (Photo 5). We used two 8-ft. tracks and cut the ends so there would only be one joint in the center of the track. Mount the hangers. Then tilt the doors and hook the wheels onto the track to install them (Photo 7). If you"re having trouble installing the front doors, loosen the adjusting screws on the wheels and extend them to maximum height. After installing the doors, crawl inside the cabinet and readjust the wheels so the doors hang level and are even with each other. Finish the door installation by installing the door guides. Locate them where the doors overlap, centered 2-5/8 in. back from the front edge of the trim.
With shelves in, all that"s left to do is brush on two coats of polyurethane, load up your new storage space, and say goodbye to that mess in your garage.
Hollow-core doors are stiff and inexpensive, so they make great shelves for projects like this one.

Original article and pictures take http://www.familyhandyman.com/DIY-Projects/Home-Organization/Garage-Storage/giant-diy-garage-cabinet/View-All site
>
Комментариев нет:
Отправить комментарий