We here at The Family Handyman recently had the opportunity to pool our talents and build a garage. We were reminded of what a great project it is for an advanced DIYer. So here is some of our best advice on building a garage. We concentrated on framing, which is the most distinctive part of the project. We couldn"t include how to roof it, install vinyl or cement-board siding and windows, etc., but you can follow the above links or search for those topics in the search window above and find all the information you need.
You"ll want to enlist a few friends and family members for a project of this size. It"s helpful to have at least one worker with some framing experience, but the rest of the crew"s skill level can vary from intermediate to “Which end of the hammer do I hold?”
We"ll also talk about a lot of other topics for anyone who"s interested in tackling a “detached” (not attached to the house) garage. These include the permit process, design considerations, slab details, roof truss options, materials ordering, and much more.
The very first thing you should do when you plan to build a garage is pick up or download the information packet provided by your municipality. If your local government doesn"t have one, ask the building official what you need to know before getting started. Although sometimes it"s easier to apologize later than to ask permission, that"s not the case when building a garage—get your plan approved! Here are some questions you should ask.
How big can it be?
Sure, it would be nice to build a 40 x 60-ft. dream garage with 12-ft. walls, but there will be local rules, ordinances or covenants on square footage and how tall new structures can be. Here are some rules you may encounter:
- Only a certain percentage of a lot can be covered with impervious structures, including buildings, decks, driveways, aprons and sidewalks.
- There will be a limit on the total number of buildings allowed.
- The garage might have to be shorter than the house.
Where can it be built?
Talk to your neighbors first. Mrs. Whitman may not appreciate your new garage blocking the sun from the garden she"s nurtured for the past 20 years. The city/county will want to know where you plan to build. Here"s what you"ll have to do:
- Get a copy of the survey of your property from the city/county.
- Draw an outline of the proposed building on the survey.
- Find property markers (at least the two or three that are relevant).
- Dig a hole and check for solid soil (you can"t build on spongy soil).
- Talk about your plans with neighbors.
- Apply for variance if the plans don"t conform.

You can get great design ideas from several online sites, but it"s not necessary to spend hundreds of dollars on a blueprint. All the city or county will need to see is a basic drawing showing length, width, height, roof pitch, soffit size, etc. But consider the following during the design phase:
- Match the house roof pitch, overhang size, siding and roofing if possible.
- Place windows so you can see people coming and going.
- Don"t place windows where you may want a cabinet or pegboard.
- Put the service door close to the house.
- Add an extra service door in back if needed.
- Build taller walls to accommodate a larger overhead door.
- Upsize to 2x6 walls for more space for insulation and increased R-value.
- Position the building to avoid water runoff problems.

The type of foundation or footings and slab you build your garage on will depend on your budget, the size of the garage, the grade and the soil conditions. Pouring just a slab with a thickened perimeter is the least expensive and a perfectly acceptable option if you have good soil conditions (not spongy). Adding one course of block to a slab keeps the framing farther up from the ground, which may be necessary depending on the grade. The most expensive option is laying several courses of blocks on top of frost footings, and then resting the edges of the slab on the blocks. But this is also the most durable and long-lasting option. Large garages and sites with deep organic topsoil conditions may require either this method or lots of digging and lots of fill.

Even if you hire a cement contractor to pour your slab, you need to be involved in the process. Here are some minimum requirements you should insist on:
- Proper elevation: Wood framing, sheathing and wood siding need to be 6 in. from the final grade (vinyl siding can be touching the ground, and fiber cement can be within 2 in.).
- Four to 6 in. of base material, laid down and compacted.
- Concrete with a 4,000-psi mixture.
- A pour that"s no less than 3-1/2 in. thick (thicker if you plan to park heavy items like antique tractors on it).
- Reinforcement with mesh, rebar or fiber mesh mixed into the concrete.
- Sloped floor (at least near the overhead door).
- Approved plate anchors properly spaced (communicate the wall layout to avoid anchors

- Control joints (spaced no more than 12 ft.).
Asking a lot of questions up front will minimize misunderstandings and avoid conflicts. Here are other topics that should be discussed:
- Ground insulation options for heated spaces.
- Floor drains.
- Installing PVC pass-throughs for electrical or plumbing rough-ins.
- Rebar grounding for electrical panel.
- Pads outside of the service door and aprons in front of the overhead door.
- Cement sealer (but don"t seal the floor if you plan to install an epoxy floor coating).
- Inspection scheduling (who will call?).
- Always call 811 to have your utilities located before you do any digging.
If possible, hire a local contractor who"s familiar with the rules in your municipality. Most experienced crews have developed a relationship with the local building official (hopefully a good one) and know what to expect.

Don"t stress about ordering the materials; let your lumber supplier do that for you. The closest home center is probably your first thought, but give your local lumberyard a chance. The prices may be a touch higher, but you"ll get the experience of folks who do material “take-offs” for builders and remodelers all day long.
No matter who creates the materials list for you, take a close look at it. Your list could include caulking, nails, flashing and other items you may not need. Even worse, you may not have everything you do need, and the last thing you want is your whole crew twiddling their thumbs waiting for materials to show up. Here"s what to look for when checking your materials list:
- Pressure-treated lumber for bottom plates.
- Top and bottom plates that are long (14 or 16 ft.).
- It"s more efficient to use the same sheathing for the roof and walls. Half-inch or 7/16-in. OSB (oriented strand board) is the most common material builders use.
- Header material.
- H-clips for the roof decking.
- Hurricane clips to secure the trusses to the walls.
- Material for overhead garage doorjambs.
It"s a good idea to cross-check the actual lumber order too. If an inexperienced person did the material take-off, you could have a mess on your hands. Use these rules of thumb to check the materials list:
- Studs: One stud for every linear foot. This will leave plenty extra for trimmers, corners, blocks and cripples.
- Treated bottom plate: Total number of linear feet plus 20 percent.
- Top plates: 4 ft. for every 1 ft. of the perimeter. You"ll need the extra material for the bracing and blocking.
- Sheathing: Add the total square footage of wall area (less the garage door opening and roof area), including the overhangs, and divide that by 32 to give you the total number of sheets of sheathing you"ll need. And then add a couple!
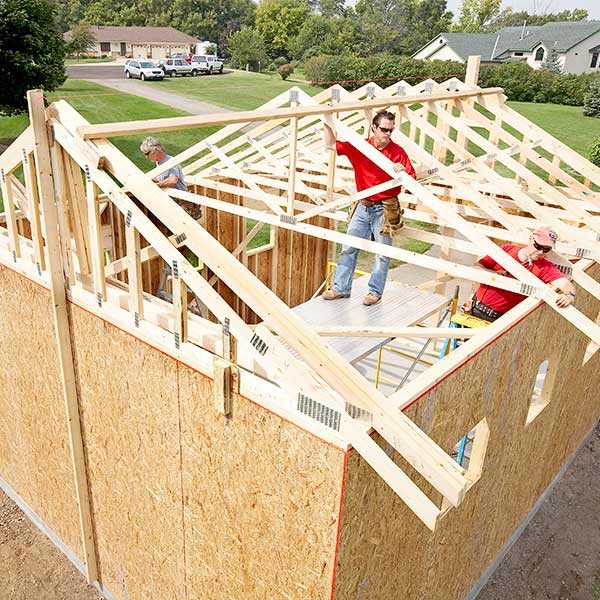
Hand-framing the trusses will save you a little money but add a whole lot of time to your project. Prefabricated trusses are straight and strong, and they"re super easy to install. The person who orders your lumber will also order your trusses. Order early—allow two to four weeks for delivery.
Gable-end trusses have vertical webbing to attach sheathing and siding to. Some gable trusses are sized to match the common trusses. Others, called “dropped-top chord trusses,” stand about 3-1/2 in. lower than the common trusses. That allows lookouts to run over the gable truss and makes wide overhangs stronger (see Photo 15).
Storage trusses have no webbing in the center, creating more room for stuff. The bottom chord is beefier so it will support the extra weight. Storage trusses cost about 30 percent more than common trusses.
The trusses will be delivered with a packet of installation instructions. These instructions tell you which truss goes where (for multiple roof lines), and they"ll indicate how the trusses need to be braced. Each truss manufacturer has different bracing requirements. You won"t pass inspection without this packet on-site!


Your most experienced carpenter shouldn"t be hauling wood—that"s a job for a newbie (sorry, newbies). The key to getting the most from your crew is to assign tasks that match skill level. Here"s a good way to divide your labor:
Expert: Do layouts, assemble window and door openings, straighten walls.
Some experience: Cut lumber and sheathing, build headers, nail studs and sheathing, help with trusses.
No experience: Haul lumber, fetch fasteners and other supplies, hold the “dumb end” of the chalk line, crown studs, lift walls, keep the job site clean, install hurricane clips.

We spoke to a local building inspector and asked about the most common mistakes made by homeowners when building a garage:
1. Inspection schedule: There will likely be several inspections at different stages of the building process. Don"t skip any.
2. Attic ventilation: If a garage is going to have a ceiling installed, there needs to be 1 sq. ft. of vents installed for every 300 sq. ft. of floor space—60 percent venting in the soffits and 40 percent in the roof. Even if you plan on finishing later, go ahead and install the roof vents before the roofing. It will be much easier now than later.
3. Erosion control: As soon as you start moving dirt around, a silt fence or some other means of erosion control needs to be installed. This prevents the rain from washing the soil into your neighbor"s yard or into the storm sewer, which can pollute our rivers.
4. Portal framing requirements: The small walls on each side of an overhead garage door need additional beefy bracing to tie the walls to the foundation as well as the header to the wall (talk to your local building official for details).
Original article and pictures take http://www.familyhandyman.com/garage/framing-a-garage/view-all site
>
Комментариев нет:
Отправить комментарий