
How to build easy, affordable shelving for your shed, storage area, or garage. This was an easy DIY and didn't take a lot of time. We were also able to fit the wood into our minivan.
How to build easy, affordable shelving for your shed, storage area, or garage. This was an easy DIY for storage and didn't take a lot of time. We were also able to fit the 
wood into our minivan.
We purchased a great shed at the beginning of the summer, but now that it's Fall we realized that we needed to get everything truly organized for the winter. I am so excited about quickly and easily my husband put this together.
Supplies
Supplies listed below may include affiliate links to the products.
- (1) 4x8 plywood project wood
- (8) 8' 1x3's
- (3) 8' 2x4's
- Tools, nails, etc.
Tutorial
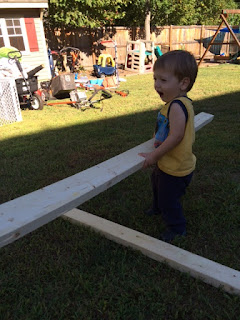
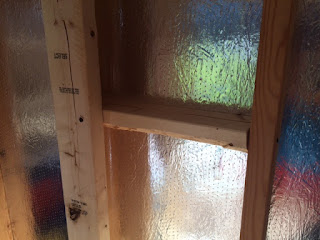
First we cut our wood and created a frame for the left side from (2) 8' pieces of 2 x 4 woods. We couldn't transport wood big enough to span the whole length of either side in the shed so we needed something to support the left end of the shelf. The right end would be attached to the wall studs.
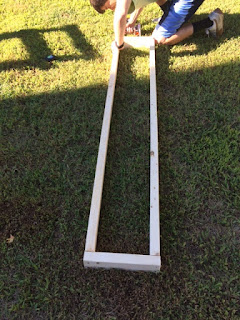
Here's the rectangular frame. For our particular shelves, making this meant creating a rectangle with two 12" pieces and two 72" pieces. You may want to adjust yours depending on the size of your shed. The height needed to match the shed studs height.
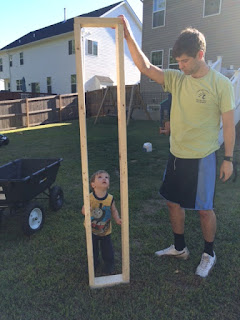
My husband screwed it into the wall stud. The wood along the bottom is just there temporarily to make sure the spacing is correct.
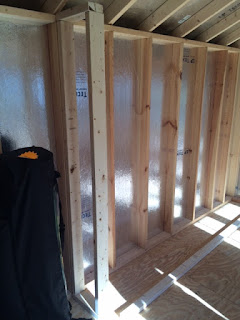
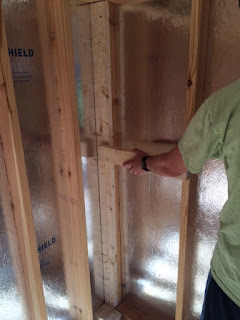
On the right side, towards the corner, he screwed a piece of wood along the stud to make everything flush on that side... this is where the right side of the shelves will attach. On the right, you can see where he's adding a board to support the right side of the shelf.
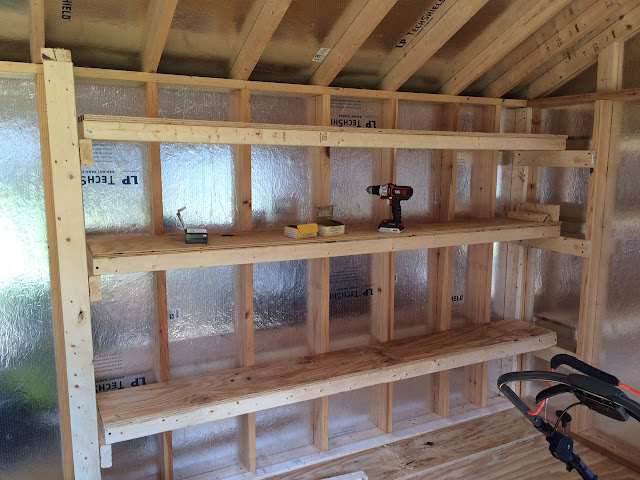
I didn't get a good picture of the shelves being built, but he used 1x3's to create the shelves EXACTLY how he made the left frame. Once he created his rectangle, he cut a piece of plywood to fit on top and screwed the plywood on.
Once built, the shelves were placed on top of the supports on each side and screwed into the wall studs behind the shelves. They just sit on the supports- those aren't screwed in.


Final Pictures of our DIY Storage Shelving
This is the final product. They're very sturdy- my husband and son were sitting on one shelf together before the other two were finished.

Thanks for taking the time to read this post! I really appreciate the time you've taken. Please share, like, and pin my post if you enjoyed it. Follow me on social media and subscribe to my email list to keep up to date on all of my latest projects!
Disclosure of Material Connection: Some of the links in the post above are “affiliate links.” This means if you click on the link and purchase the item, I will receive an affiliate commission. Regardless, I only recommend products or services I use personally and believe will add value to my readers. I am disclosing this in accordance with the Federal Trade Commission’s 16 CFR, Part 255: “Guides Concerning the Use of Endorsements and Testimonials in Advertising.”
Original article and pictures take http://www.diydanielle.com/2015/10/diy-easy-storage-shelving.html#_a5y_p=4497388 site
Комментариев нет:
Отправить комментарий