Tips for Mastering Featherboards Popular Woodworking Magazine
Tips for Mastering Featherboards - Popular Woodworking Magazine
Tips for Mastering Featherboards
Featherboards are like having an extra set of hands in the shop, going where no fingers ever should.
By Jock and Susan Holmen
The featherboard gets its name from the rows of
flexible “fingers” that act like a bird’s feather and
give way in one direction only. They help ensure
safety and accuracy, because they keep consistent
pressure on stock where it’s needed most, close
to the cut. They’re indispensable for eliminating
bumps on a molded edge or uneven bottoms in
rabbets and dadoes.
Shop-made featherboards are often superior to
commercial ones, because they can be custom fit
to your machines and they cost next to nothing.
All the featherboards in this article were made
from the type of scrap lumber and plywood that
can be found in any shop.
Positioning a featherboard can be a pain. Too close to the fence or table and the squeeze is so tight you can barely feed the stock. Too loose and you’ve lost effectiveness. Try taking about 1/8 in. off the first feather. Set that end against the stock you plan to machine and clamp the featherboard parallel to the table’s fence. The pressure should automatically be just right.
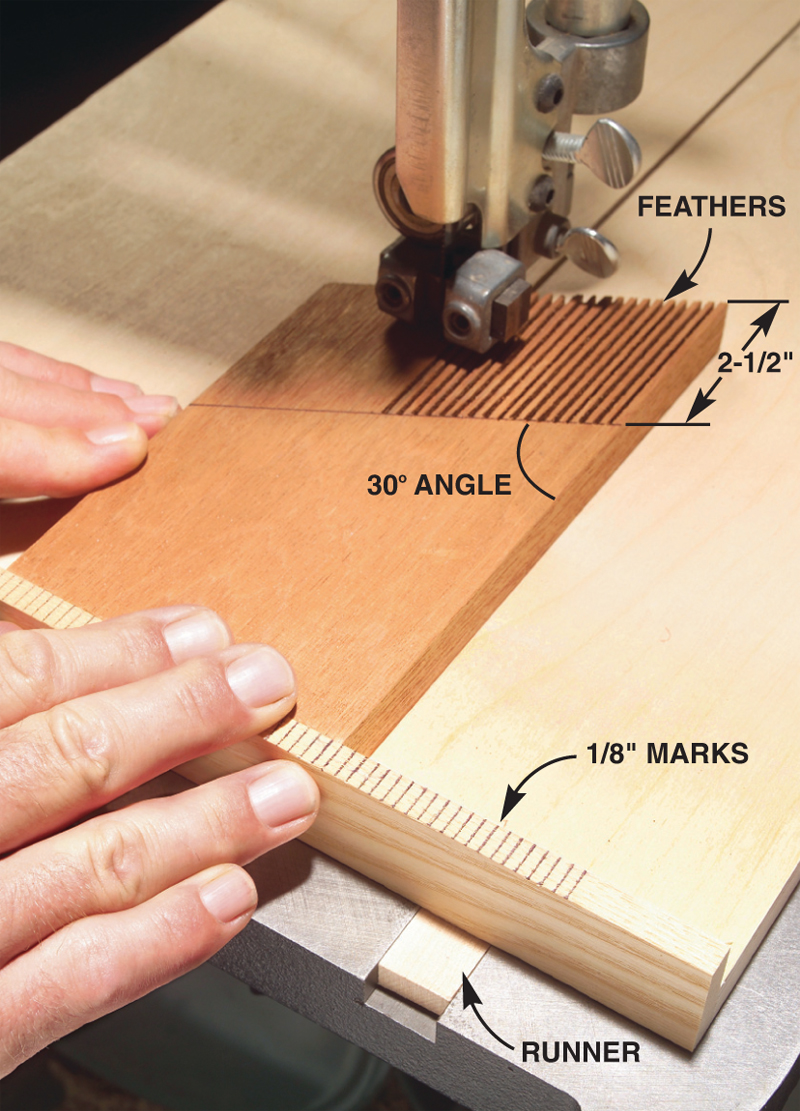
The safest way to make featherboards is on the bandsaw using a simple sled with a miter slot runner. Cut a 30-degree angle on one end of the featherboard blank first. Mark a parallel line about 2-1/2 in. from the angled end. Set the blank on the sled and make the first cut from the end to the line. Then, slide the featherboard over to the next mark to make the second cut and continue across the board’s width.
A feather length of about 2-1/2 in. with cuts made every 1/8 in. provides the right balance between flexibility (for firm pressure without being too stiff) and strength (so the feathers won’t snap off) for most hardwoods or multi-ply birch. Increase the feather spacing to 3/16-in. when you are using softer woods, such as pine or basswood, or regular hardwood plywood. You can
always fine-tune the length and spacing to suit your own needs.
A tall featherboard can apply pressure against the entire height of the fence. It’s especially useful for holding tall, narrow stock—for instance, a door panel—against a fence. Just glue some scraps to create a block that is as tall as your fence is. Then, cut the feathers on your bandsaw sled.
This wraparound featherboard produces chatter-free moldings, because it provides continuous pressure ahead of and behind the cutter. Cut a 2-in. arc in the end of the blank before you cut the feathers.
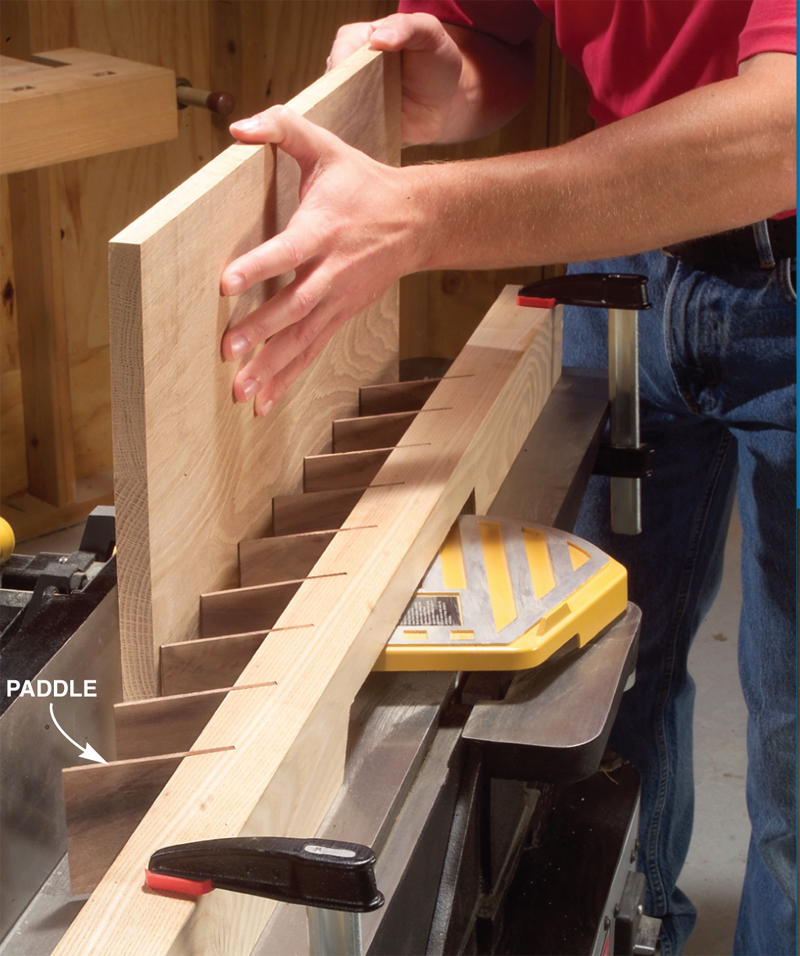
Jointing an absolutely square edge on a wide board can be tricky for someone new to the jointer. The least little tip away from the fence and you’ll have to start over. This paddle-style featherboard can bridge your jointer’s guard while keeping your stock pushed firmly against the fence. The paddle featherboard is easy to make and is just as useful on a tablesaw or router table (Fig. A, right).
Clamping a featherboard on a tablesaw can be a hassle. T-track fasteners allow you to quickly and easily position a featherboard just ahead of the blade for rip cuts. To make this style of featherboard, cut deep slots for the T-track fasteners as you cut the feathers on your bandsaw.
Sometimes you want a featherboard to apply pressure right over the blade, as when you’re cutting a rabbet. But clamping a long, narrow featherboard onto a short fence can give you fits. This long plywood featherboard is just the ticket. It clamps easily onto the squat tablesaw fence because the clamps are far removed from the feathers and the blade.
Most featherboards are made with the feathers parallel to the grain, but this one requires the feathers to be cut across the grain. Be sure to make it from plywood or your cross-grained featherboard will start to look like my 8-year-old’s smile—lots of missing teeth. To cut these feathers, use the same sled as you do for the parallel-grain boards, but add a 30-degree wedge.
A long arm on a featherboard takes the hassle out of clamping it on a tablesaw. Featherboards need to be secured at two points to prevent pivoting. Securing a single featherboard across a tablesaw’s large expanse can be difficult, if not impossible. The solution is to biscuit an arm at a 30-degree angle to the featherboard. Position the featherboard just in front of the blade for rip cuts.
(Note: Product availability and costs are subject to change since original publication date.)


Комментариев нет:
Отправить комментарий