Sawhorses are used for sawing wood, right? Well, yes… and no. The truth is that pros use sawhorses as a lot more than just unpaid cutting assistants. In fact, with a little creativity, sawhorses can be one of the most useful tools in your arsenal.
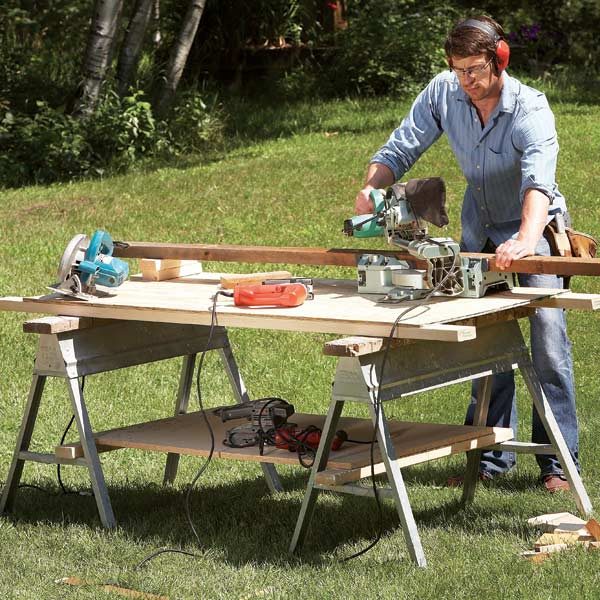
One of the best ways to get the most out of your “ponies” is to set up a semipermanent workstation when you"re trimming or framing larger or longer-term projects. Screw 2x4s to the tops and a plywood platform to the 2x4s and you"re ready to build. Let the 2x4s project a few inches beyond the plywood to make it easier for someone to help you pick up the whole works and move it around as needed. To keep the clutter out from underfoot, install a plywood shelf across the braces.
This workbench folds up in a single piece, except for the lower shelf that you lift out before folding the legs. It"s easy to throw whole thing into the back of a pick-up when helping a friend or neighbor.
5-Minute workbench parts Workbench folded up
Discover how to build a sawhorse work table that"s easy to set up and take apart. With standard wood and tools, you can make this simple, portable sawhorse table in an hour or two. And you"ll appreciate the simplicity and sturdiness. You can mount tools on this work table, use it to make long cuts and much more.
Don"t totter on stepladders to do work less than 10 ft. above the ground. Make a crude, but safe, scaffolding plank with plywood and 2x4s up to 8 ft. long. Be sure to add end blocks to keep the long 2x4s from folding up while you"re working. Build longer planks if you want, but use 2x6s for lengths between 8 and 12 ft.
Scaffolding supports
Don"t cap metal sawhorses with 2x4s; 2x6s are a better choice. You"ll get a larger working area and be able to clamp stuff to the overhanging sides (photo; Tip 4). Anchor the 2x6s from the undersides with No. 12-3/4-in.-long screws. Don"t use longer screws or you"ll be breaking saw blade teeth every once in a while. If you want to hang your sawhorses up and out of the way, let the ends run a few inches too long and drill holes in them (photo; Tip 4).
Don"t be afraid to cut into your tops! Set your blade to cut 1/4 in. deeper than the thickness of the wood and cut right through the tops. They"ll still last for years.
Need extra horses right now? You can make a pair by cutting five 8-ft. 2x4s into six 32-in. lengths and eight 26-1/4-in. lengths.
Screw the 32-in. pieces into I-beam shapes and, after you"ve drilled pilot holes, attach the legs to the I-beams with 3-in. screws. These screws, along with the upper edge of the I-beam, stabilize the legs.
Or customize the lengths and heights to suit your purpose. But you"re on your own with the numbers!
Sawhorse details
Don"t settle for one pair of horses! You"ll always need another set or at least half of another set. If, for example, you need a quick platform for cutting plywood, assemble two horses end to end with a third one in the middle, perpendicular to the first two. Make sure the cutting line is supported by the middle horse. Two sets of horses both the same height will always be the most useful.
Convert a portable table saw into a stationary saw by resting the saw table edges on two overhanging 2x4s. Adjust the placement of the boards so the saw is well supported but as far apart as possible so they won"t interfere with the fence, and then screw them to the horses. To hold the saw in place, screw through the holes in the saw table (drill "em if you have to) into the 2x4s. You can use a piece of plywood for outfeed support, shimming it so it"s even with the table top. But the best outfeed support is a hollow-core door (damaged ones are
$20 or less at home centers!). A door is the perfect thickness for most saw tables (maybe a little shimming required), and it can do double duty as a lightweight portable workbench. Outfeed table for table saw
Create a drying platform when you have to finish miles of siding or trim, cabinet doors or just about anything else. The platform is simple—just a couple of 2x4s spanning the sawhorses.
After each piece is finished, transfer it right to the platform. Start in the middle and work your way to each end. That"ll keep the whole works from toppling over and causing a disaster.
Original article and pictures take http://www.familyhandyman.com/video/device/mobile/t/57561523/savvy-sawhorse-table-tips.htm?m_n=true site
Sautéed Green Beans with Tomatoes & Crispy Parmesan - Foxes Love Lemons
Sautéed Green Beans with Tomatoes & Crispy Parmesan - A simple but fancy-looking side dish for any special meal. | foxeslovelemons.com
Do you ever feel like Thanksgiving is basically just carbs on top of carbs on top of meat? I mean, don’t get me wrong . . . I think that’s kind of what we love about this meal so much. On no other day of the year will you find me eating meat with a side of potato, a different kind of potato, bread and even more bread. But my taste buds need and crave some fresh veggies and fruits to break up all of the carb-riffic action.
Epic Thanksgiving - A flavor-packed, chef-inspired Thanksgiving dinner that YOU can make at home! | foxeslovelemons.com
These Sautéed Green Beans with Tomatoes & Crispy Parmesan are a welcome addition to my table, as the crunch of the green beans and the acidity of the tomatoes adds a nice balanced flavor on my plate. Oh, and don’t even think about forgetting the crispy Parmigiano Reggiano. These Parmesan cheese “fricos” (as they are usually called) couldn’t be an easier to make, but will make your guests think you are a gourmet chef.
Sautéed Green Beans with Tomatoes & Crispy Parmesan - A simple but fancy-looking side dish for any special meal. | foxeslovelemons.com
Parmigiano Reggiano is exclusively from Italy and contains only 3 ingredients: milk, salt and rennet. It never has additives of any kind, BUT you do need to make sure you are buying authentic Parmigiano Reggiano and not an imposter. How to do this? Depending on how the wheel is cut, pre-cut chunks of Parmigiano Reggiano will often have pinhole dots on the rind, but you’ll want to ask your cheesemonger to be sure you’re getting the the real deal.
Sunday, November 20th: Cocktail Hour! Roasted Campari Bloody Mary
Other Thanksgiving Ideas:
Prep-Ahead Strategy:
Use Those Leftovers:
Making one of these recipes? Please let me know by sharing a photo on social media with the hashtag #FLLEpicThanksgiving!
I’m so thankful for each and every person that stops by this blog, whether it’s once in awhile or every day. This little corner of the internet has allowed me to change my life and create a
career path for myself that brings me so much joy. Happy Thanksgiving to you and your family. Epic Thanksgiving - A flavor-packed, chef-inspired Thanksgiving dinner that YOU can make at home! | foxeslovelemons.com
Disclosure: This was a sponsored post written by me on behalf of Parmigiano Reggiano. Sponsored posts help me pay for the costs associated with this blog (groceries…lots of groceries), and help support me as I pursue a career in recipe development and food photography. All opinions are 100% my own.
Original article and pictures take http://foxeslovelemons.com/sauteed-green-beans-tomatoes-crispy-parmesan site
Finding Woodworking Projects and Plans for Beginners
If you are beginner as well as really curious about doing a DIY project for home after that, woodworking can be intriguing. If you do not have the correct info, guideline, and also skill, you could end up investing even more loan and time than you originally planned to spend. As a newbie woodworker, you need have the area, time as well as the correct devices. Having actually said, there are a few necessary factors that you must maintain in mind, prior to beginning with any woodworking job.
1. If you are novice, you should first should be really thinking about woodworking. Producing something brand-new with your personal hands is a special sensation. Do not begin a task if you are not interested, as this may land you in a bad area.
2. Think of the major factor of developing this woodworking task. Select making uses of the product you are making.
3. Consider your skills as well as assess the time you have, prior to you start with a task.
4. Begin tasks that you can complete. If you remain in the center of some job, then it is much better not to start any type of project whatsoever.
If you maintain these important points in mind before you begin a woodworking project, it will certainly end up being extremely easy for you to achieve success. Woodwork needs intending as long as it needs initiative. So exactly how do you get going?
Beginning With Woodworking Jobs and also Prepare for Novices
Prior to starting anything, it is extremely important to select the woodworking projects that you desire to begin with. As a beginner, constantly pick a job that has an extremely basic build up or a straightforward building and construction. Some simple to begin jobs include, bird feeder, benches, racks, etc. When you acquire the techniques, you can constantly removal to the next degree of woodworking jobs, like cabinets, sheds and others. Beginning projects need to constantly be much less challenging and less irritating to make sure that you have a far better understanding of working with timbers and their tools. When the task is picked, start selecting your tools.
Beginners Woodworking Tools
Tools are the ways whereby you will certainly win the fight of woodworking. Lots of people believe that power devices are needs.
Nonetheless, for beginners basic hand devices could be really useful and more than valuable in finishing a project. If woodworking is your pastime, then a few devices that you would call for are:
1. Workbench - A workbench is required for precise cuts and measurements. The workbench when fixed with vises use ample area to work. As a primary device, workbench should belong of your newbie’s woodworking tools.
2. Hammer - Hammer is a necessary tool for woodworks. It assists you to own nails, pins, staples, etc. A tiny and light-weight hammer will make points a lot simple for you. When you purchase a hammer, always check the equilibrium in between the weight and stand. Constantly pick a strong, yet lightweight product.
3. Saw - A saw is an additional tool that you could not live without while woodworking. This device assists you to reduce timbers at various sizes. There are various types of saws readily available in the marketplace. Select a dimension that you could handle.
4. Screwdriver - Screwdrivers are offered in different forms and also sizes. Mainly there are Canadian kinds and also standard flat kind. Having all of them will help you beforehand woodworking. You could additionally purchase power screwdrivers as they make the work much quicker.
5. Determining tape - It is one more really important tool that you can not work without. The measuring tape assists you to gauge timber before they could be attached with each other.
6. Wrench - Some woodworking tasks need fixing screws as well as fixes. For such tasks, you call for wrench. Nonetheless, this is not a tool for novices, but having it would certainly make job easier for you at a later stage.
7. Drill - Drill aids you make holes in wood. Power drills are much more beneficial however they cost more. Low wattage power drills will make the job a lot very easy.
8. Various other tiny as well as fundamental tools - These include pencils, gum, staple gum tissue, degree, eliminate, first help kit as well as shop vac.
Costing and also Allocate the Job
There is no set cost on woodworking jobs. Based upon the sort of task you wish to finish, pricing could be figured out. The basic the task, the much less price it includes. Nonetheless, at the really starting purchasing the devices will be a little substantial. Therefore, it is much better to take care of a budget plan first on the tools, then on the project. Getting the basic devices will ensure that you do not should acquire anymore product aside from the timber ply.
Time and Instructions
Directions are among the primary points that every beginner must follow. It resembles the woodworking Bible. Instructions guide is an extremely easy to recognize process, what to do as well as how you can do it. It is a methodical guide for finishing the project. Time additionally plays a vital function in the building of woodworking jobs. Woodworking jobs need time and therefore it is essential for a newbie to have sufficient amount of time each week.
Tips and Techniques for Beginners
There are no quick pointers or techniques that would make the work easy. However, the most crucial point that will assist you to attain success is correct preparation. With appropriate preparation and also a strategy, it is feasible to accomplish success quickly. If you understand the function of woodworking, the item you intend to construct, the tools you need to own and also the average time you could offer each day; then you are good to go to go.
Conclusion
All these tips and also instruction will certainly make the woodworking projects and also plans for novices quick to finish. Always ensure that you have all the vital devices, materials, space prepared. Maintain the directions of constructing an item convenient. Proper strategy as well as preparation will aid you making a fantastic woodworking task for your residence.
The Beginners Guide To Buying Used Woodworking Tools
Experienced or Brand-new Woodworkers
It is possible to save an excellent amount of loan by acquiring top quality, made use of woodworking tools rather than only acquiring new devices and also this holds true whether you are a brand-new or skilled woodworker.
Nonetheless, it is essential to choose the right kind of woodworking device by purchasing from the ideal source.
Where Should You Purchase Good Used Tools?
Constantly guarantee you are purchasing from a reliable resource that you understand as well as count on. It may likewise be worth buying from a reliable store in your area that has a reputation for supplying only top quality devices and equipment as well as will certainly provide some kind of back up solution for you after the sale.
You could likewise acquire from public auctions or even on the internet. Nonetheless, make sure to establish the top quality of the items prior to you devote and also examine whether they use any type of return plan if required.
While it is always good to conserve some loan by acquiring utilized woodworking devices or devices, you may locate getting second-hand or used could be incorrect economic situation instead of a great financial investment, if it is either improper for the intended job or is of such inadequate quality that it will certainly not carry out the job for which you plan it.
There is a distinction between the devices as well as devices that a specialist woodworking craftsman will require for their woodwork as well as the tools called for if your woodworking is even more of a hobby. The expert craftsman can not be acquiring low-cost pointless devices that cannot be made use of expertly and need to just be buying used woodworking tools from stores or distributors who remain in business of marketing utilized items as a career and have a back up policy and also great client service.
For the a lot more casual woodworker, it is no different apart from that you may be able to find good top quality old-timer devices that are ideal for less durable woodworking from the marketplaces or public auction houses.
For power tools you will certainly need to take care concerning purchasing second-hand and also you should only consider purchasing these from reputable resources.
Simply How Old Can Second Hand Devices Be?
The age of hand tools is lesser than power devices and equipment. Old hand tools, such as mallets, chisels, squares etc are classic and could still be used properly for years if they have been well cared for and also are well preserved.
Power tools and equipment have moving components that put on quickly and also often as well as obtain obsoleted a lot more easily. Also the expense to preserve can be even more compared to they deserve. Some machine devices could be replaced cost successfully to guarantee they last for many more years if used appropriately as well as are maintained appropriately.
Original article and pictures take http://theartofwood.tumblr.com/?p="951058981934347" site
So my absolutely amazing friend, Lexi, wrote a cookbook. And it’s epic.
Yes, I may have shot the cover and yes that may make me a little biased. But I’ve now made 4 things from Lexi’s cookbook, aptly titled Lexi’s Clean Kitchen, and they were all phenomenal.
Like, you know when you were little, there were moms whose houses you wanted to go to so badly just because of how good their cooking was? It wasn’t a particular ingredient they used, just a flavor that made its way into each of their dishes.
A similar, almost indescribable flavor permeates all of Lexi’s recipes. What it really is, is magic. Her cooking is some of the best I’ve ever had, and I’m tearing up right now just thinking about how proud I am of her for this book.
These s’mores pots de creme are just one of the many desserts in her cookbook of over 150 recipes. There are basics, breakfasts, apps, main courses, beverages, and more. The “best grilled chicken” is truly the best, and the arroz con pollo was so good we ate it three nights in a row.
But let’s talk about these s’mores pots de creme for a moment. HOW BEAUTIFUL ARE THEY?!
So beautiful.
And so freaking delish.
I ate these both at room temp and from the fridge and both were fantastic. One gives the chocolate this luxurious mousse-like texture, while the other imparts a rich, smooth chocolate bottom. You really can’t go wrong serving them either way.
And yeah, back to that whole “I shot the cover” thing. I shot the cover for this book! We had the most fun day shooting in a gorgeous kitchen in Boston last winter, and it is just amazing to see it in print.
OK, any more praise and I may puke she’s so cute. If there’s one cookbook you get this season,
Rusty Junk Coat Rack on a Repurposed Headboard - Knick of Time
My favorite piece in the box of junk was this blissfully rusty old doorknob.
The only problem was that in order to attach it to anything, one of the doorknobs needed to be removed. But the screws holding them in place were so rusted that they wouldn’t loosen.
My husband cut through the bar they were stuck on. He cut it flush with the back of the rim lock and welded it so the remaining doorknob would stay in place.
At first I thought I’d attach it to an old piece of wood, but I remembered this antique headboard I’ve had for several years in my workshop.
All of the original finish is worn off and the wood looks really rustic now, so I knew it would be perfect for the coat rack I had in mind.
I put D-rings on the back so it could be hung up, then started attaching my rusty treasures.
The old doorknob went on first. I used rusty screws and an old ceiling hook to attach it.
I never throw away old screws, because they eventually come in handy for a project like this.
I attached small coat hooks in the openings on the side posts that originally held bedside rails.
Next came an old metal hinge and coat hook.
Next to that I attached another small hook that was in the entryway when we moved into our house.
An old license plate fit in the gap that was left at the end, and I hung an old metal fryer basket on the other bedpost.
Now it was time to put all the rusty junk to work …
The fryer basket holds a plant.
An ironstone pitcher with a plant inside, a skeleton key, scarf, and my favorite flannel shirt hang on the rest of the hooks.
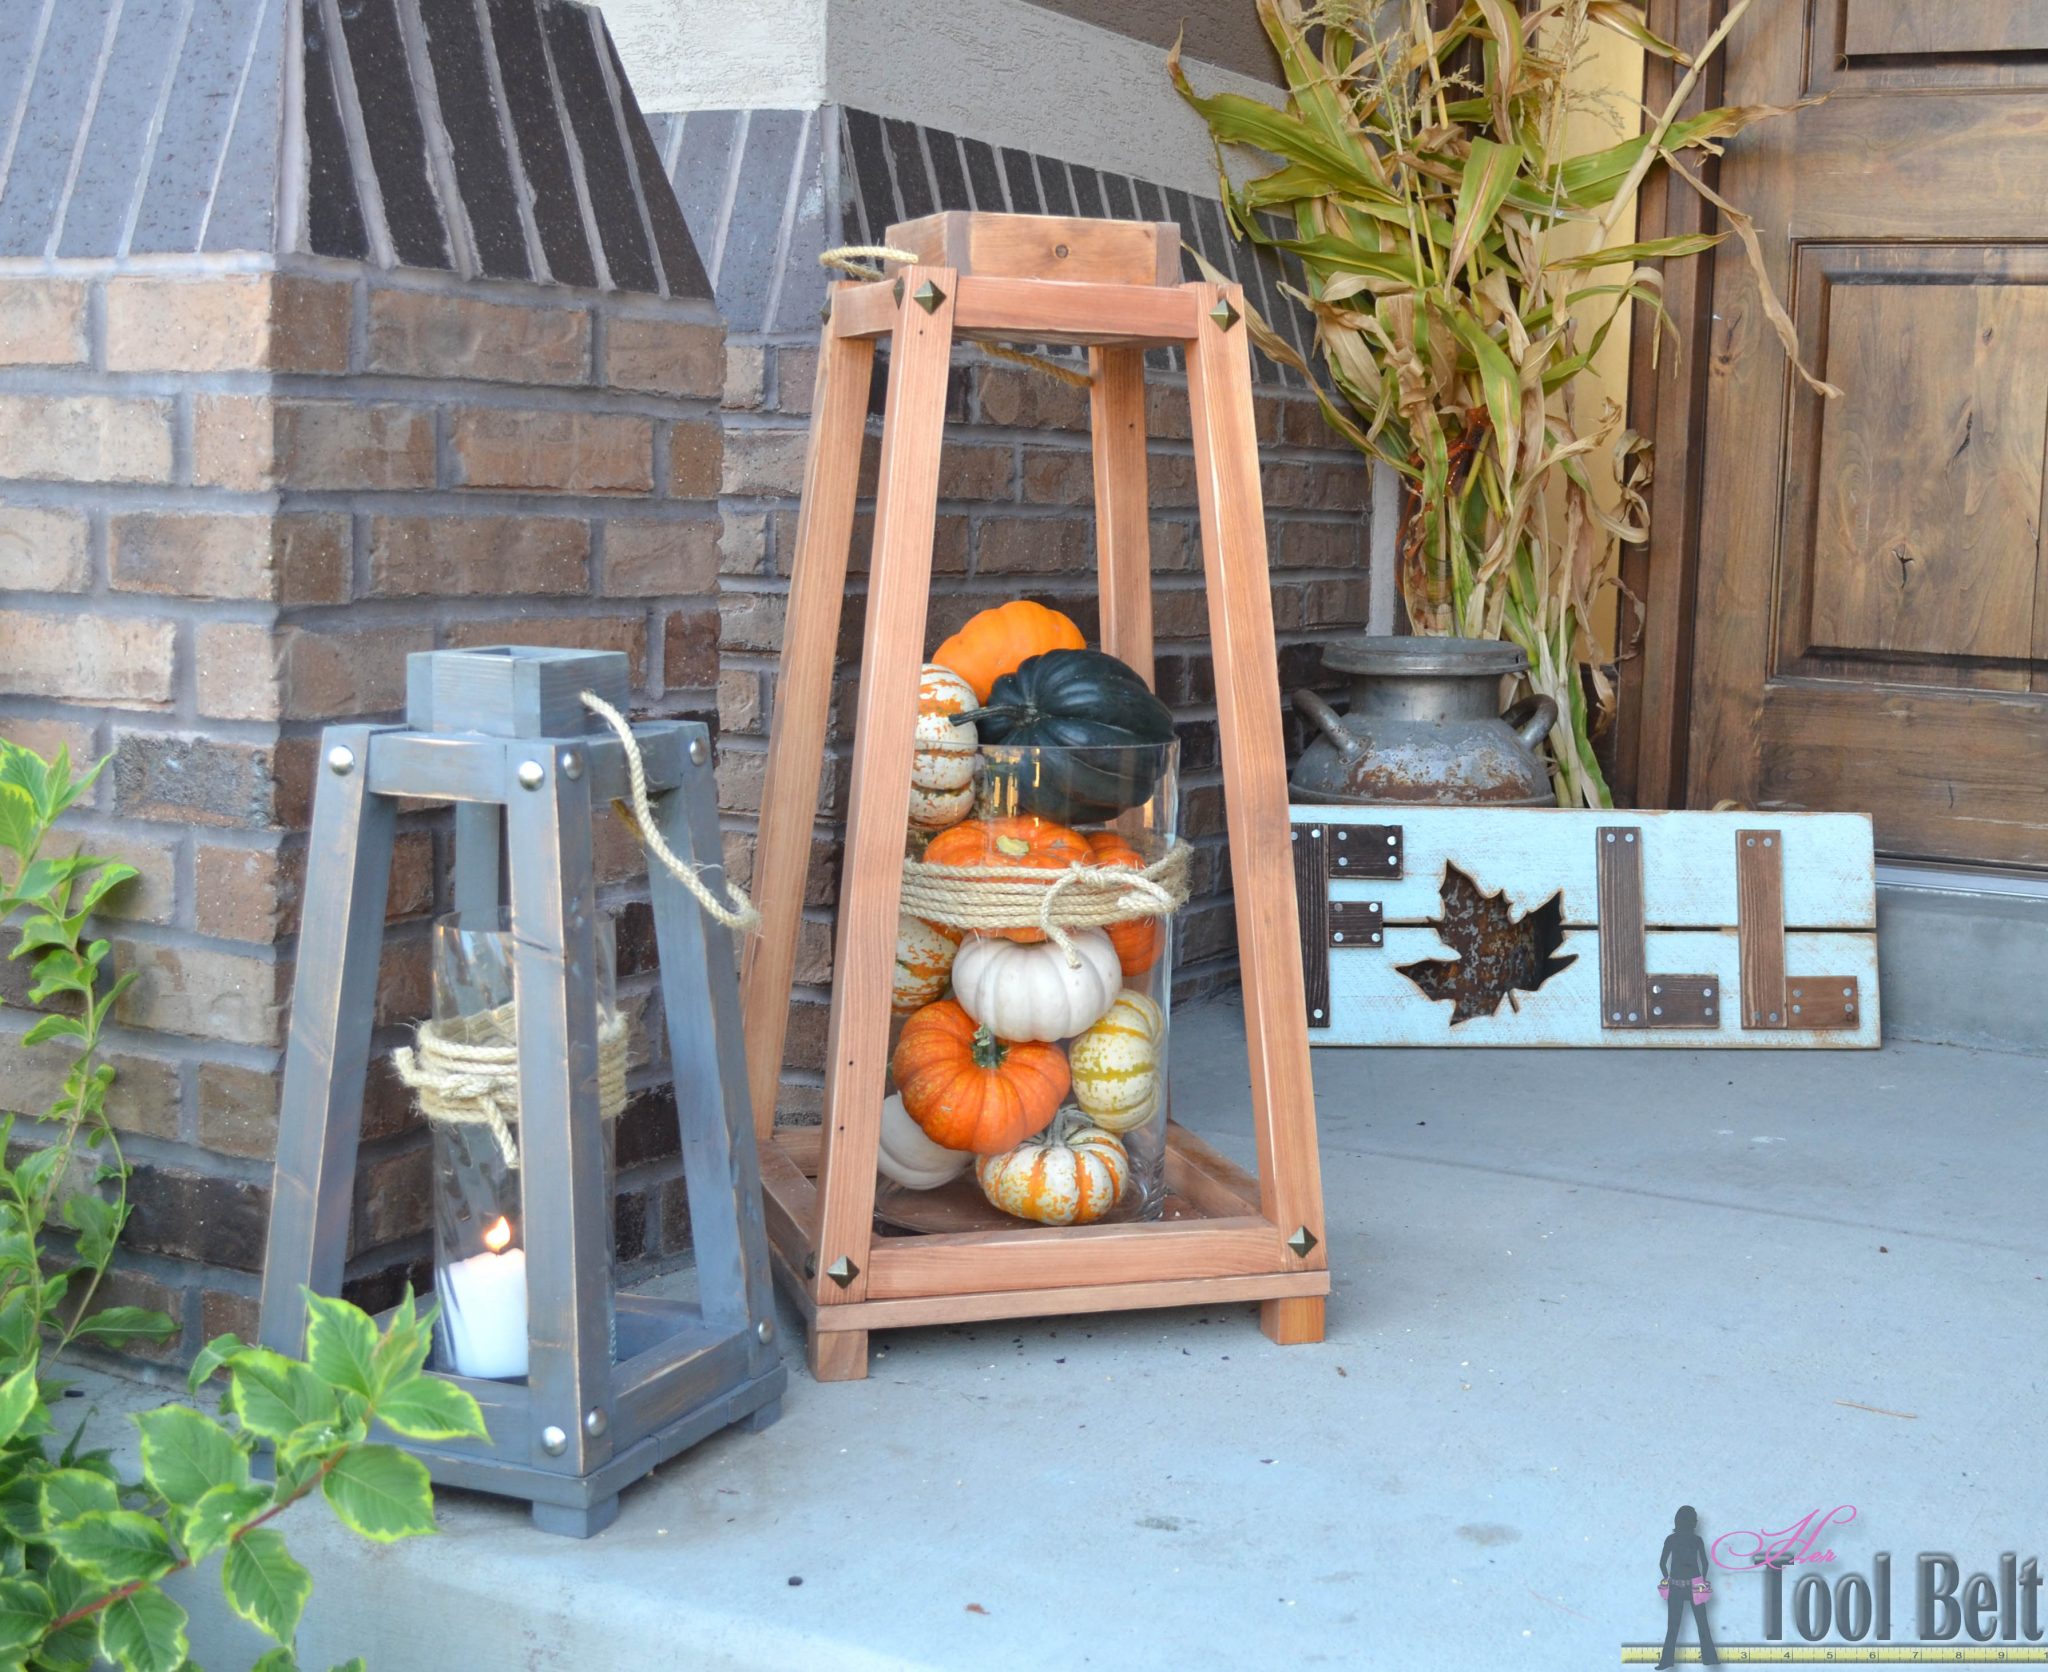
The large lantern is about 34″ tall and the shorter one is about 21″ tall. You can easily change out the decorations for each holiday. I like the candle lit glow in the evening! Wouldn’t a hanging mason jar cluster be fun in the large lantern? The large lantern will cost you about $15 to make if you add the decorative nails.
I’m teaming up with Ryobi Nation this month to share the plans for these rustic wood lanterns. You can get the full tutorial and plans at Ryobi Nation.
Thanks for visiting and happy building!
clarification on the compound angle for the legs:
For more Fall Craft projects check
out: Original article and pictures take http://www.hertoolbelt.com/rustic-wood-lanterns/ site